

Tool School: GitHub 101 (GitHub is the New Google Drive)
Everything you need to start using GitHub: setup, workflow, and an interactive lesson where you learn GitHub by using GitHub.


This article is part of my Tool School series - 101 guides for the tools AI-native work actually requires. Each article covers one tool, from zero to confident.
I have a master’s degree in computer science and have been a product manager for almost a decade. Despite the degree and the decade in tech, when I started using GitHub for the first time in my professional career a few months ago, I immediately felt like the most junior person on my team.
One of the benefits of working almost exclusively in Claude Code is that I now have the opportunity to collaborate directly with my engineering team in GitHub. The problem? I haven’t touched GitHub since college and there is a very big difference between using GitHub on a mini school project and how teams actually work in GitHub in the professional world.
Since moving my day-to-day workflow predominantly to Claude Code and GitHub, I’ve experienced every classic beginner mistake in real time. I pushed to the wrong branch. I overwrote my own work. I lost changes I’d spent hours on and had no idea how to get them back. I stared at merge conflicts like they were written in a foreign language. I committed files I wasn’t supposed to commit. I accidentally worked on main when I should have been on a feature branch. At one point I’m pretty sure I managed to confuse myself about which version of a file was the right one.
And I’m a senior PM. The person who’s supposed to have it all together. Instead, I was desperately pinging my engineering team at 11pm on a Thursday night because I’d somehow overwritten my own pull request with 100+ files I’d spent four hours on, and I had no idea how to get them back. The next morning, I tried to rebase from main (yes, by the end of this guide, you’ll know what that means!) and ended up with 50 merge conflicts where none of the resolution options made any sense to me. I was right back to pinging the team, begging someone to jump onto a call and help me get my local environment out of its messed-up state.
I’m incredibly lucky. My engineering team has held my hand through every single one of these disasters with patience and zero judgment (although probably a few good laughs at my expense). They walked me through rebasing, helped me untangle my branches, and taught me how to merge my pull requests. They never once made me feel stupid for not knowing something that’s second nature to them. This kind of psychological safety - where a senior PM can say “I have no idea what I’m doing” to her engineering team and get support instead of side-eye - is rare, and I don’t take it for granted.
But I know not everyone has that. If you’re transitioning to AI-native workflows and suddenly need to use GitHub for the first time, you might not have a patient engineer sitting next to you. You might be figuring it out alone, and GitHub can feel genuinely intimidating when you’re starting from zero.
So I teamed up with Sidwyn Koh, a staff software engineer at Meta and the writer behind Path to Staff, to write this guide together. I want everyone reading this to feel like they have a really talented engineer holding their hand - explaining things clearly and without judgment, the way my team has done for me. I hope that Sidwyn can be that engineer for you.

These new AI-native ways of working don’t just require learning AI tools. They require learning a bunch of adjacent tools you may have never touched before - GitHub, Figma, and more. This guide will take you from “I’ve never used GitHub” to “I actually know what I’m doing.” It’s the guide I wish I’d had three months ago when I started.
A quick note: This article focuses on using GitHub with Claude Code, but everything here applies whether you’re using Cursor, Antigravity, Codex, or any other AI coding tool. Everything you learn here applies no matter which tool you use. When we show Claude Code examples, just substitute your tool of choice.
By the end of this article, you’ll have:
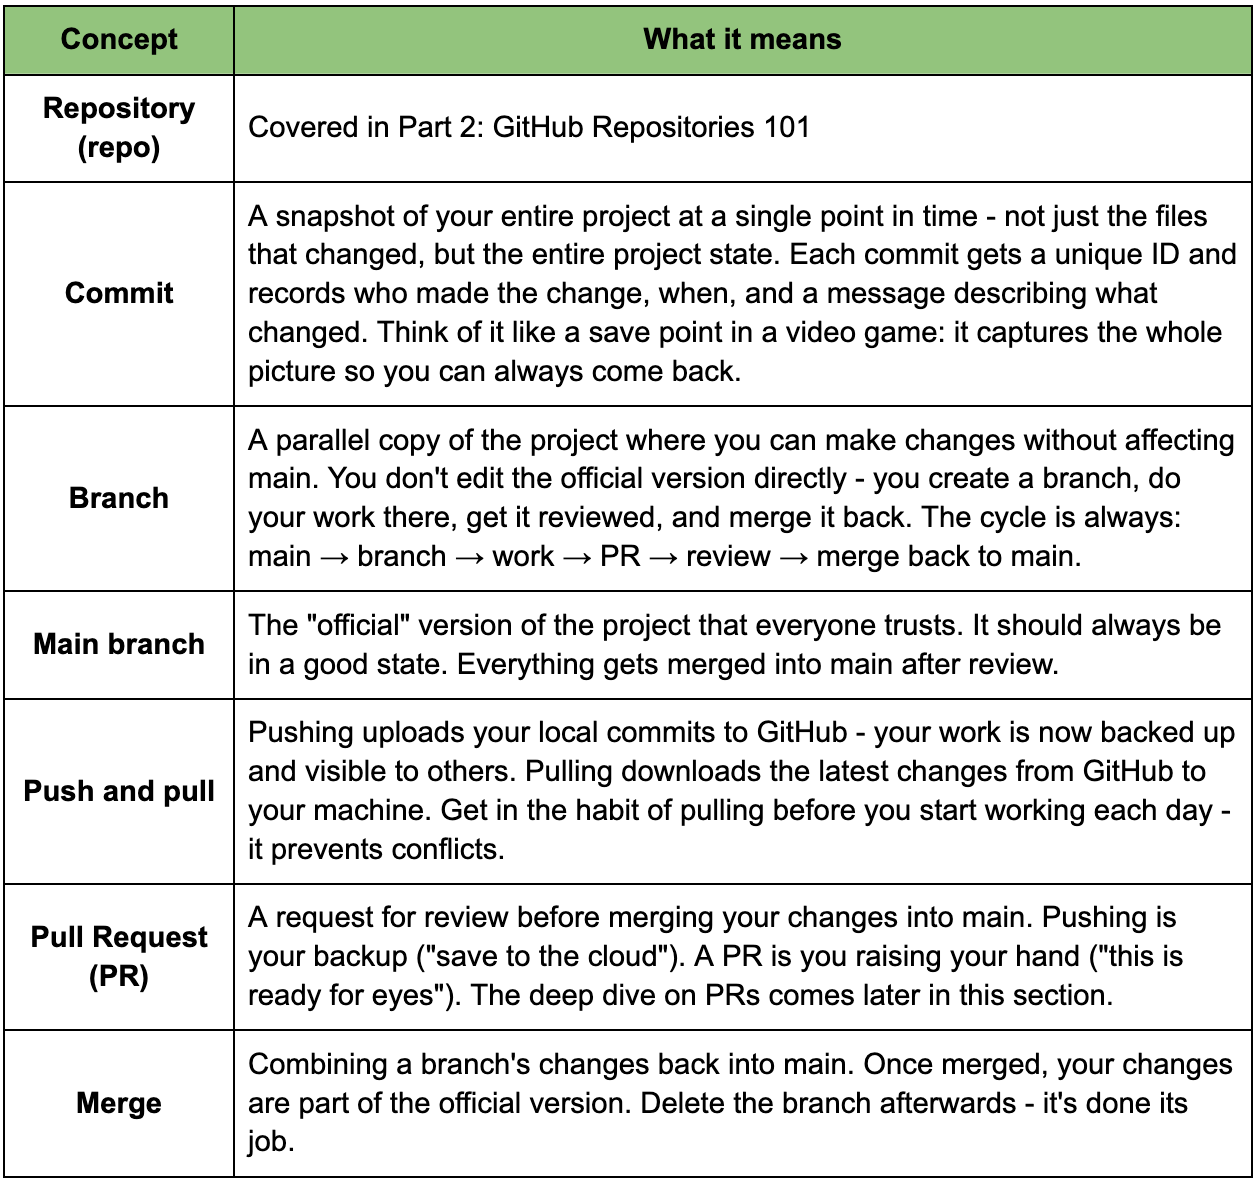
Every core GitHub concept in plain language: Repos, branches, commits, pull requests, merging, rebasing, and stashing - explained through familiar Google Drive comparisons, not engineer-speak.
GitHub fully set up on your machine: Git installed, SSH keys configured, GitHub CLI ready, and (optionally) the GitHub MCP connected to Claude Code.
A real project to practice on: You’ll download the same project used throughout this article and work in it from start to finish - ending with your first real contribution.
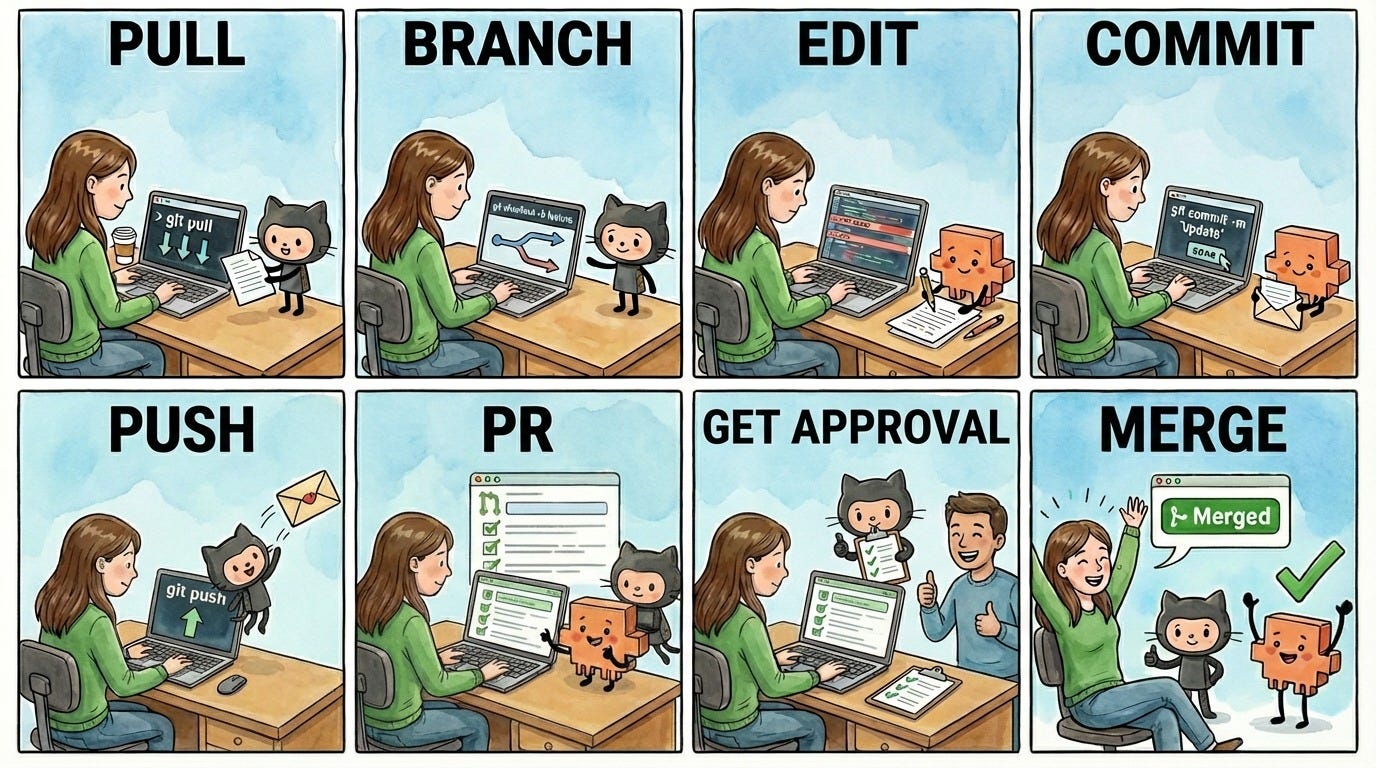
The complete daily workflow from pull to merge: Pull, branch, edit, commit, push, PR, merge - the seven-step rhythm you’ll use every day, with both the short version and the full explanation.
The full collaboration workflow: How to propose changes, review other people’s work, and handle conflicts when two people edit the same thing.
What to do when things go wrong: The four most common Git errors, what they mean, and how to fix them.
Every In the Weeds guide comes with an AI tutor
Every In the Weeds article is available as an LLM-friendly markdown file in my In the Weeds GitHub repository. Clone the repo, start a new session in your AI coding agent, and you have an instructor that knows every article I’ve written - ask questions, get answers grounded in specific sections, or have your agent read through the guides and tell you what to improve about your current setup.
The goal of this repository is to be able to access these articles where you’re actually working - not in a browser tab you have to switch to, but right alongside you as you’re building with Claude, Codex, Cursor, Gemini, or your agent of choice.
If you haven’t cloned the repo yet:
Clone the repo. New to GitHub? Go from zero-to-confident with my GitHub 101 guide.
Open the folder in Claude Code, Cursor, or your AI coding tool of choice.
Ask your first question.
Already have the repo? Open the repo folder in your terminal and run git pull to get this article.
Star the repo on GitHub if you learn something new!
Here’s how this guide is organized:
GitHub in Plain Language: What these tools do and how people use them to work together
The Practice Repo: A real GitHub repository you’ll fork and use throughout this guide
Part 1 - Setup: Everything you need installed to start using GitHub
Part 2 - Repositories: What repos are, how to organize them, and creating your first one
Part 3 - The Daily Workflow: The day-to-day workflow - from pulling the latest changes to merging your work into the official version
When Things Go Wrong: Common errors and how to fix them
Your Turn: Submit your first PR to the practice repo
This is a long guide. You won’t absorb all of it in one sitting - and you don’t need to. The goal is to understand the system so that when something isn’t working, you know what to change and where. Start by getting set up and forking the practice repo, then work through the rest at your own pace. Bookmark this and come back when you need it.
You’ll probably need to reference these concepts more than once. That’s why we’ve included this entire article as a markdown file inside the practice repo - so you can get it on your computer and reference it while you work, with Claude or any AI coding tool of your choosing. More on that in the next section.
GitHub in Plain Language
What GitHub is, why it matters beyond coding, and how teams use it to collaborate.
GitHub isn’t just for engineers
If you’ve never used GitHub, you probably think of it as a coding tool - the place where engineers store and manage code. That’s technically true - but it’s like saying Google Drive is a tool for sharing docs. Sure, that’s one use case, but it barely scratches the surface.
GitHub is a collaboration platform for any kind of knowledge work that benefits from version control. Project specs, playbooks, documentation, marketing materials, analysis - any work that involves collaboration can live and get versioned in GitHub. If you’ve read the CLAUDE.md article, you’ve already met Sarah - she’s Head of Operations at Acme and manages her entire operations workflow using Claude Code. What we didn’t discuss in that article is that all of her work actually lives in GitHub. Her repos are full of project specs, vendor info, and office procedures - not a line of code in sight. They look like shared Google Drives, except every change is tracked, every version is recoverable, and Claude Code can read and write to them directly.
The key ideas:
Version history: Every change tracked. Who made it, when, and why.
Review before it’s official: Your teammates review your changes before they are merged into the main version.
Rollback: Something went wrong? Go back to any previous version instantly.
Collaboration: Multiple people can work on the same project without overwriting each other.
These aren’t new problems. Teams have been dealing with “which version is the latest?” and “who changed this?” since the dawn of collaboration. GitHub is the best answer anyone’s come up with.
Why GitHub matters even more now
The challenges around version history, review, rollback, and collaboration have existed for years. But as teams go AI-native, GitHub goes from “nice to have” to essential, and is suddenly relevant for people who never needed it before.
As teams adopt AI tools like Claude Code, they need a way to share context - CLAUDE.md files, company knowledge, organizational memory - in a versioned, centralized place that everyone can access. When one person improves the team’s CLAUDE.md, everyone should get that update. When someone writes a useful set of instructions for how Claude should handle a specific workflow, the whole team should benefit. (For more on shared AI context, see the previous article on shared AI context files.)
Teams also need to share Claude Code skills and commands. When someone builds a useful automation or workflow, it shouldn’t live on one person’s machine - it should be available to the whole team and improvable by anyone. And as more people contribute to these shared files, you need a way to review and approve changes before they go live.
And when AI agents are making edits autonomously - drafting documents, updating specs, and reorganizing files - you need a system where those changes get reviewed before they become official. You need to see what changed, who (or what) changed it, and have the ability to roll it back if something went wrong.
GitHub is the tool that handles all of this.
How collaboration actually works
A walkthrough of the GitHub collaboration workflow with Sarah and Jake.
Sarah manages Acme’s operations playbook, a long markdown file that covers vendor contacts, office procedures, and team workflows. Her colleague Jake also contributes to it. Here’s how they work together using GitHub.
Sarah is trying to add a new catering vendor to the playbook. Don’t worry about the bolded terms yet - we’ll explain each one later in this guide. For now, just get familiar with the flow:
Sarah clones the repo (downloads a copy of the project to her computer)
She creates a branch called
update-vendor-section(her own parallel copy to work on)She makes commits as she works (saving her progress each time she finishes a section)
She pushes her branch to GitHub (uploads her work so Jake can see it)
She opens a pull request (asks Jake to review what she’s changed)
Jake comments: “Can you add the new catering vendor?”
Sarah updates her branch based on the feedback and pushes again
Jake approves, and the branch gets merged into main (Sarah’s changes become the official version)
Here’s the powerful part: while Sarah was doing all of this, Jake was working on a completely different playbook section on his own branch. Neither of them affected the other’s work. When they both merged, the playbook had both updates - no overwriting, no confusion about which version is the right one.
The important thing is the workflow: work on your own copy, get feedback, then combine it with the official version once your teammates approve.
Meet the Practice Repo
A real repo you’ll clone, explore, and submit your first PR to by the end of this guide.
Now that you understand what GitHub is and why it matters, let’s get hands-on. We’ve set up a real practice repo that mirrors the examples in this article: github.com/sidwyn/acme-ops.
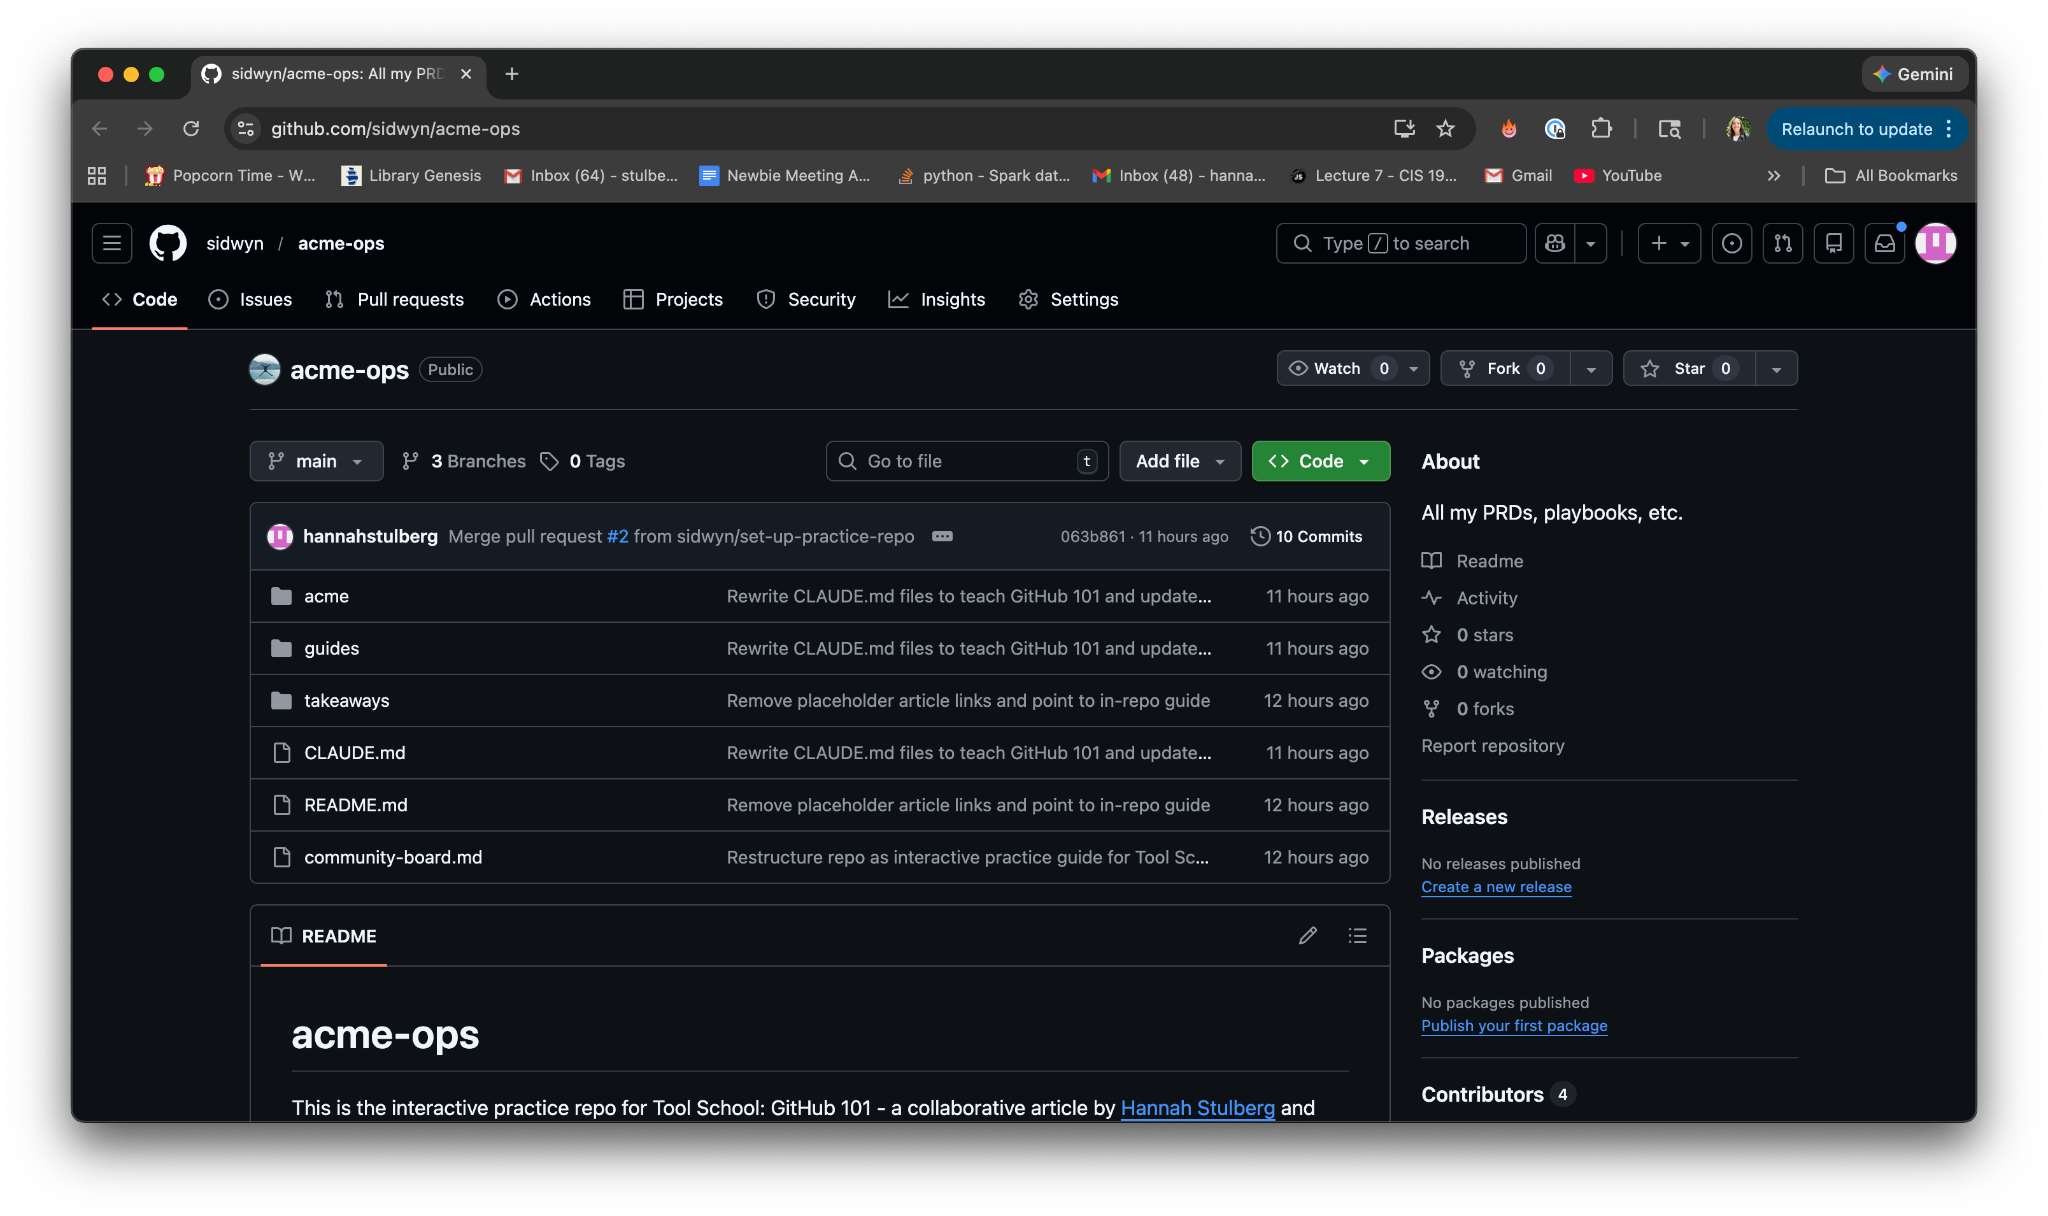
This is Sarah’s operations folder from the examples above, turned into a real GitHub repo you can clone and work with. It has playbooks, procedures, and templates - the same structure you’ve been reading about. Every command and concept in this guide, you’ll try on this repo. And by the end of the article, you’ll submit your first pull request to it.
We’re going to have you fork this repo rather than just clone it. There are two ways to get someone else’s repo:
Clone when you just want to use or explore a project. This downloads a copy to your machine.
Fork when you want to contribute changes back. This creates a copy under your GitHub account that you can push to.
For most repos you find online, you’ll just want to clone. You’re downloading someone else’s project to use or explore, not contributing changes back to it. But since you’ll be making real changes to this repo as part of the interactive lesson at the end of this article, forking sets you up for that. We’ll go deeper on forking and cloning in the repositories section.
The repo also includes this entire article as a markdown file (guides/github-101.md). Here’s why that matters: when you’re working in GitHub and get stuck, you don’t want to tab back to a browser and search through an article for the answer. Instead, the article is right there in the repo where you work. Open it in Claude Code and just ask your question - Claude reads the article and uses it as context to walk you through the answer. “How do I resolve a merge conflict?” and Claude walks you through it using the guide you already trust.
In fact, you don't even have to read this article front to back if you don't want to (although we very much recommend that you do!). Once you have the repo on your computer (Part 2 walks you through that), you can just ask Claude your questions and it'll walk you through the concepts like a personal tutor - using this guide as its source material.
The repo’s CLAUDE.md files also give Claude context about the practice repo itself and common GitHub questions - so Claude is primed to help from the moment you fork it.
This is a pattern worth knowing: any long reference guide can work this way. Save it as a markdown file where you work, and Claude becomes your tutor for that material. (This is a natural extension of what the CLAUDE.md article covers - the CLAUDE.md in the repo acts as persistent context for Claude.)
You’ll fork this repo in Part 2. For now, just know it’s there waiting for you.
Part 1: Setup & Installation
Everything you need installed before you can start collaborating in GitHub.
Before you can collaborate in GitHub, you need five things set up:
A GitHub account
Git installed on your machine
Your identity configured
SSH keys connecting your machine to GitHub
The GitHub Command Line Interface (CLI)
This section walks you through each one.
A note on why we show the git commands: Even though Claude handles most git commands for you, you’ll see these commands running in your terminal as Claude works. Understanding what they mean makes you more confident when things go wrong - and it helps you spot when something doesn’t look right. We lead with the Claude Code approach and show the manual git steps as a fallback. (And if you're not already using Wispr Flow to dictate your prompts to Claude, you should be - it's faster than typing and makes the whole experience feel like a conversation.)
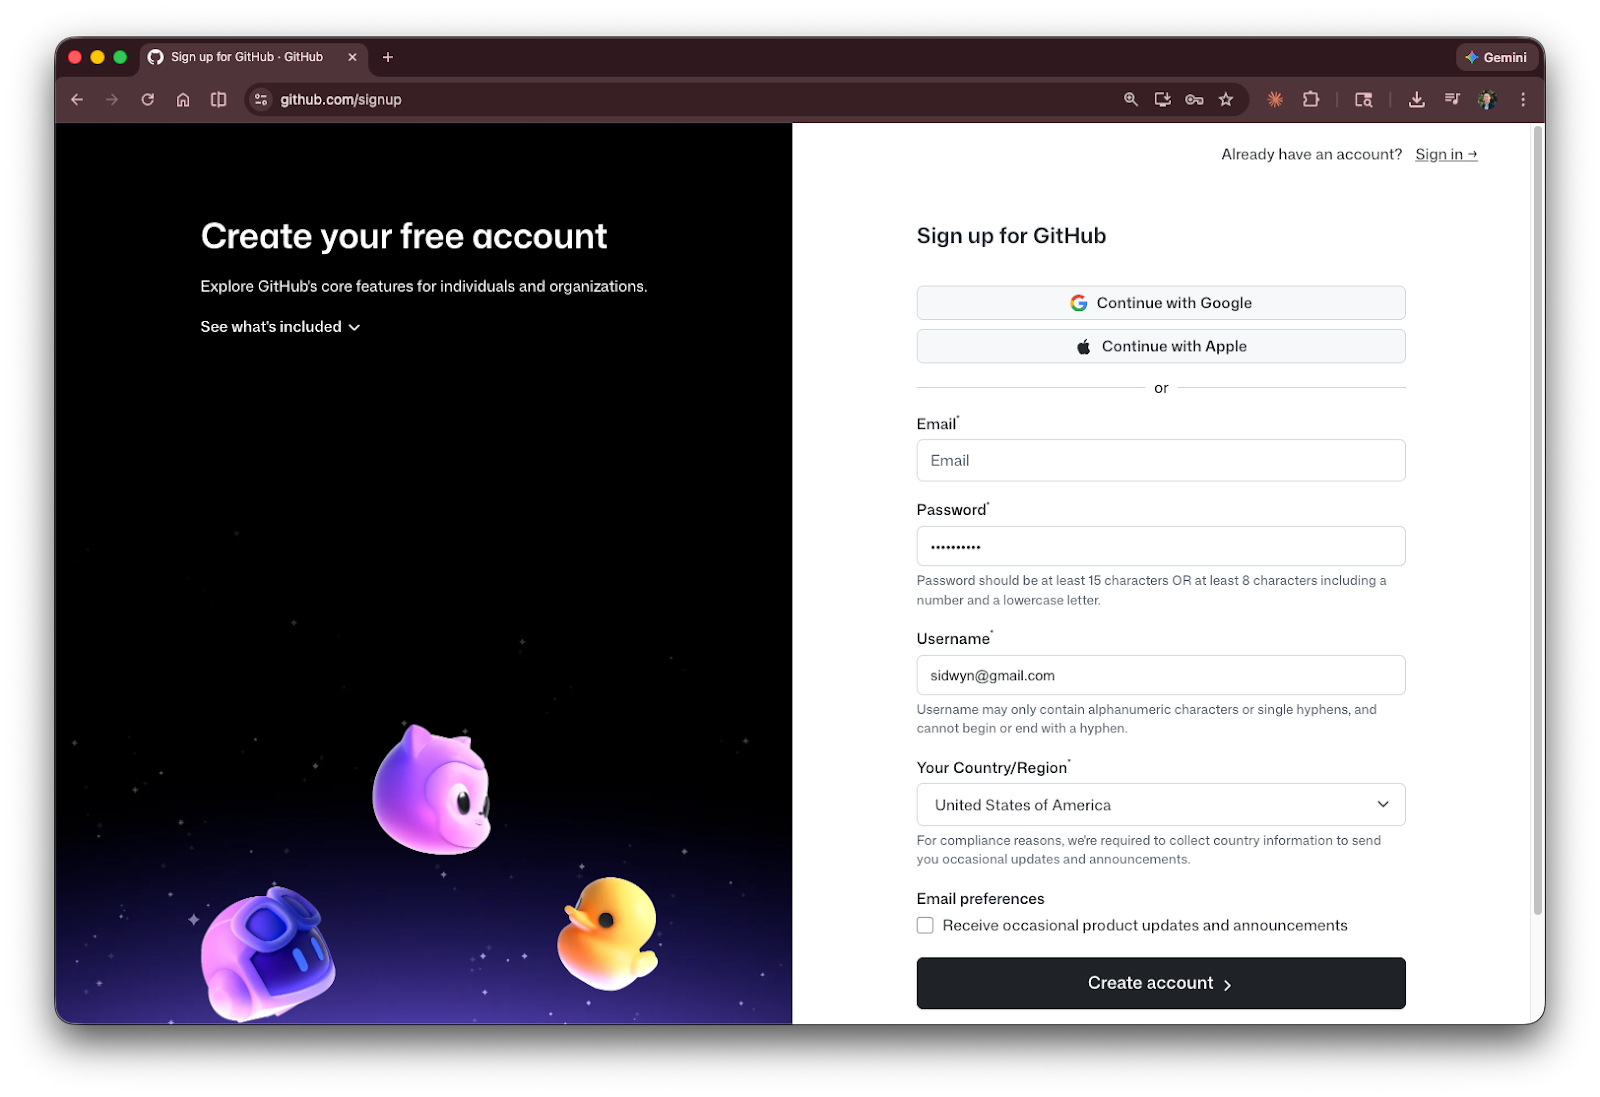
1. Create a GitHub Account
Go to github.com/signup and create an account. Pick a username you’re comfortable being public - it will show up on anything you contribute to.
2. Install Git
Git is the version control system that runs on your machine. GitHub is the website run by Microsoft that hosts Git projects. You need both.
The Claude Code way:
“Is Git installed on my machine? If not, can you install it?”
If you already have Claude Code running, just ask. It’ll check and walk you through the installation if it’s missing. If you hit an error here, skip to the manual way below - it’s just as quick.
The manual way:
Mac: Open your terminal and run:

This installs Apple’s command line tools, which include Git. You can also install it through Homebrew if you prefer (brew install git).
Windows: Download Git for Windows and run the installer. Accept the defaults.
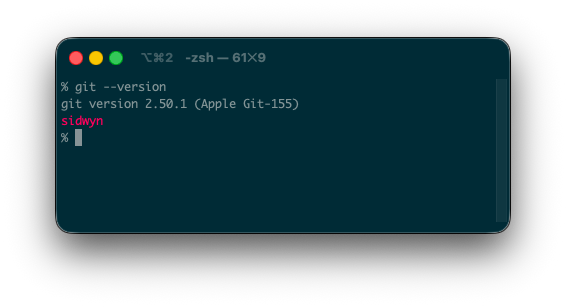
Verify it worked:

You should see something like git version 2.53.0. The exact number doesn’t matter as long as something shows up. Sidwyn’s name appears here because he’s customized his terminal display. Don’t worry if you don’t see your name.
3. Configure Git
Git needs to know who you are so it can label the changes you make.
The Claude Code way:
“Configure Git with my name and email.”
Done.
The manual way:

Use the same email you signed up to GitHub with. This is how GitHub connects your local commits to your account.
4. Set Up SSH Keys
An SSH key is like a keycard that lets your computer into GitHub without a password. Every time you push or pull from GitHub, your computer needs to prove it’s you. You could type your password every single time, but that gets old fast. Instead, you set up an SSH key, a file on your computer that GitHub recognizes, like a keycard that lets you into a building without stopping at the front desk.
SSH keys come in pairs: a private key (stays on your machine - never share this) and a public key (you give this to GitHub so it can verify you). Think of it like a lock and key - you keep the key, GitHub gets the lock.
The Claude Code way:
“Set up an SSH key for GitHub.”
Claude Code generates the key and shows you exactly where to paste it. At the end of the process, Claude will offer to test your connection to GitHub. Don’t worry about any scary error codes that look like this:

The manual way:

The -t ed25519 part specifies the type of encryption key. It’s the modern, recommended option. Leaving it out won’t hurt and will fallback to another type of encryption key (RSA).
Press Enter through the prompts (the defaults are fine). Then add the key to your SSH agent:

Copy the public key to your clipboard:

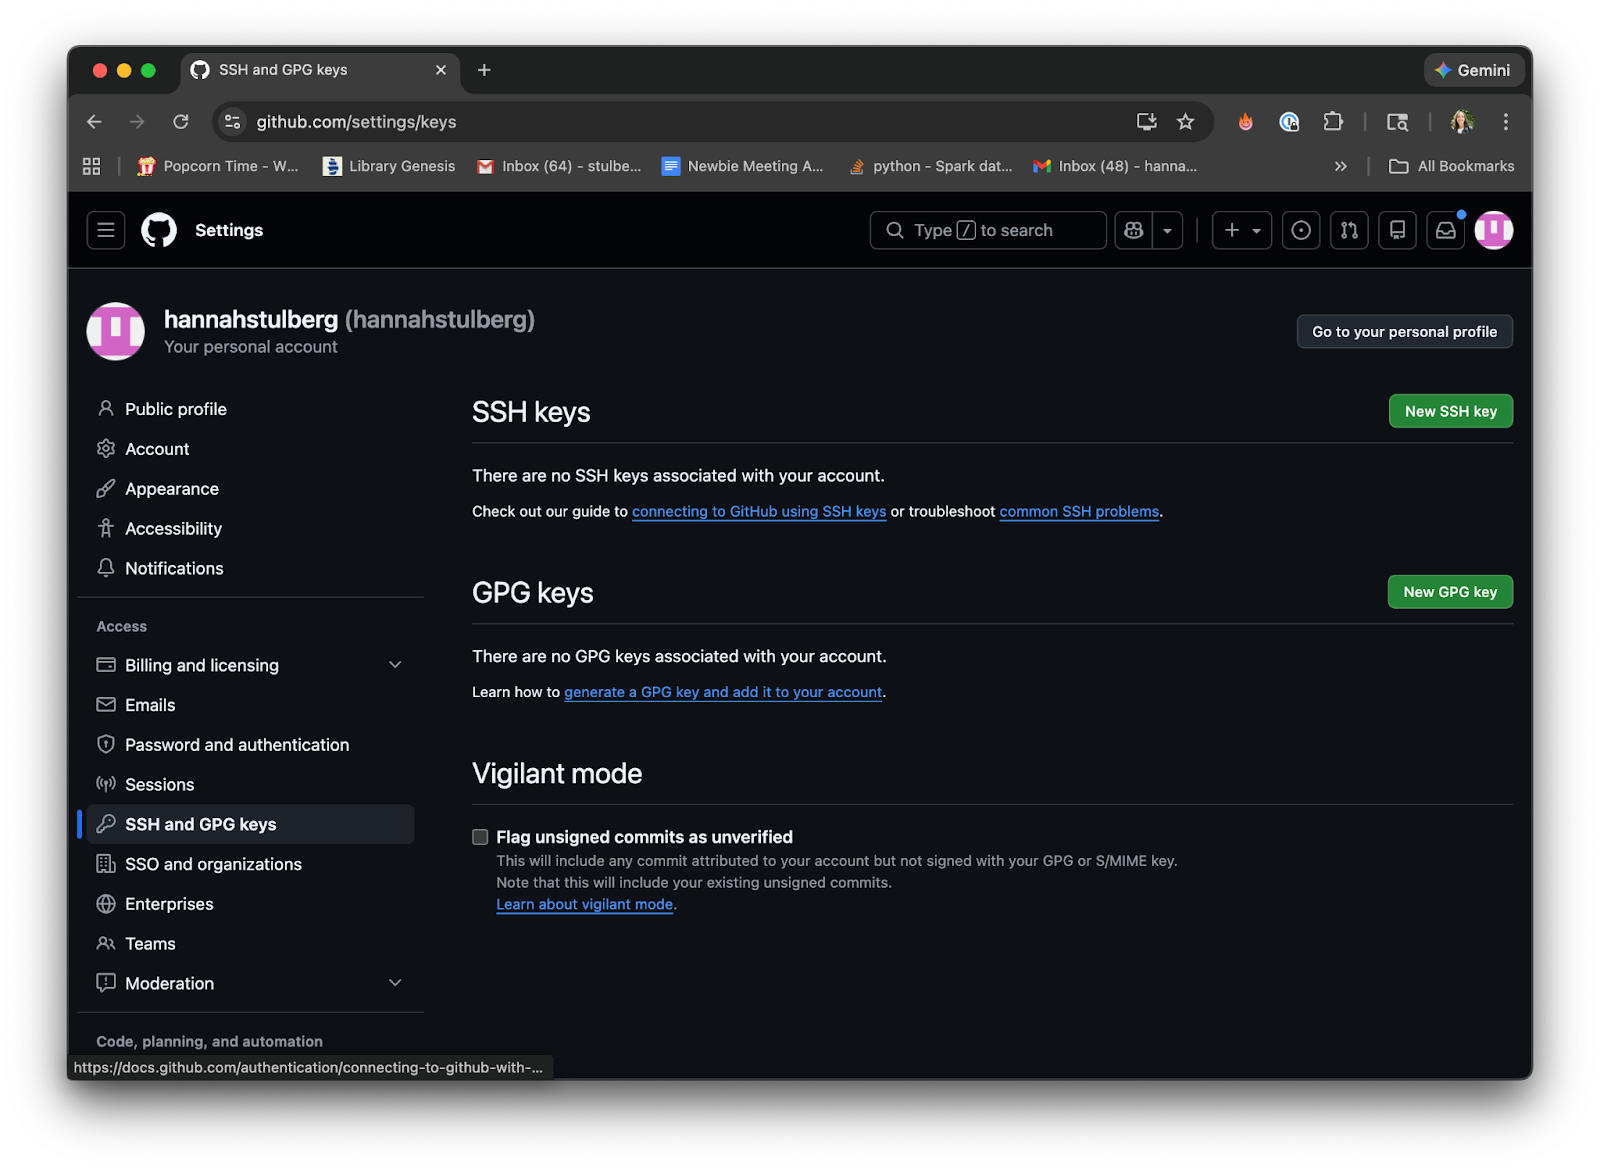
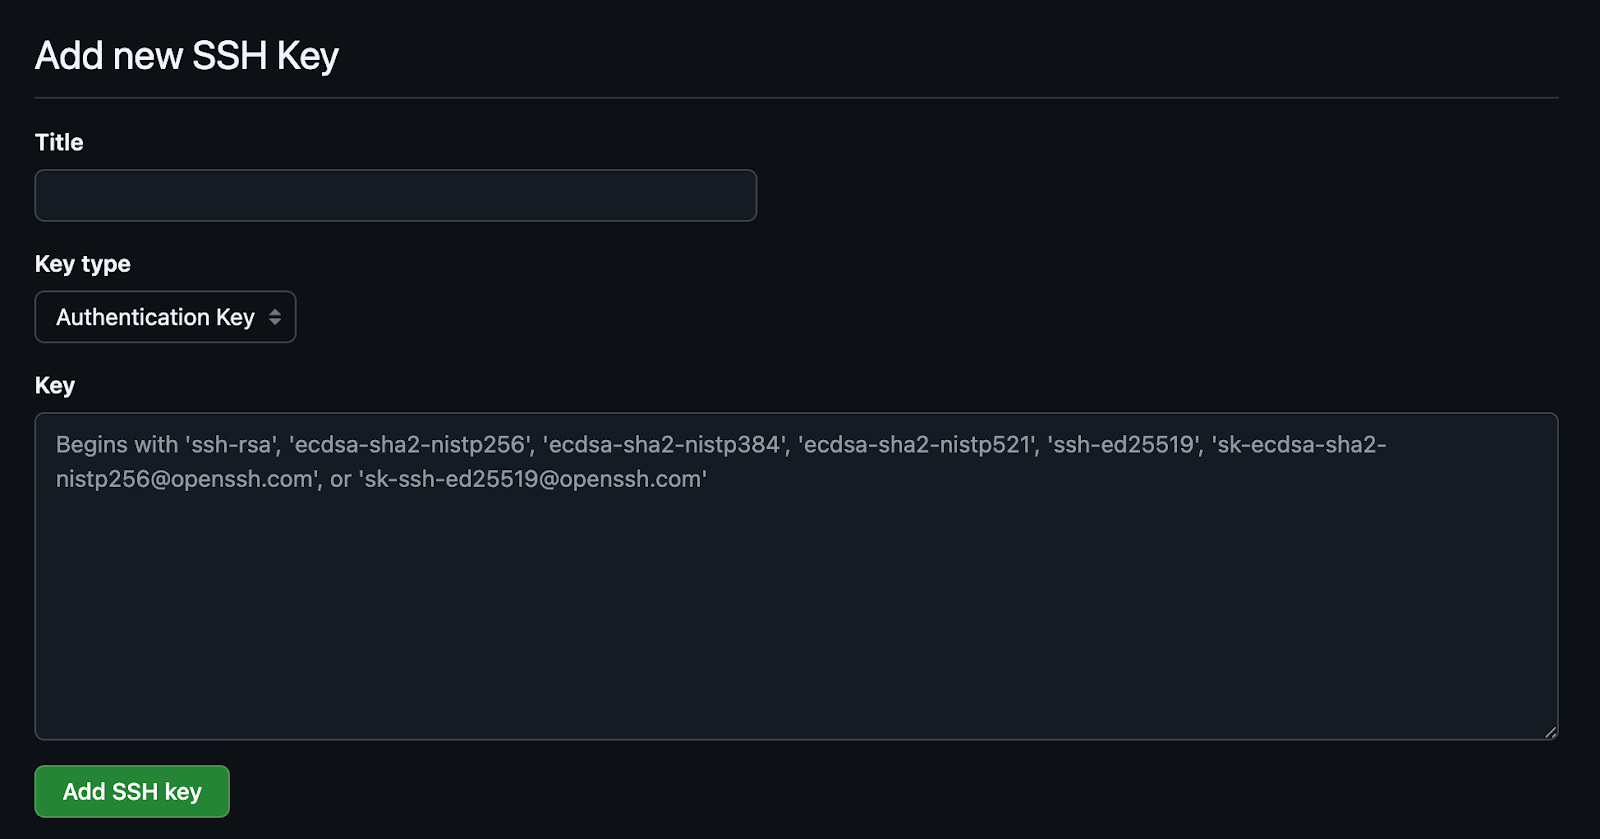
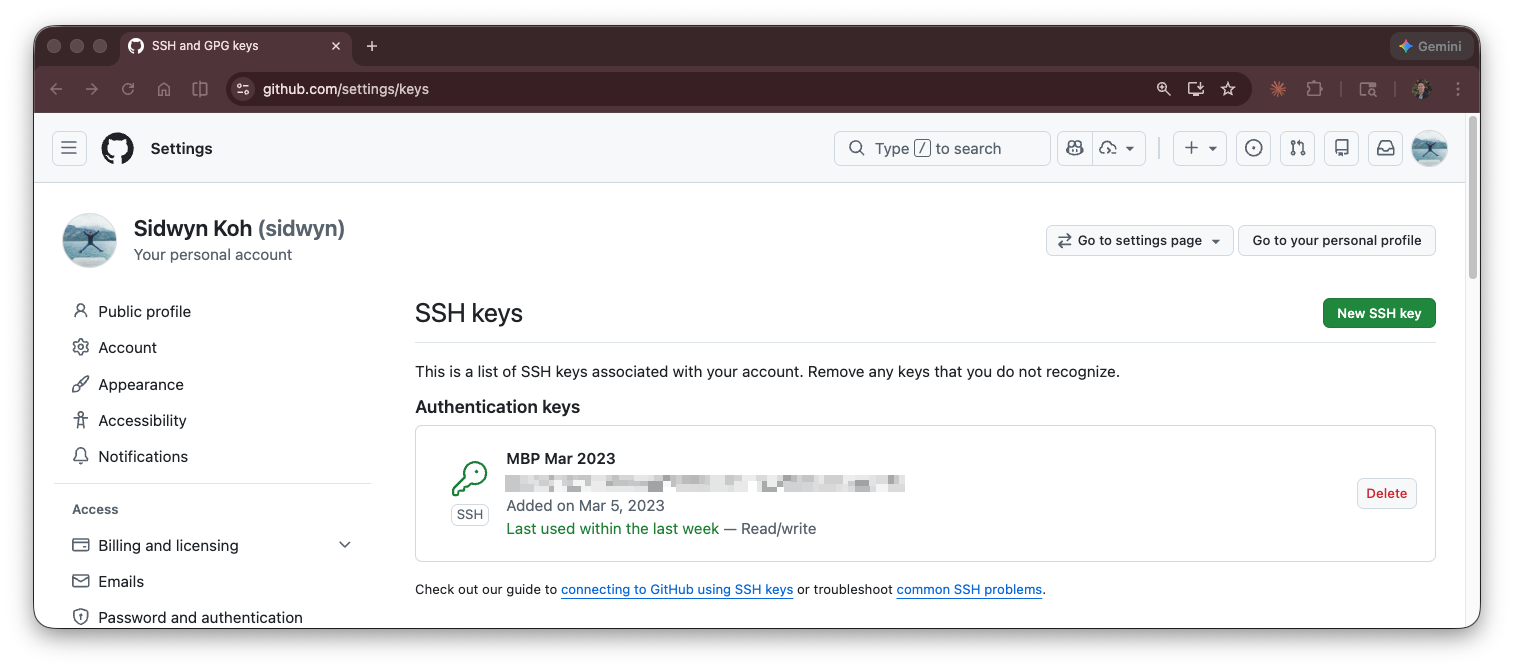
Go to GitHub → Settings → SSH Keys, click “New SSH key,” paste the public key, and save.
GitHub’s got a more detailed guide if you run into issues here.
5. Install the GitHub CLI
The GitHub CLI (gh) lets you interact with GitHub directly from the terminal without ever needing to open the web UI. Since you’re already working in the terminal with Claude Code, the CLI improves efficiency by enabling you to perform your full workflow in one place. Claude Code can also use the CLI directly - and I’ve found this especially valuable for things that aren’t supported by the GitHub MCP (next step).
The Claude Code way:
“Install the GitHub CLI.”
Claude Code will handle it and run gh auth login to connect it to your account.
The manual way:
Download the Github CLI from cli.github.com
Then authenticate:

Follow the prompts. Pick “GitHub.com” and “SSH” when asked.
6. Install the GitHub MCP (optional)
The GitHub MCP is a plugin that lets Claude Code interact directly with GitHub on your behalf. If you’ve read the Notion article in this series, it’s the same concept - an MCP server that connects Claude Code to an external service (GitHub in this case). Without it, Claude Code can still version your files locally using Git and interact with GitHub through the CLI. The MCP adds a more direct connection - Claude Code can create repos, open pull requests, and manage settings through GitHub’s full API, without relying on the CLI as a go-between.
The Claude Code way:
“Add the GitHub MCP server.”
Claude Code will walk you through the setup, which involves authorizing it to access your GitHub account. Remember to update your CLAUDE.md with the GitHub MCP information.
The GitHub MCP is optional. Everything in this article can be done without it. But if you’re using Claude Code regularly, it removes a lot of friction. Sidwyn and I both personally like using it since it has access to the full set of GitHub tools and the MCP protocol doesn’t take up a ton of context.
You’re set up
At this point you have:
A GitHub account
Git installed and configured
SSH keys connecting your machine to GitHub
The GitHub CLI for terminal-based GitHub management
(Optional) The GitHub MCP
That’s the full toolchain. Let’s use it.
Part 2: GitHub Repositories 101
Where your work lives and how to keep it organized.
Now that your tools are installed, let’s talk about where your work actually lives. This section covers:
What a repository (repo) is
How to organize your repos
The decisions you’ll make when creating one
How to set up your first repo end-to-end
What is a Repository?
A project folder that remembers everything.
A repository (repo) is a project folder with version history built in (via Git). On the surface it looks like any other folder on your computer: files, subfolders, and maybe a README. The difference is that Git is recording everything that happens inside it - every change you make, every file you add or delete, and every edit to every line. Not just the current state, but the full history. Who changed what, when, and the note they left about why.
When you push that repo to GitHub, the entire history goes with it. Anyone with access can see not just the current state of the files, but every version that ever existed. This is what makes rollback possible - you can always go back to a previous version.
A repo has a specific scope: it’s one project, one domain, one self-contained body of work. Everything inside a repo shares the same history and the same collaborators. Things outside the repo are invisible to it - separate repos can’t see each other’s files or history. This is by design: it keeps unrelated work from getting tangled together.
On GitHub, repos can be grouped under an organization - a shared space for a company or team. Acme would have an Acme organization with all the team repos inside it. If you’re just working on personal projects, you don’t need an organization - repos can live under your own GitHub account.
What a Repo Looks Like on GitHub
A quick tour of the repo page you’ll see on every project.
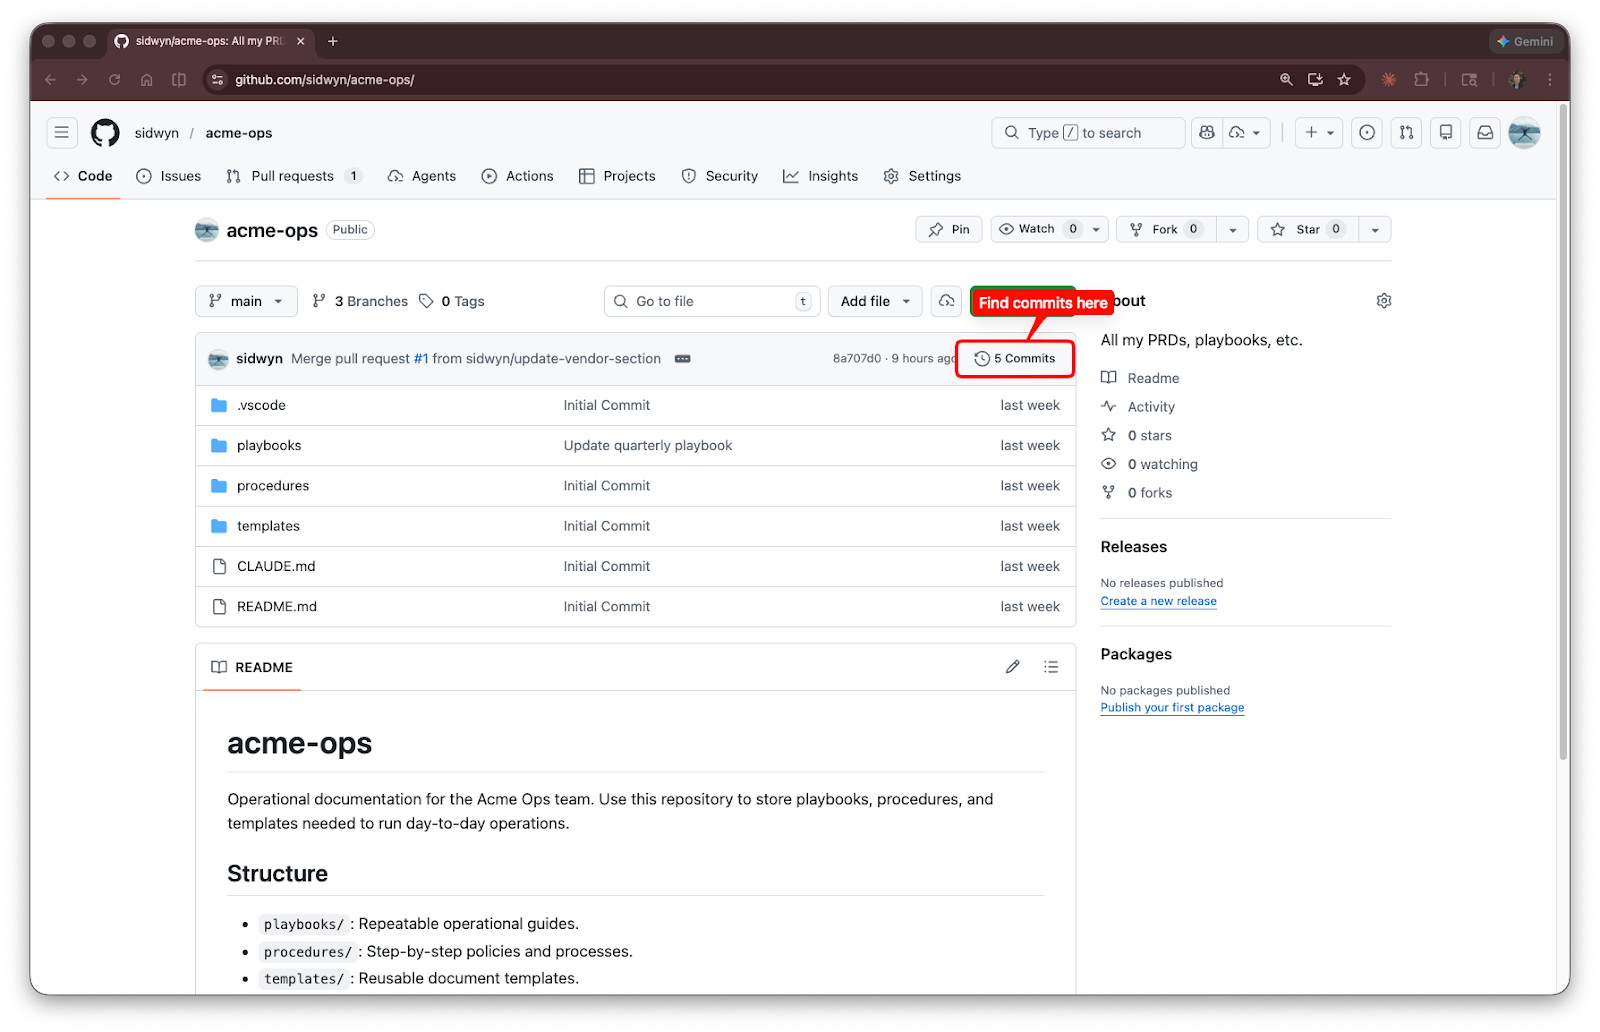
When you visit a repo on GitHub, here’s what you’re looking at:
The file list. The top section shows all files and folders in your repo, just like a file explorer. Click any file to view its contents.
The README. Below the file list, GitHub displays the contents of README.md if one exists. This is the front door of every repo - when you land on a project, the README is the first thing you see. It typically explains what the project does, how to set it up, and how to use it. Take a look at openclaw/openclaw for a good example. When you create your own repos, writing a clear README is one of the most useful things you can do. (Sidwyn has a great piece on the principles of writing for clarity - be clear, be concise, and tell people what they need to know upfront.)
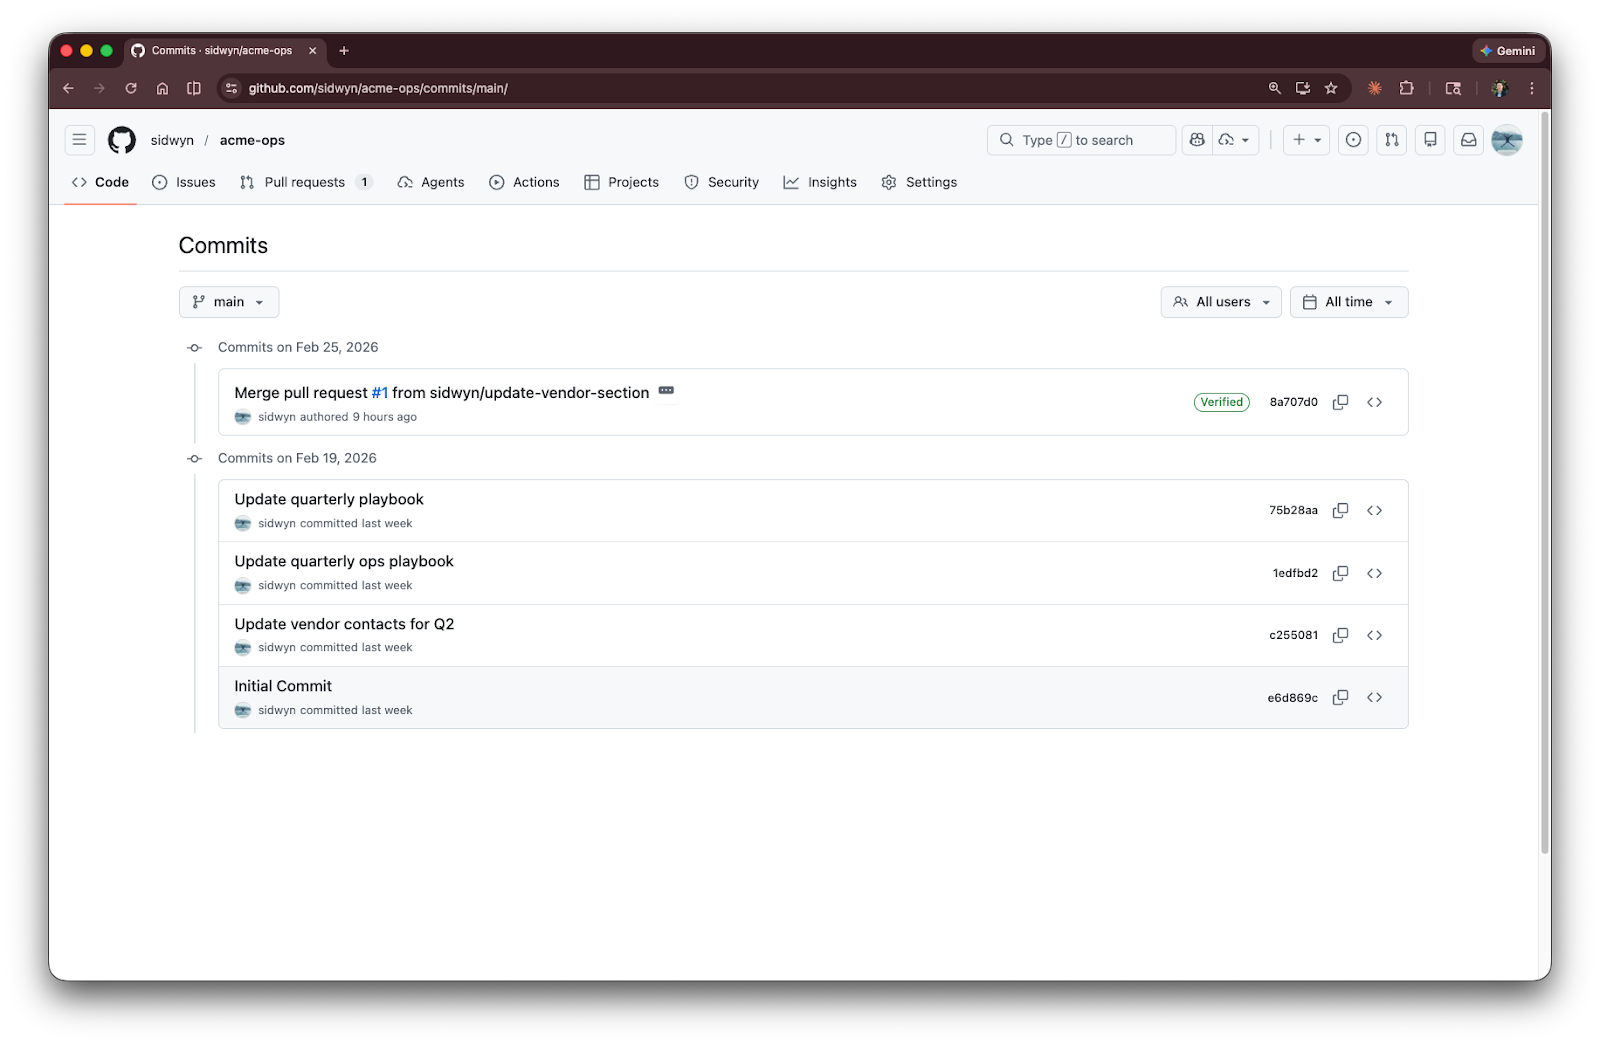
Commit history. Click “Commits” (or the clock icon) to see every commit ever made, in reverse chronological order. Each entry shows who made the change, when, and the commit message. This is your version history.
How to Organize Your Repos
One repo per project or domain - and how to share context across them.
This often trips people up: should everything go in one giant repo, or should you split things across several?
An important thing to know: repos are isolated from each other. You can’t share files or context across separate repos directly. This is actually useful - it means you control who sees what and unrelated work stays separate.
Here’s my practical guidance: one repo per project or domain. You’ll likely have two categories of repos: team repos organized by domain and a personal repo for your own work that no one else needs to see. If you’re Sarah at Acme, the Acme organization might have these repos - including a private one for Sarah’s personal work:

The product team doesn’t need to see ops playbooks and no one except Sarah needs access to her personal work - initial drafts, notes, CLAUDE.md files, and personal workflows.
In our practice repo, we’ve kept things simple: everything lives in one repo (sidwyn/acme-ops) so you only need to fork one thing. In the real world, Acme would split these into separate repos like the list above.
Inside a repo, organize by the way you actually think about the work:
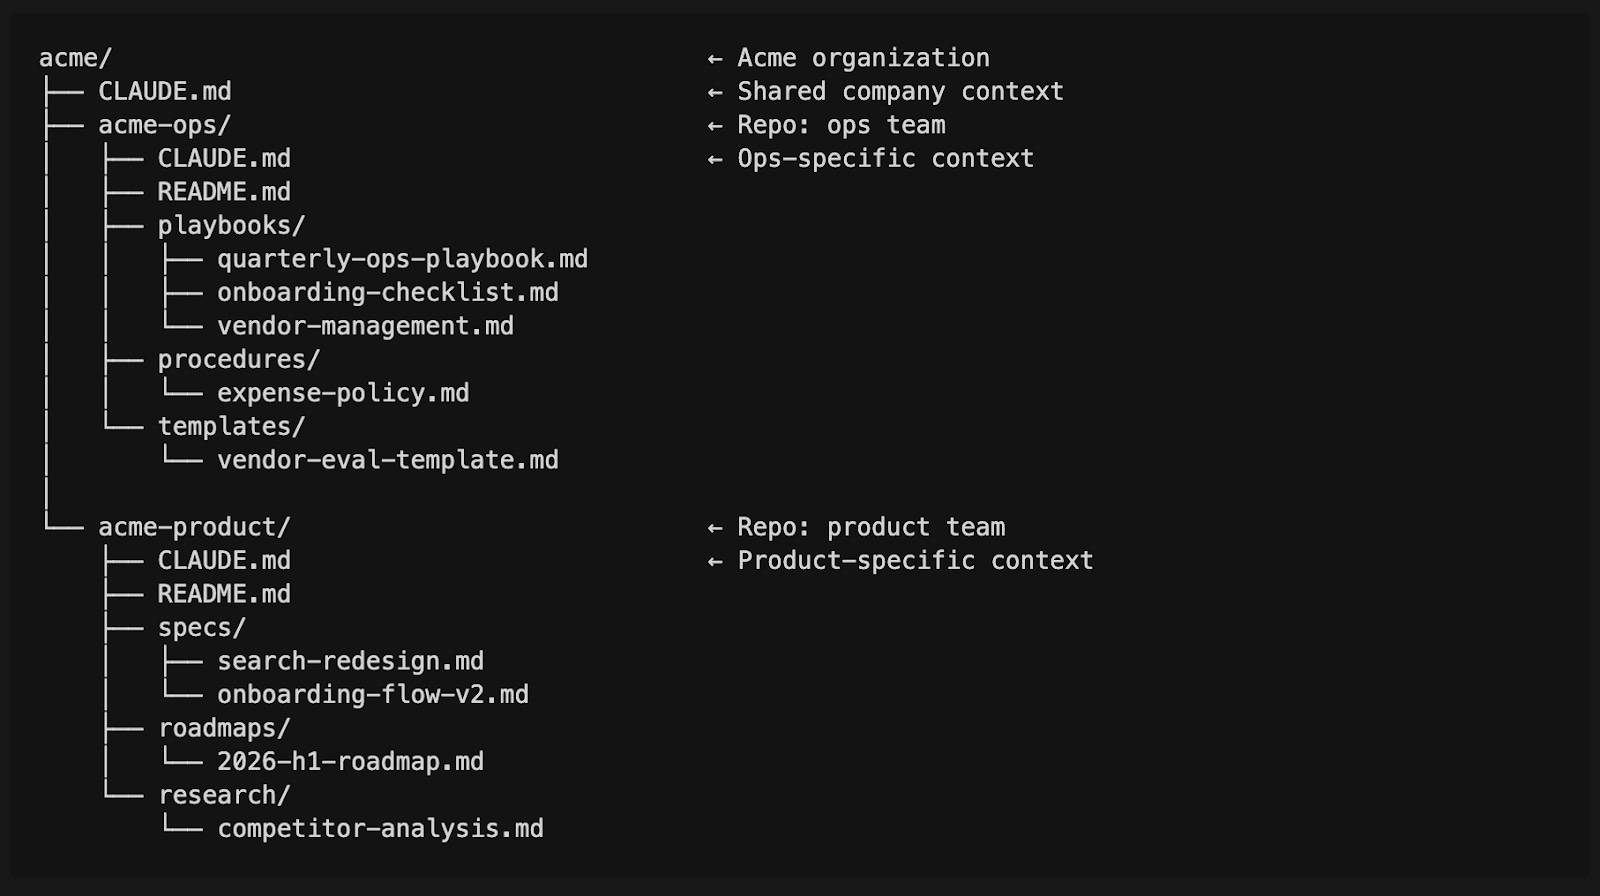
You’ll notice a README.md in each repo - the front door we just talked about.
If you’ve read the previous article on CLAUDE.md files and folder structure, this should look familiar. Each repo has its own CLAUDE.md with context specific to that domain. The top-level CLAUDE.md in the parent organization shares company-wide context across all repos - it loads automatically when you open Claude Code from that parent directory.
Don’t overthink this. You can always reorganize later. Start with one repo for whatever you’re working on right now.
Before You Create: Key Decisions
Three things GitHub will ask you when you create a repo and what to pick.
Public vs. Private: Pick Private by Default
When you create a repo, GitHub will ask whether you want it to be public or private. Here’s what I usually do:
Default to private. A private repo means only you (and people you invite) can see it.
Go public only when you have a specific reason:
You’re sharing a tool or project you want other people to use
You’re contributing to an open-source project
You want to build a portfolio of visible work
If you’re building something for yourself, your team, or a client? Keep it private. You can always make a private repo public later. You can’t un-ring the bell the other way - once something’s been public, someone may have already seen it.
Public repos need a license (use the MIT one)
When you create a public repo, GitHub will offer to add a license file. A license tells other people what they can and can’t do with your work.
If you’re going public, use the MIT license. It’s the simplest and most permissive option: anyone can use, copy, modify, and distribute your work, as long as they include the license notice. It’s the “do whatever you want with this, just don’t blame me if it breaks” license.
GitHub has a license chooser that walks you through the other license options if you have specific needs. (The GPL and Apache 2.0 licenses are the other common ones you’ll see, but if you’re not sure, just use MIT.)
For private repos, you don’t need a license. Nobody else can see it.
Initialize with a README
When GitHub asks if you want to initialize with a README, check the box. You can always edit it later, and it gives your repo something to start with.
GitHub vs. Cloud Storage: When to Use Each
Not every project needs GitHub.
If you’re working solo on your own projects, it’s much simpler to backup your work using a cloud storage desktop app like Google Drive or Dropbox. You get automatic backup and can access your files from anywhere.
When you need to collaborate with others on a shared project, that’s when GitHub earns its place. It’s built for teams working on the same files - tracking who changed what, reviewing each other’s work, and keeping everything in sync.
If you have an existing folder you want to move to GitHub, you don’t need to start over. You can connect that folder to a new GitHub repo. First, open the project folder in Cursor (or your IDE). (Note: If the folder is inside Google Drive or Dropbox, move it to a non-cloud-storage location first (like ~/projects) to avoid the sync issues mentioned above.)
Then:
The Claude Code way:
“Push this project to a new private GitHub repo called [your-project-name].”
Claude Code (with the GitHub MCP) will create the repo and run everything. Claude will generate a README as well.
The manual way:
First, create an empty repo on GitHub (same steps as above, but don’t check “Initialize with a README” - your project already has files in it).
Then in your project folder:

These five commands: initialize Git tracking in the folder, mark all your files to be included, create the first snapshot, point the folder at your GitHub repo, and upload everything. Looks like a lot, I know. But you really only do this once per project.
Finding and Using Other People’s Repos
How to find, clone, and fork projects on GitHub.
People share Claude Code skills, MCP servers, and other useful tools on GitHub. When someone drops a GitHub repository link in a conversation or article, you can download a copy to use it yourself. Here’s how.
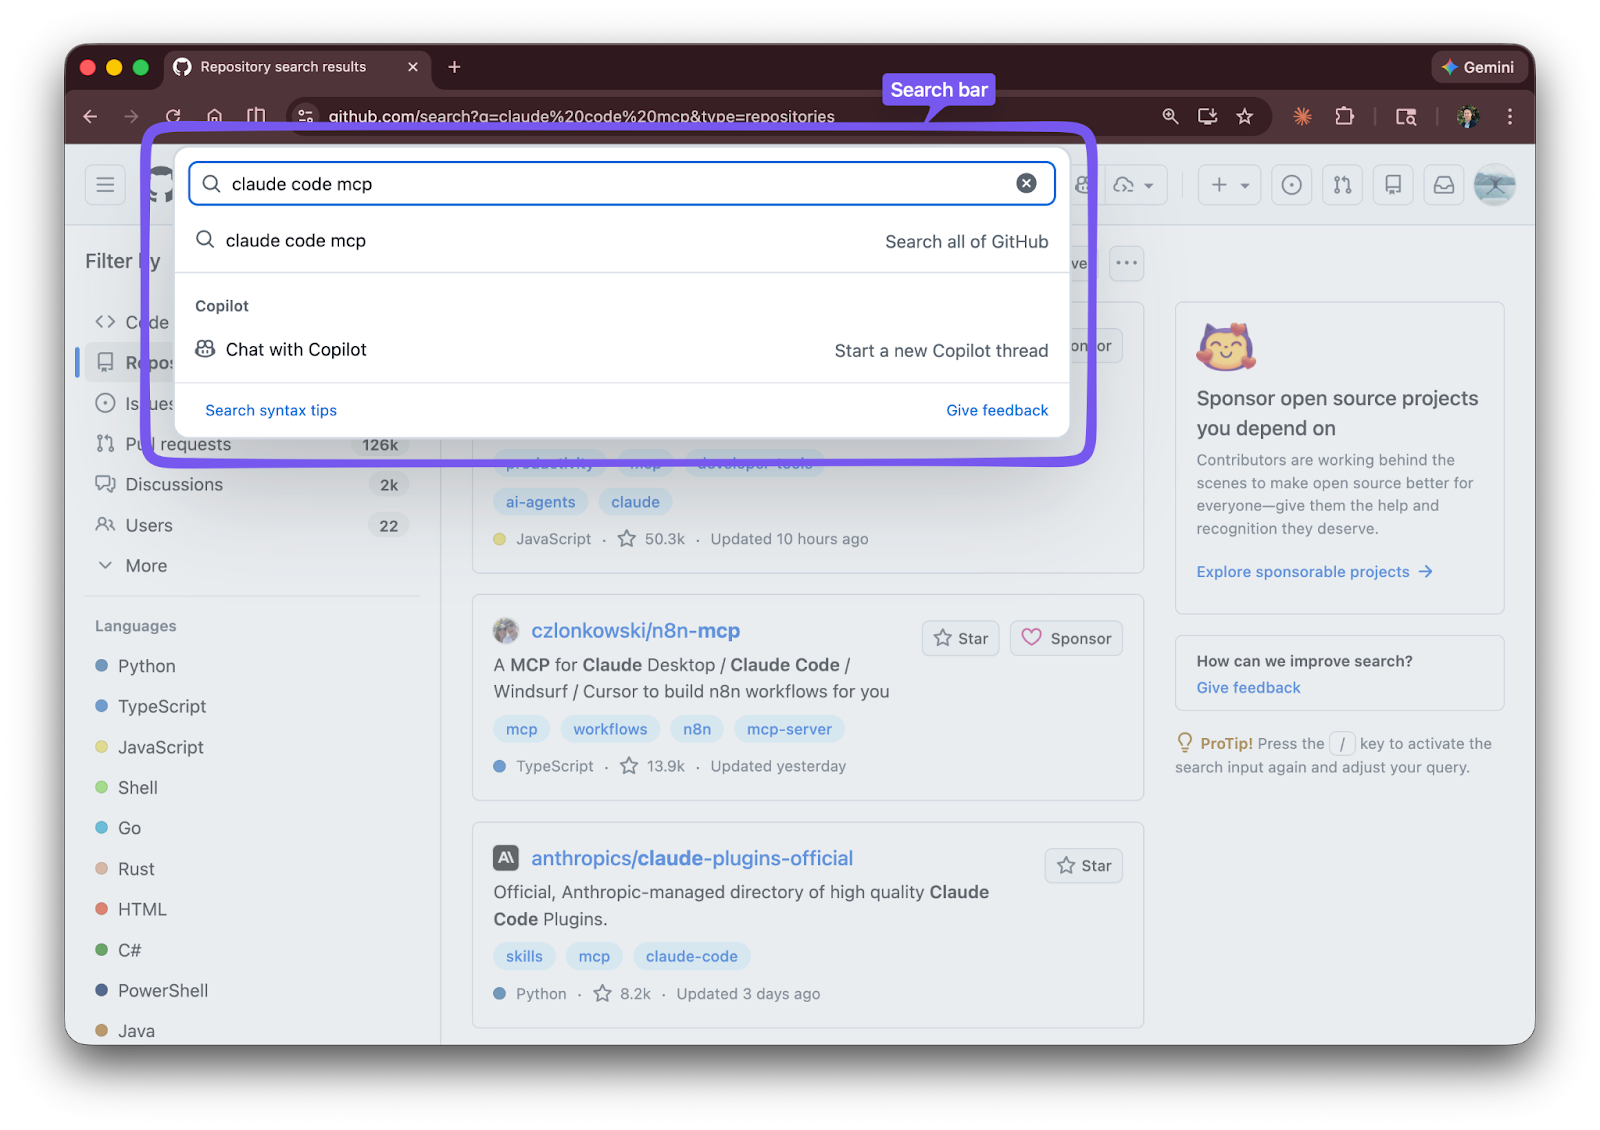
Finding repos
You can search on github.com using the search bar at the top. Try searching for “claude code mcp” or “claude code skills” to see what’s out there.
There’s also a great curated list of Claude Code resources worth bookmarking. (Yes, the 24k stars on it are real.)
Cloning repos
Cloning someone else’s repo works the same as cloning your own.
The Claude Code way:
The manual way:
Go to the repo page, click “Code,” copy the URL, and run git clone <url> in your terminal.
After cloning, read the README first. Good repos like cloudflare/moltworker include prerequisites, installation steps, and configuration instructions right there. If the setup looks intimidating, ask Claude Code to walk you through it - it can read the README and handle the installation steps for you. Just ask Claude:
“Read the README and help me set up this project.”
Forking repos
Sometimes you don’t just want a copy on your machine. You want your own version of someone else’s project that you can modify freely on GitHub. That’s called a fork. Cloning downloads it to your machine; forking gives you your own copy on GitHub that you own and control.
To fork, click the “Fork” button in the top-right corner of any repo page.
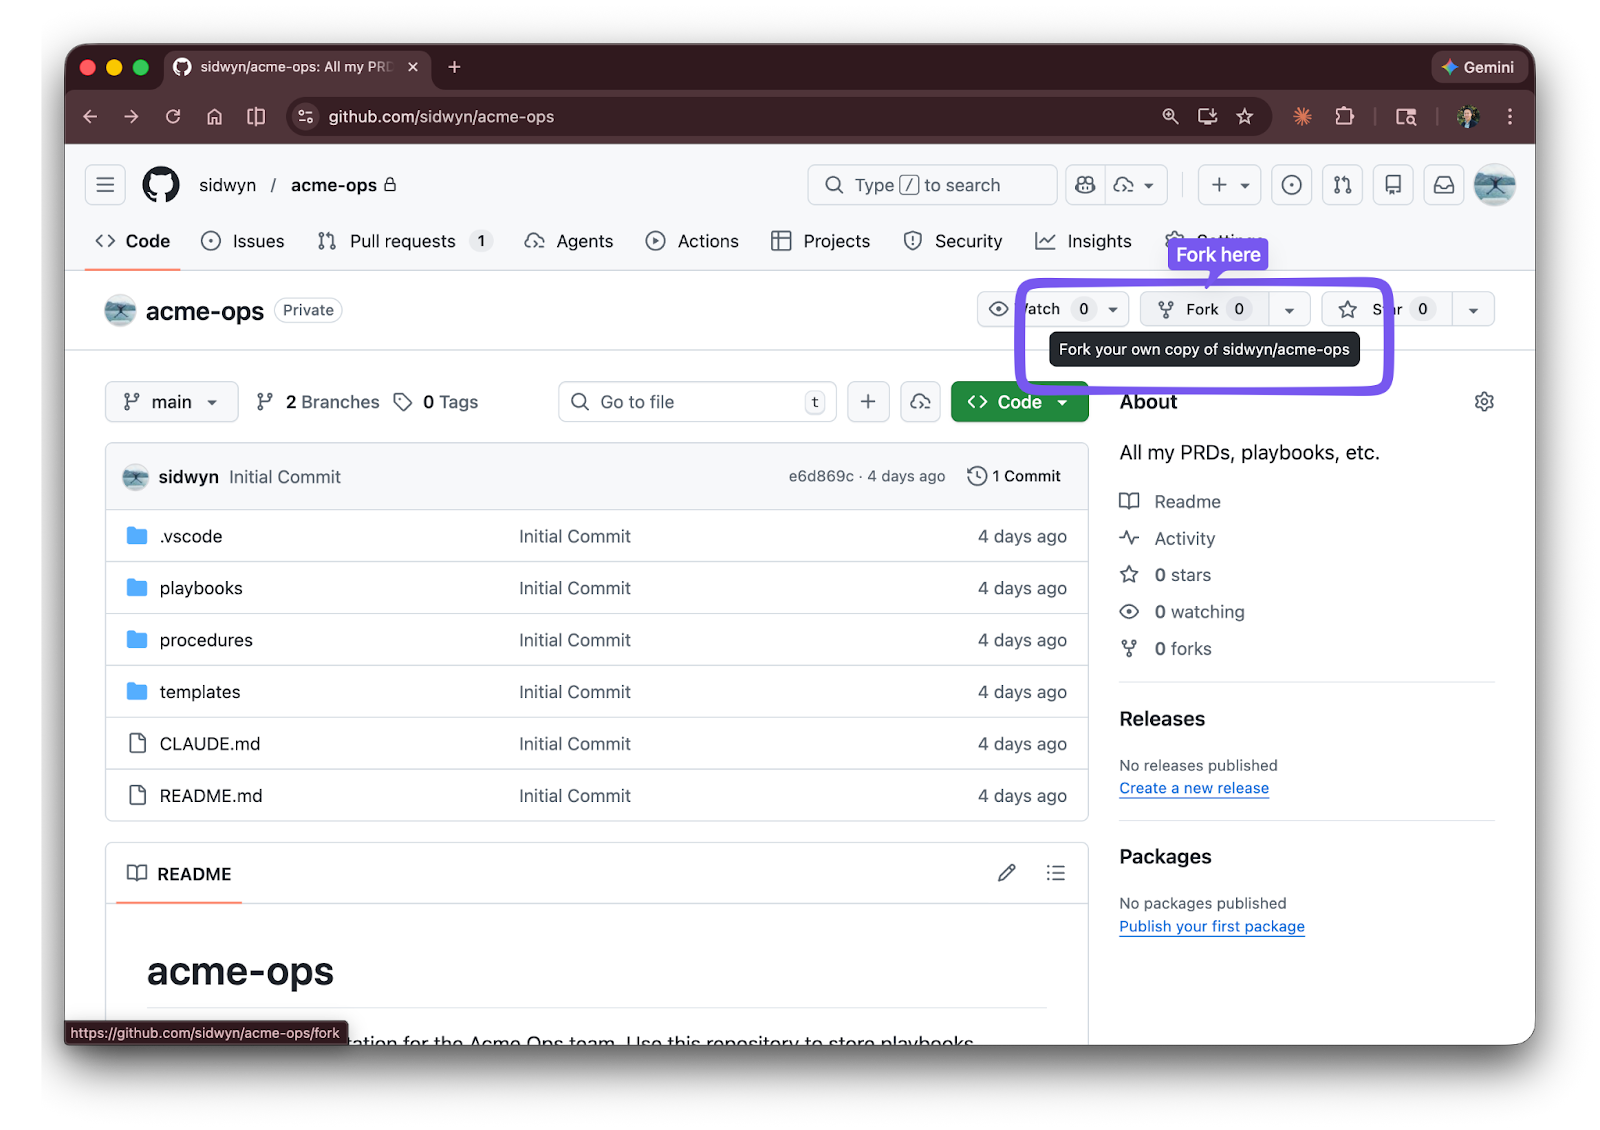

To fork, click the “Fork” button in the top-right corner of any repo page. GitHub creates a copy under your account. From there, you clone your fork to your machine (just like cloning any other repo) and modify it however you want. You’ll fork the practice repo in the next section.
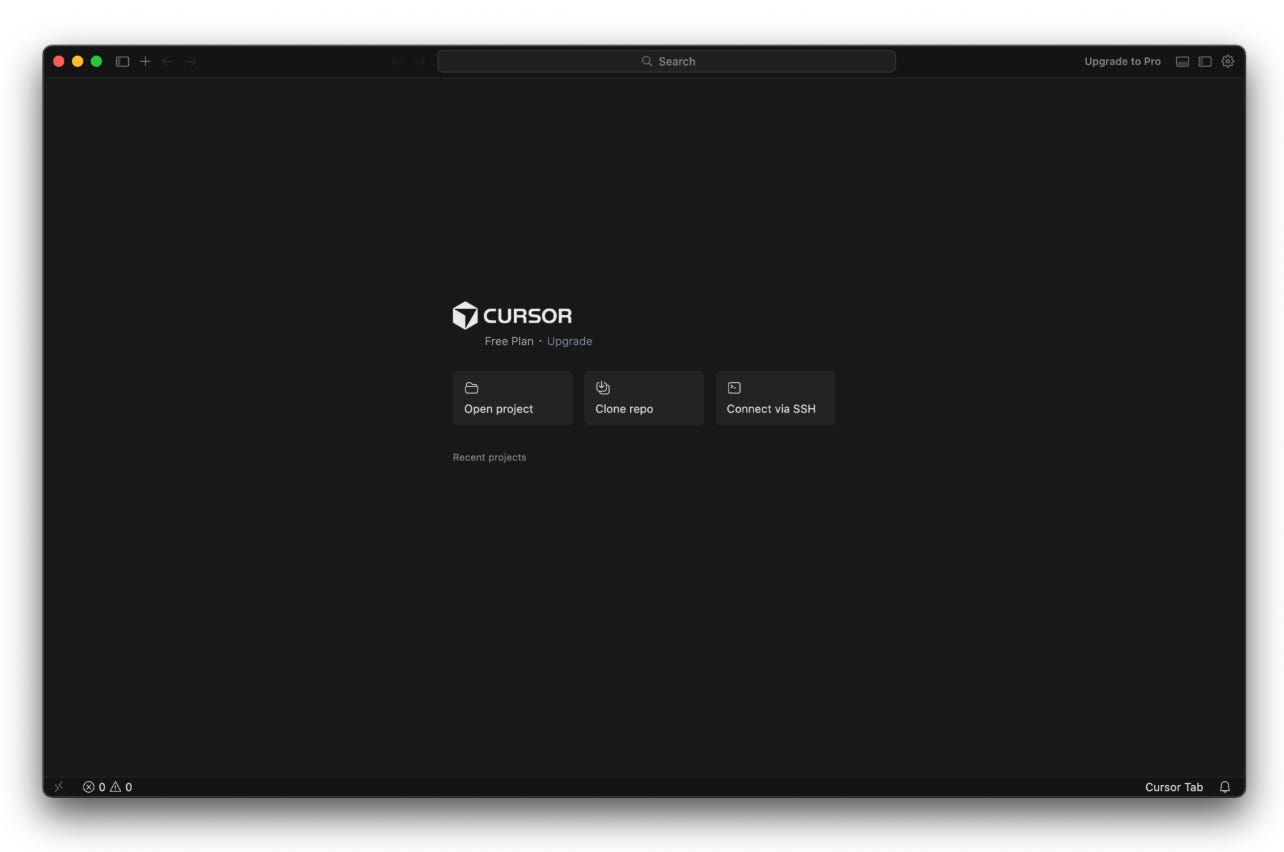
Your First Repo: Fork and Clone acme-ops
The hands-on moment - fork the practice repo, clone it to your machine, and explore it.
Time to get your hands dirty. You’re going to clone the practice repo we introduced earlier (sidwyn/acme-ops) to your machine.
Step 1: Fork the repo on GitHub
Go to github.com/sidwyn/acme-ops and click the “Fork” button in the top-right corner. GitHub creates a copy of the repo under your account (e.g., your-username/acme-ops). That’s it - one click.
Step 2: Clone your fork to your machine
Now you need to download your fork to your computer so you can work with it locally.
A quick note on where repos should live on your computer. When you clone a repo, it becomes a regular folder on your computer. Most people keep all their repos in one place - a projects or repos folder in their home directory. This keeps things tidy and easy to find.
Can you put a repo inside your desktop cloud storage folder (such as Google Drive or Dropbox desktop apps)? Technically yes - repos are just folders. But cloud sync services can interfere with Git’s internal version history tracking if Google or Dropbox tries to sync to the cloud while Git is in the middle of an operation. The safest approach is to keep repos in a non-cloud-storage folder on your computer.
Important: Do not clone a repo inside another repo’s folder. Git tracks everything inside a repo, so a repo inside a repo creates conflicting tracking - both try to manage the same files. Keep your repos side by side, not nested.
The Claude Code way:
In Cursor, open the folder (e.g., ~/projects) that you’ve set-up for your repos.
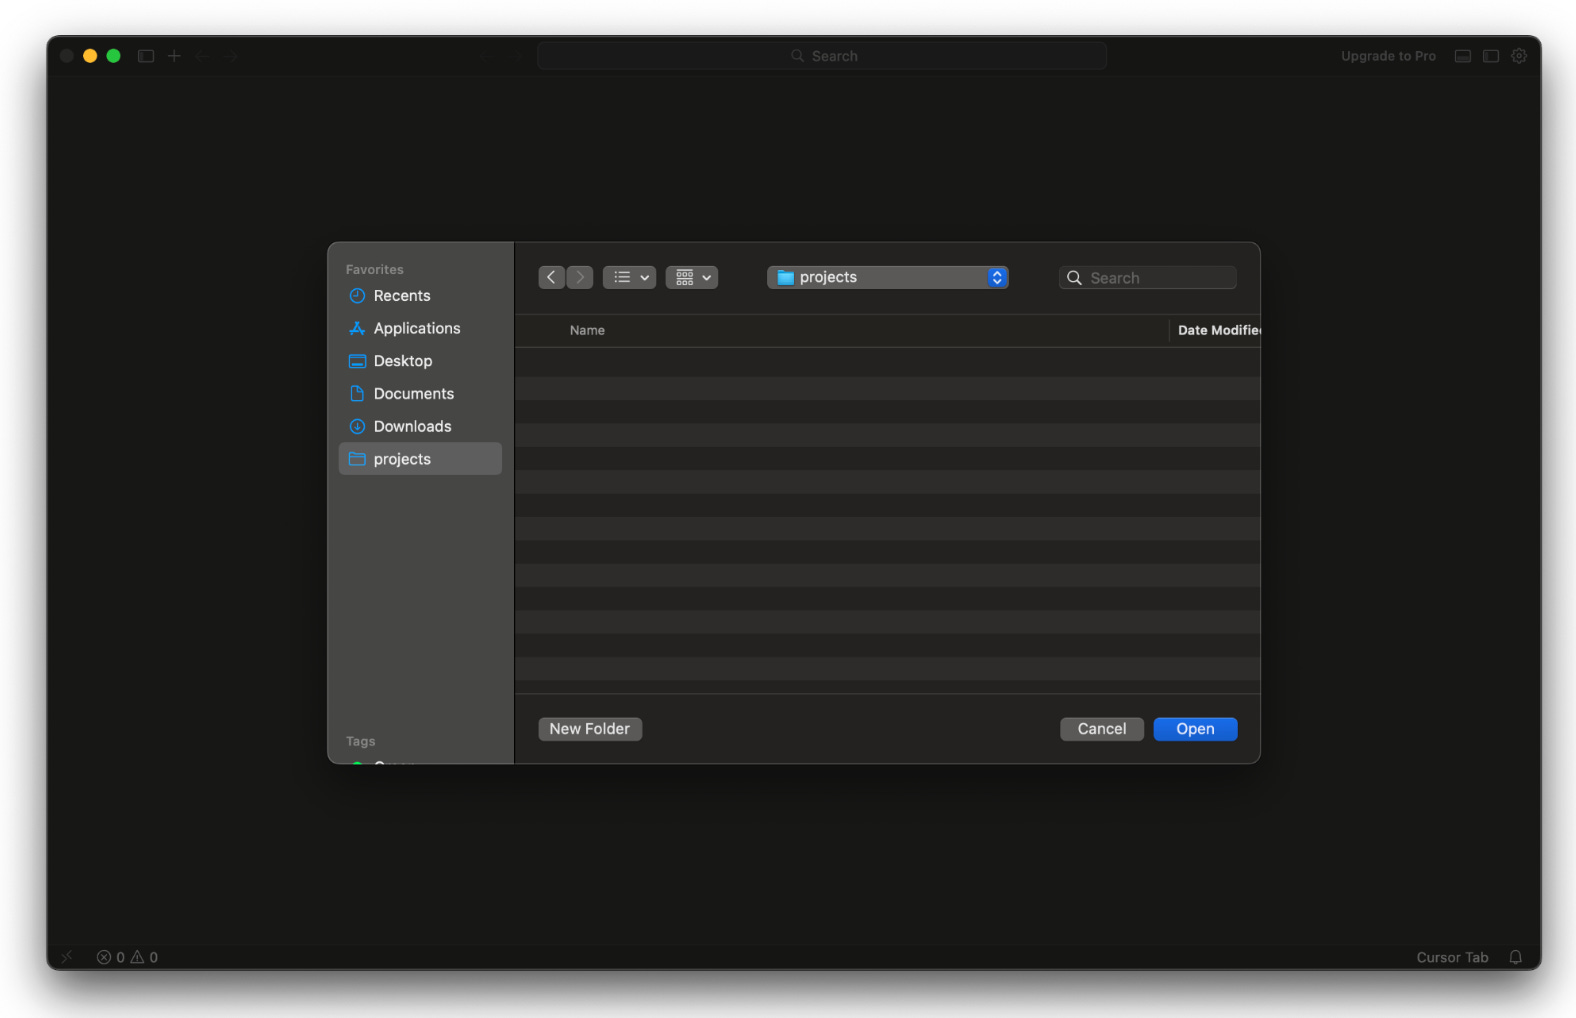
Then, prompt Claude:
“Clone https://github.com/your-github-username/acme-ops"”
Claude handles it without you needing to ever leave the terminal.
The manual way:
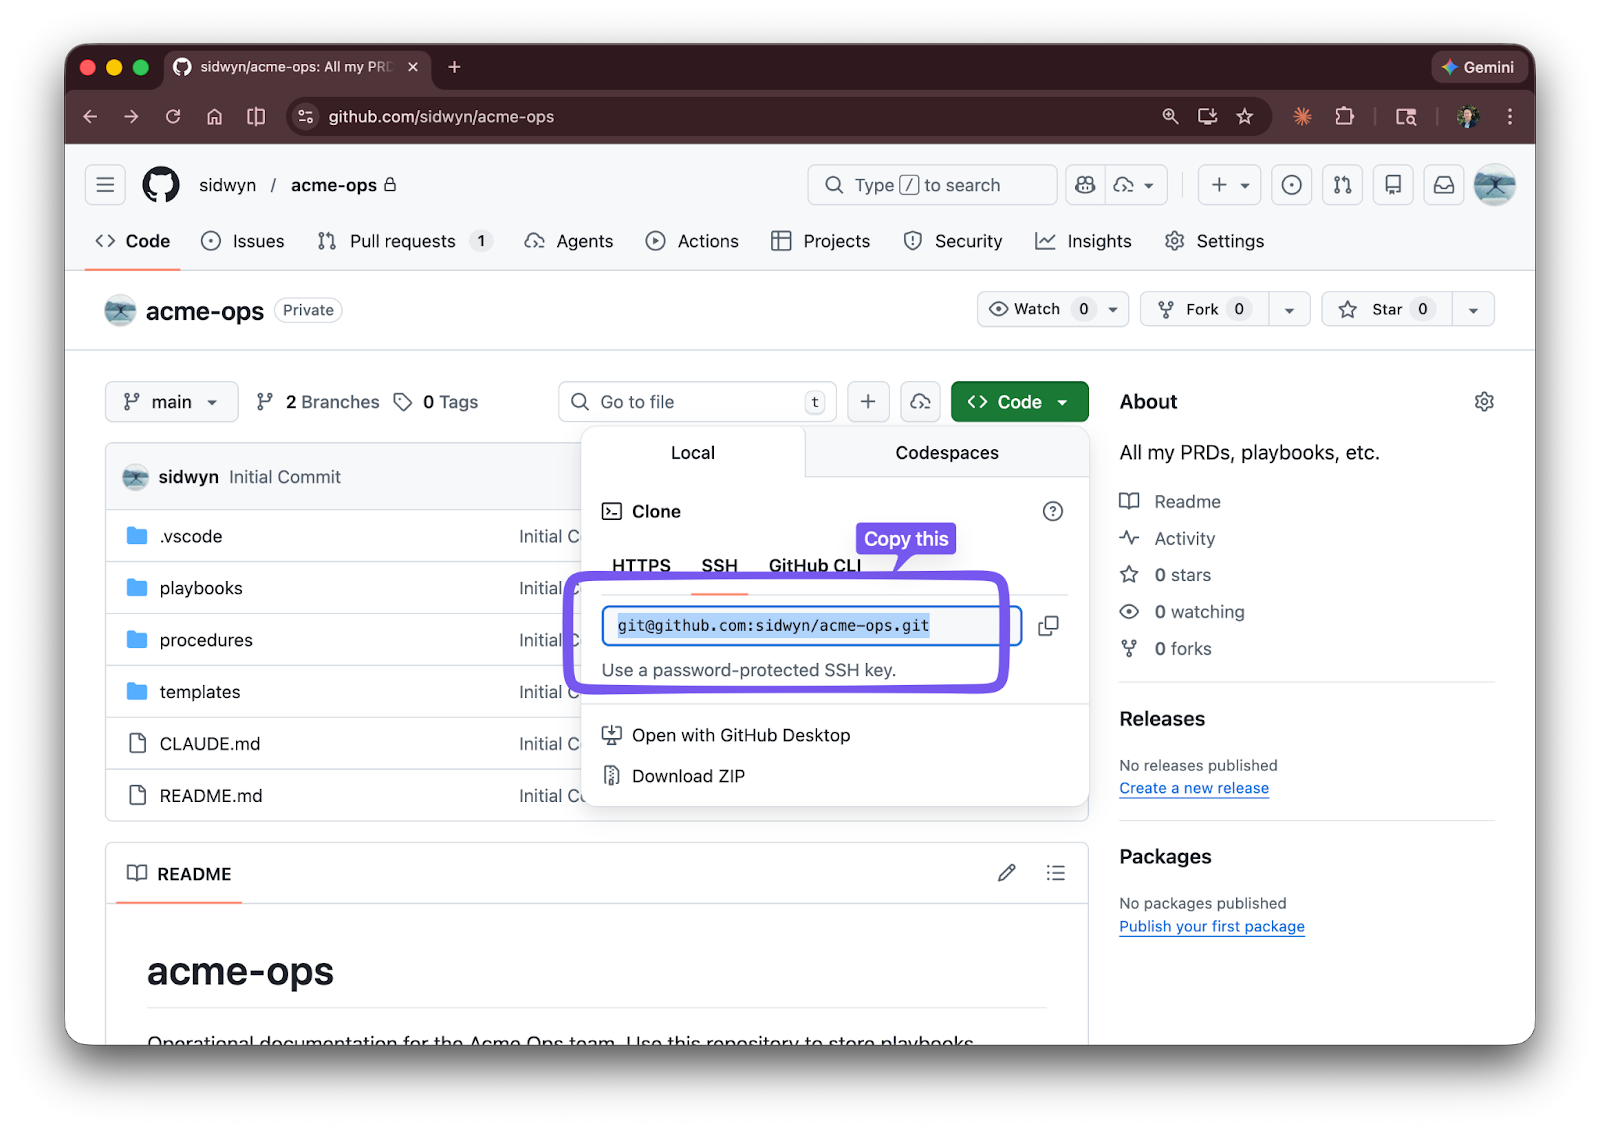
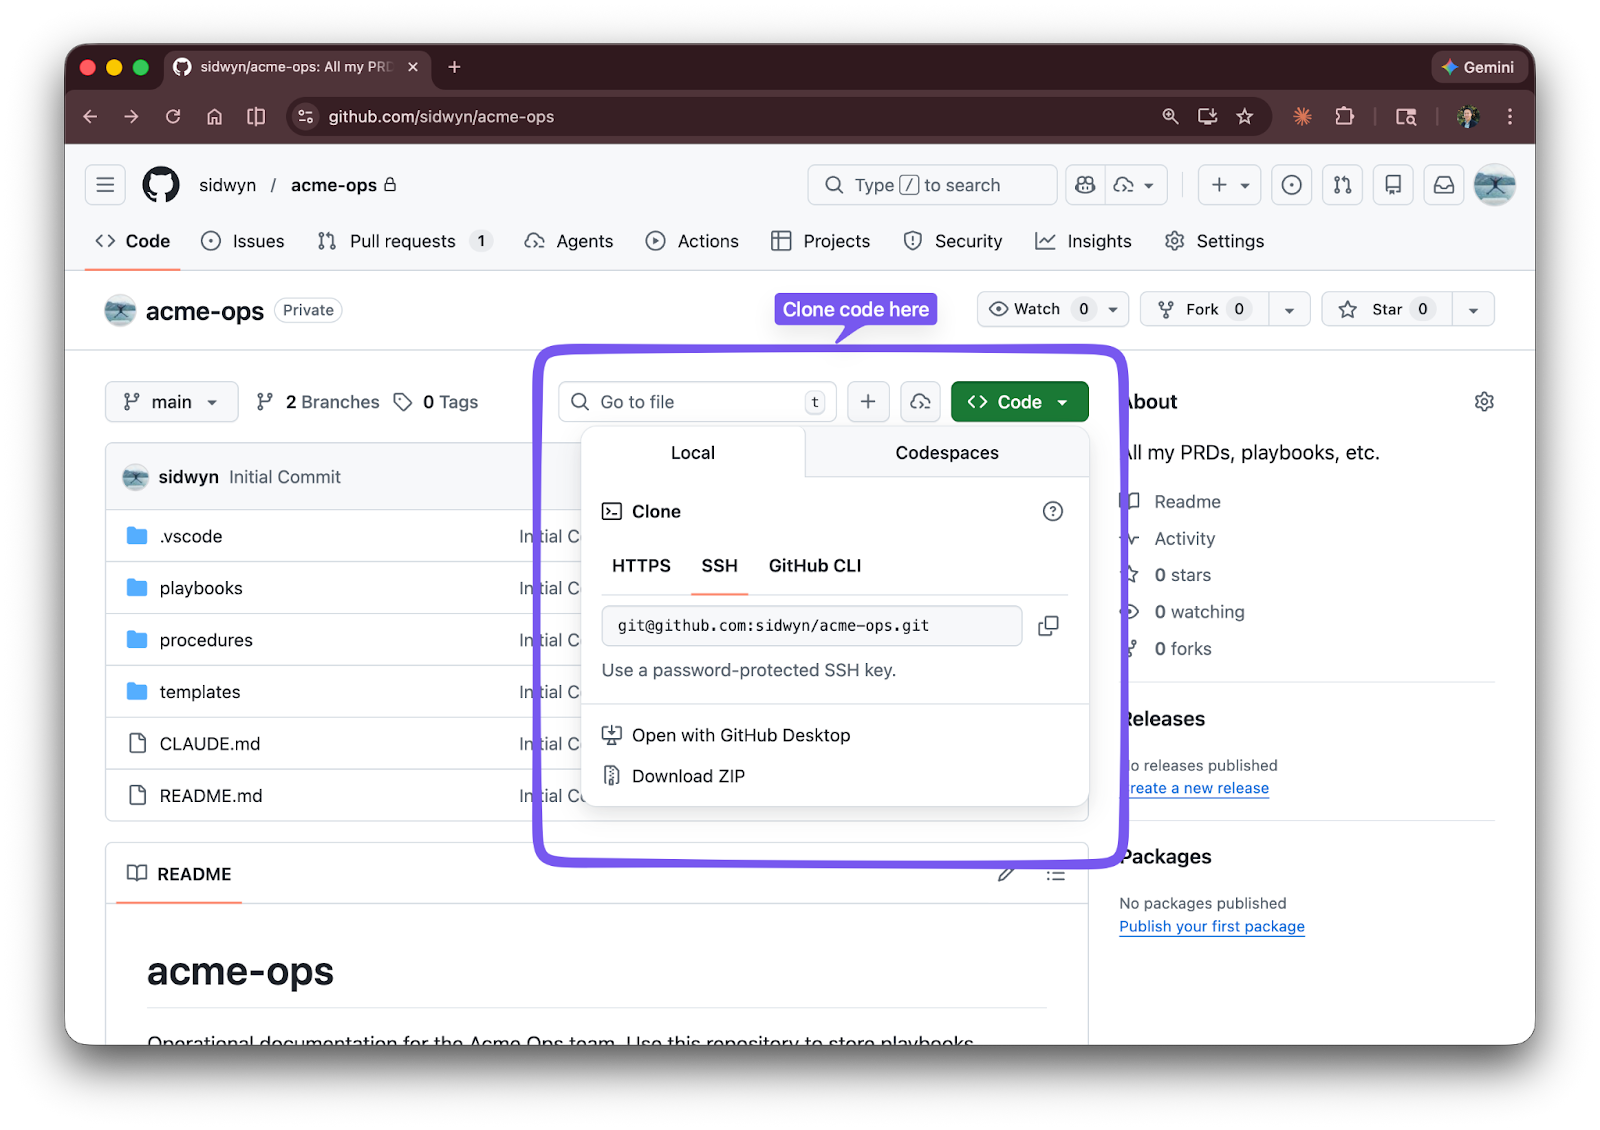
Go to your fork on GitHub (github.com/your-github-username/acme-ops), click the green "Code" button, and copy the SSH URL (it starts with git@github.com:).
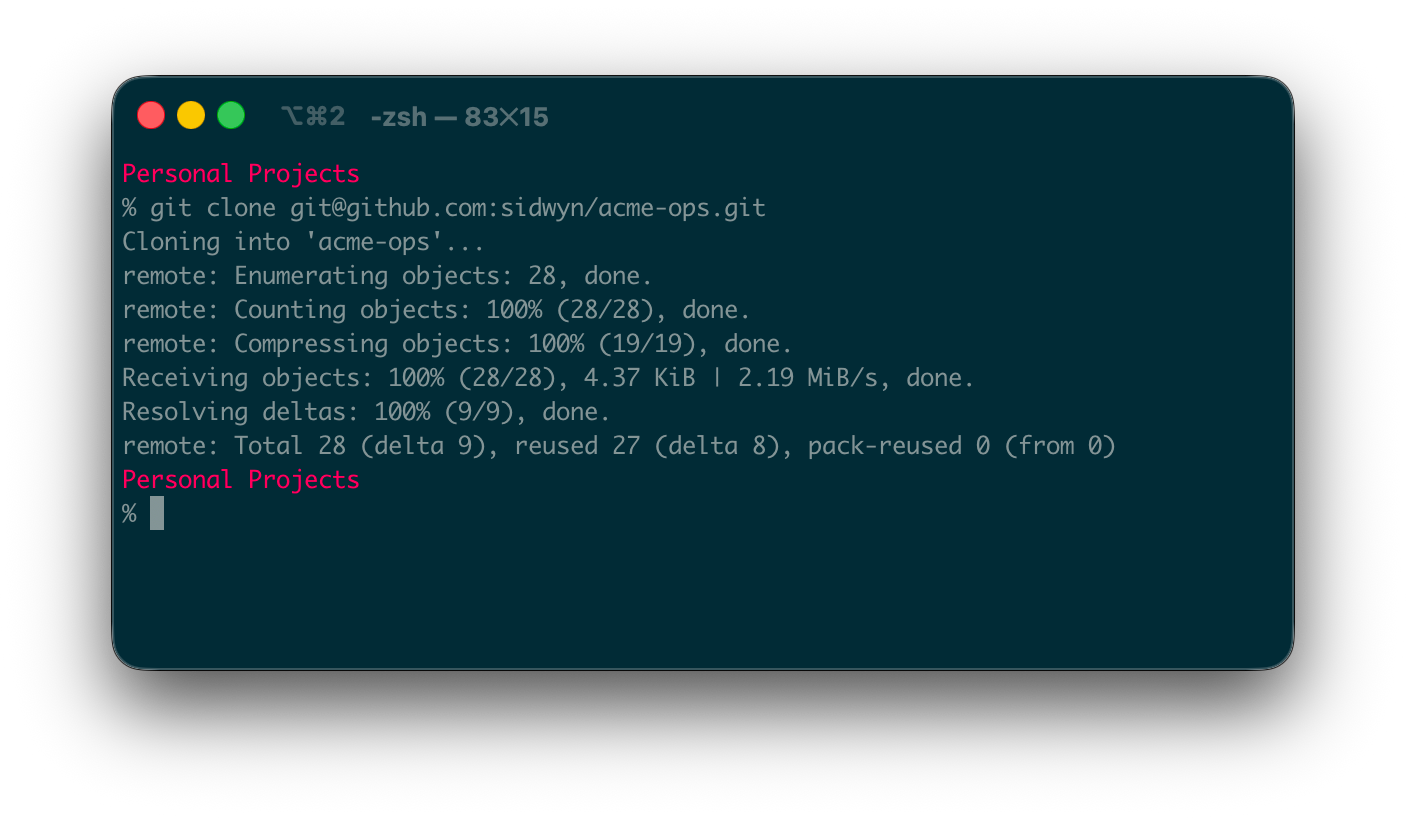
Then in your terminal:

Note: You might see a warning here in the future if you’re cloning an empty repository. That’s fine.
If you’re asked to enter a passphrase, that’s your SSH key passphrase from the setup step. Enter it to continue. If you set one and can’t remember it, you can create a new SSH key.
You’re in. You now have a local copy of your fork of the practice repo.
Now, open a new window in Cursor and open the acme-ops folder.
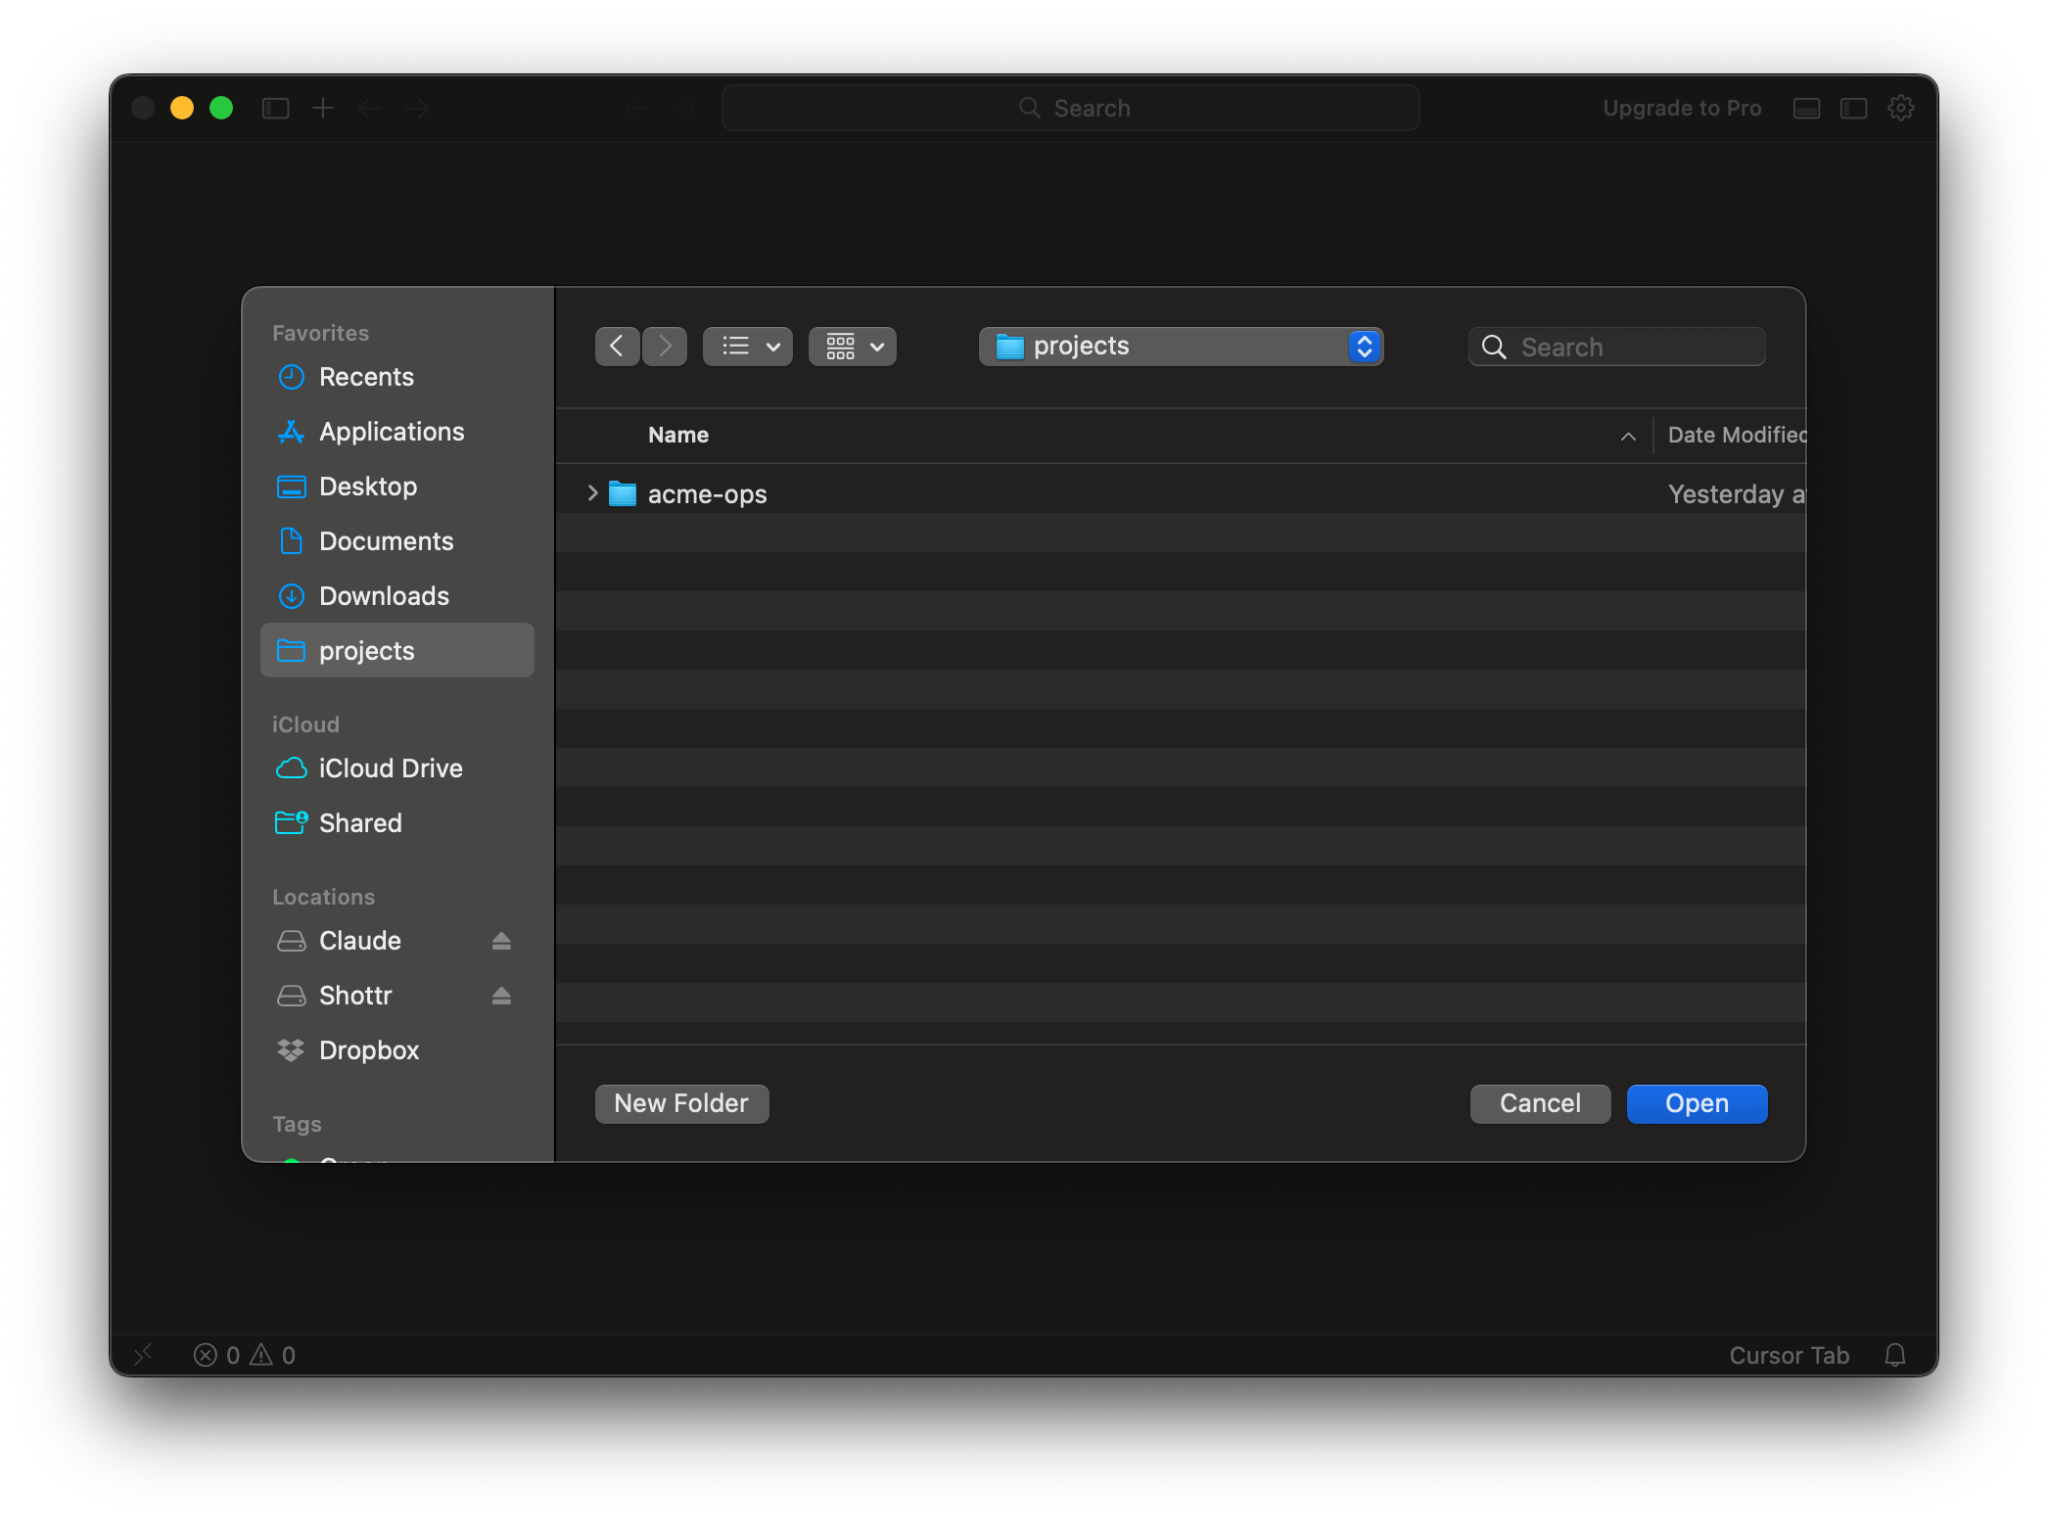
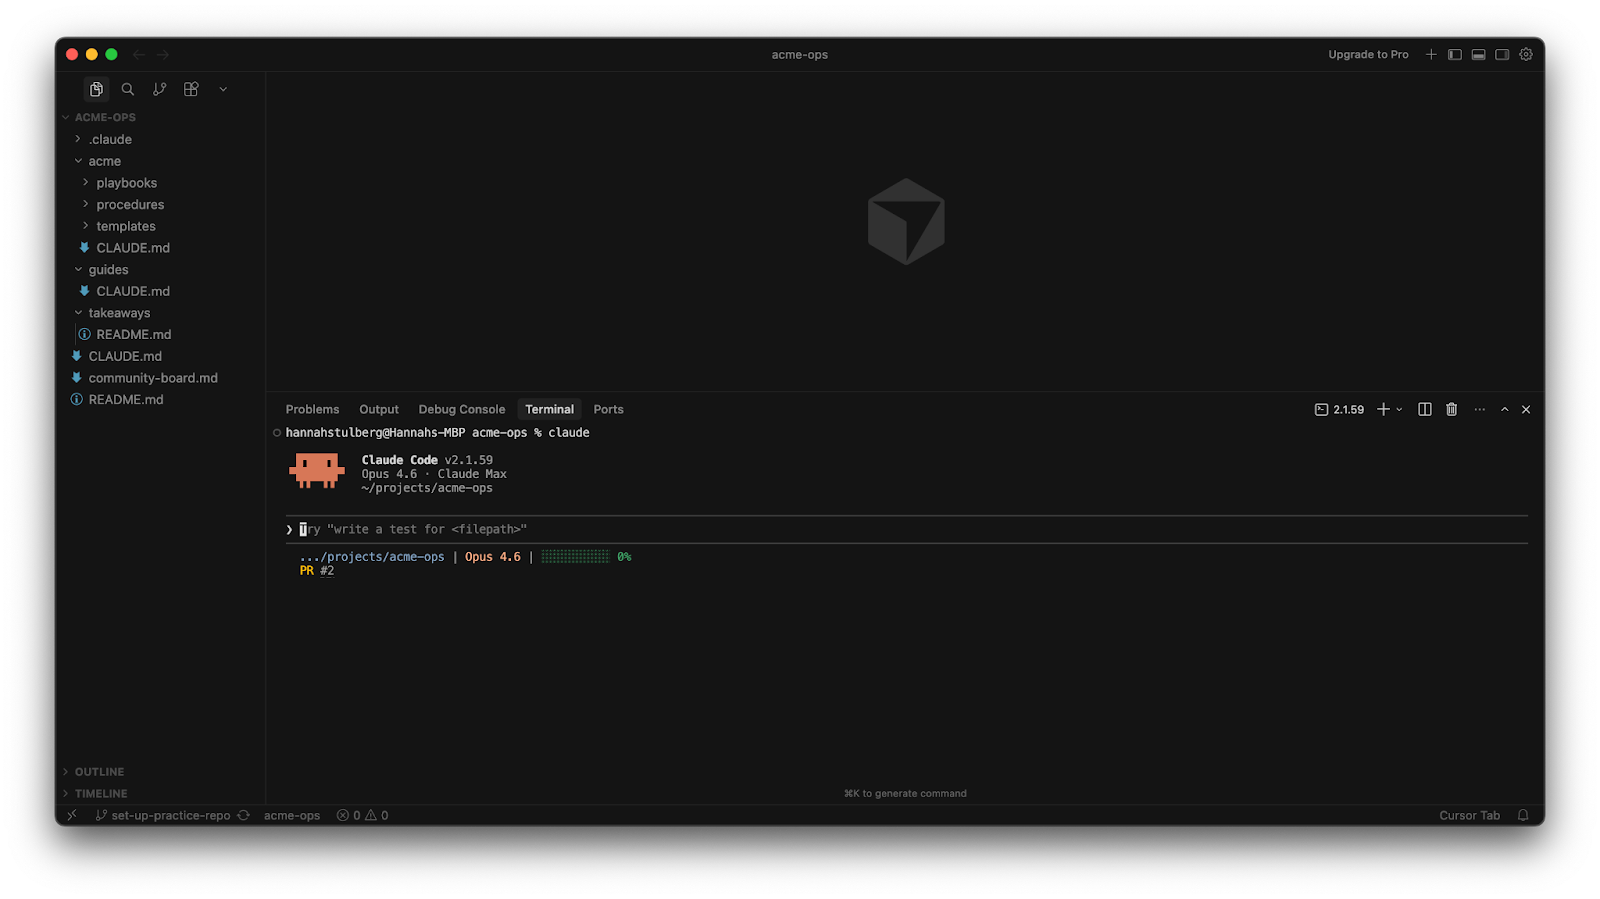
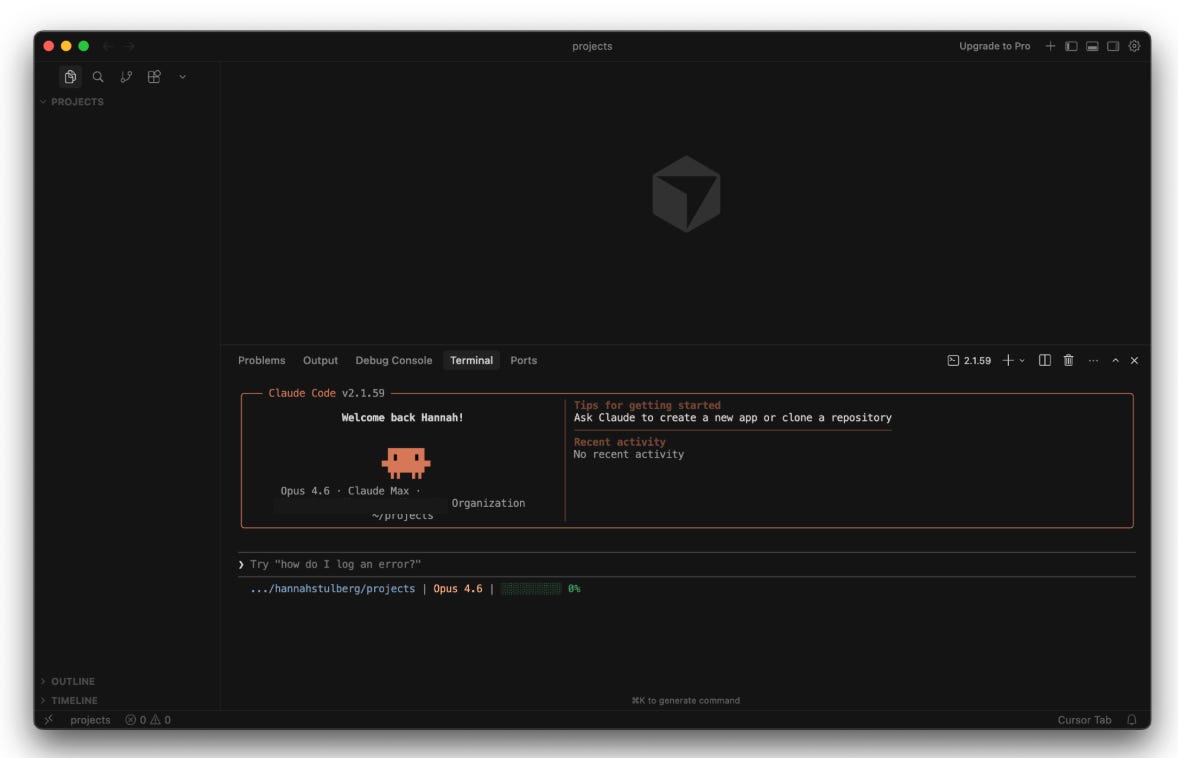
You should see the playbooks, procedures, and templates folders in the sidebar. Take a look at the README.md and the CLAUDE.md file. If you’re using Claude Code, the CLAUDE.md loads automatically and Claude is ready to help you with GitHub questions.
You’re Ready to Work
A quick orientation on where you’ll spend your time: your IDE, the terminal, and GitHub’s web interface.
Your repo is forked and cloned. Now how do you actually work?
You’ll work in your IDE (Cursor, VS Code, or similar) with Claude Code running in the IDE’s built-in terminal. This is your primary workspace for everything.
Important: Each repo gets its own IDE window - open the repo’s folder in your IDE, and that window is your workspace for that project. If you’re working across multiple repos, you’ll have multiple windows open.
GitHub’s web interface is for browsing repos, reading READMEs, and managing settings (most of which can also be done directly in the terminal with Claude Code). You’ll use it occasionally, but most of your day-to-day work happens in the IDE (both Sidwyn and I rarely open the web interface).
Part 3: The Daily GitHub Workflow
Everything you need to start working on GitHub today.
You have your tools installed and a repo cloned. Now, let’s learn how to actually work in GitHub. This section covers:
The core GitHub workflow concepts mapped to tools you already know
The complete GitHub workflow in seven steps - enough to start working right now
How branches, commits, pushing, pulling, and pull requests work under the hood - so you understand what’s happening, not just what to type
Putting it all together: An end-to-end example of Sarah’s full GitHub workflow at Acme
GitHub Is the New Google Drive
The six core GitHub concepts, mapped to a tool you already use.
Most people use Google Drive (or a similar cloud-based file-sharing tool like Dropbox or Notion) on a day-to-day basis. If that’s you, you already have the mental model for GitHub.
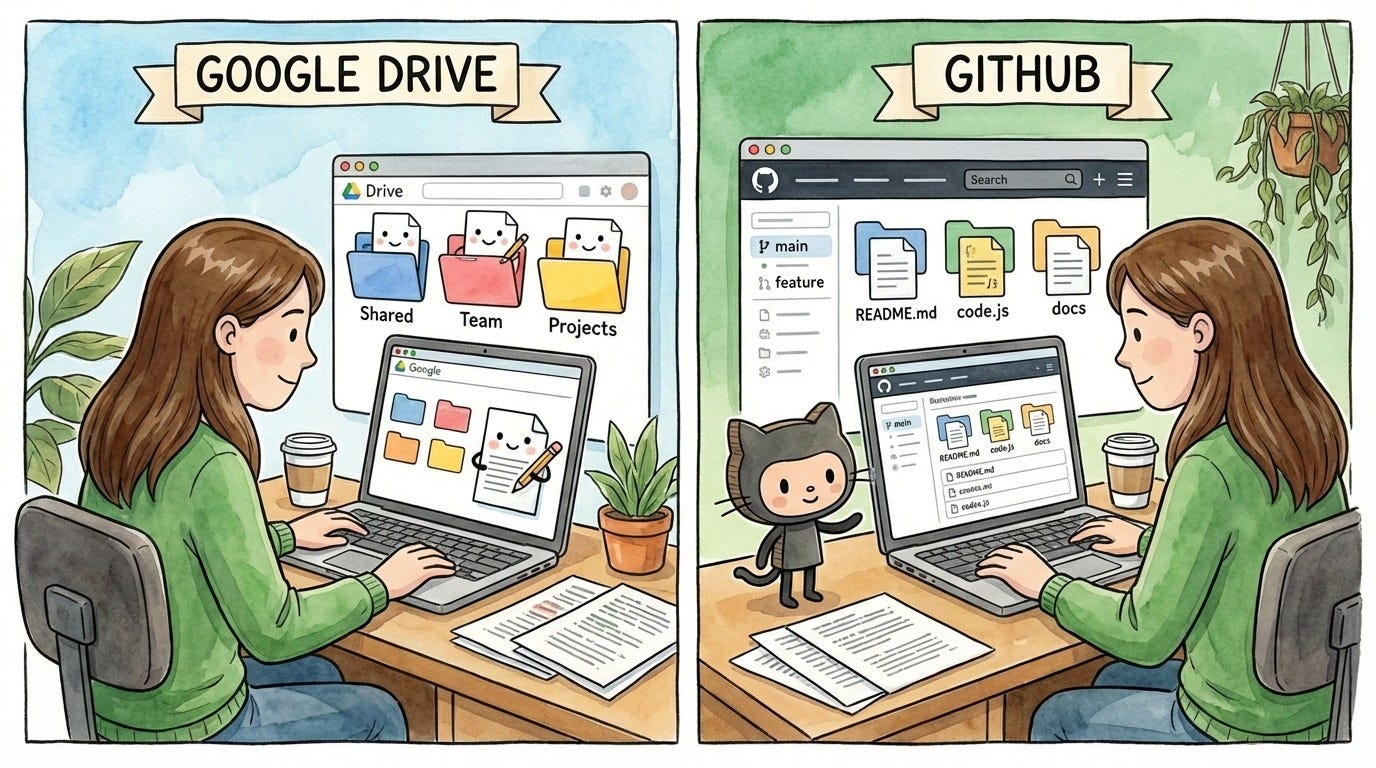
Here’s a side-by-side comparison:
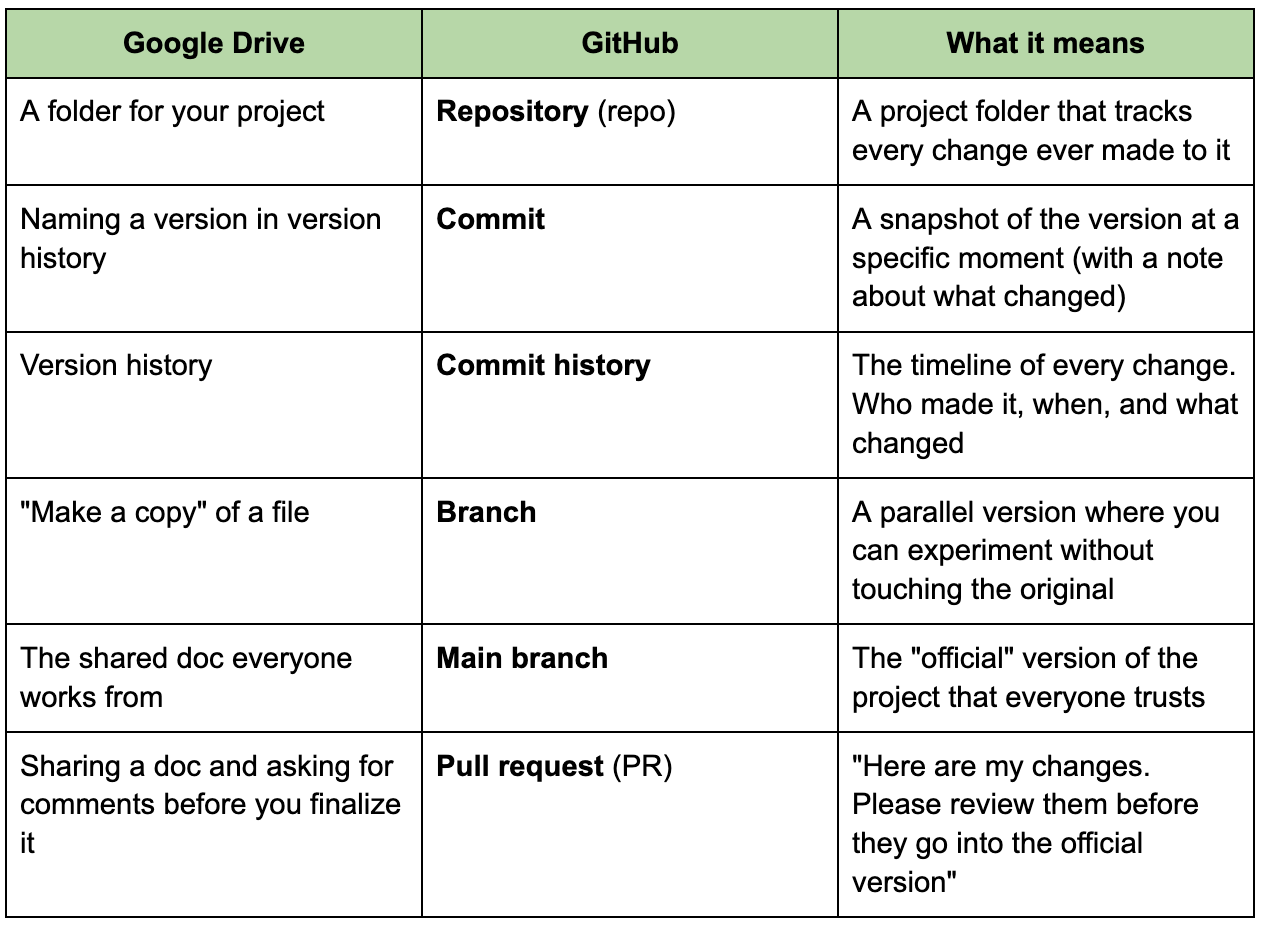
Let's go deeper on each one.
The Short Version
The complete workflow in six steps - enough to start working right now.
This is the workflow you’ll use every day. When you’re executing it, you’ll have your repo open in Cursor (or your IDE) with Claude Code running in the terminal. We’ll walk through each step here, then go deeper on each one. Then, you’ll put it all into practice in the “Your Turn” section at the end.
All prompts below are for an AI coding agent like Claude Code.
Get to your branch. Before you start working, you need to be on the right branch with the latest changes. How you do this depends on whether you’re starting something new or picking up where you left off.
Starting new work: Pull the latest version of main, then create a new branch. Name it something descriptive, like update-vendor-section.
“Pull the latest changes from main and create a new branch called update-vendor-section.”
Continuing existing work: Switch to the branch you were working on and pull the latest.
“Switch to update-vendor-section and pull the latest changes.”
Make your edits. Work on your files as you normally would. Claude Code can help you draft, edit, and organize. As you work, your IDE’s source control panel shows every file you’ve changed since your last save point.
Commit. When you’ve finished a meaningful chunk of work, save a snapshot. A commit captures the state of your entire project at that moment, with a note about what you changed. Commit early, commit often - it’s your safety net.
“Commit my changes.”
Push. Upload your commits to GitHub. Until you push, your work only exists on your machine. After you push, it’s backed up online and visible to your team.
“Push my changes.”
Open a pull request. When you’re ready for feedback, open a PR. This says: “Here are my changes - please review them before they go into the official version.” Claude can create the PR and write the description for you.
“Open a PR for this branch.”
Merge. Once your PR is reviewed and approved, merge it into main. Your changes are now part of the official version. Delete the branch - it’s done its job.
“Merge this PR.”
The next section explains why each step matters, what’s actually happening under the hood, and how to handle the situations that come up in practice.
The Deep Dive
Each step from the workflow above, explained in full - what’s happening, why it matters, and what to do when things get complicated.
You can start working with just the short version above. Come back to this section when you want to understand what’s actually going on or when something doesn’t work as expected.
Step 1: Get to your branch
How to start your day in GitHub.
main is the version everyone trusts - the official, current state of the project. If you edited it directly and introduced a typo, a broken link, or a half-finished change, it would negatively affect everyone else on your team because they’re all also working off of main. It’s like editing a shared Google Doc - you use comments or suggest mode rather than overwriting someone else’s work directly. Branches are GitHub’s version of that. You create a branch - your own parallel copy of the project where you can make changes without affecting anyone else’s work. When your changes are ready and reviewed, you merge them back into main.
Sarah’s update-vendor-section branch contains the same files as main, plus her edits. Jake’s update-office-procedures branch has his edits. Neither of them affects main until they merge. You can have as many branches as you want. Each one is independent. When you’re done with a branch, you merge it and delete it.

When to branch vs. work on main: Working solo on a small personal project? Main is fine. Working with others, or trying something experimental? Branch. A practical rule: if you’d be nervous about breaking something, make a branch first.
Creating a branch:
The Claude Code way:
“Create a new branch off of main called update-vendor-section.”
The manual way:

The checkout command means “switch to.” The -b flag means “create it first.” So git checkout -b update-vendor-section means “create a new branch called update-vendor-section and switch to it.” Every change you make now goes to this branch, not to main.
Always branch off main. When you create a new branch, make sure you’re on main first. If you create a branch while you’re on another branch, your new branch starts from that branch’s changes instead of from the official version. This gets confusing fast. Switch to main, pull the latest, then create your branch.
Naming branches: There’s no official rule, but most engineers follow these conventions. Use lowercase, separate words with hyphens, and keep it descriptive. update-vendor-section is good. fix-login-bug is good. my-branch is not great. asdfgh is terrible.
Some teams prefix branches with a category like feature/contact-form or bugfix/login-error, which is nice for organization but not required. The main thing is that someone (including future you) should be able to read the branch name and have a rough idea of what’s happening on it. Claude Code will usually suggest a reasonable name if you ask it to create one, but it helps to know the convention.
Pulling
“Pull” in Git means “download changes from GitHub to my machine.” But there are actually two different situations where you need to pull, and they solve different problems.
Someone else pushed to your branch. Sarah is working on
update-vendor-section. Jake is helping Sarah and pushed some changes to the same branch from his machine. Or maybe Sarah pushed changes from her office computer and now she’s working from home. Either way, GitHub has a newer version of her branch than what’s on her computer. She needs to download it.Main moved forward without you. Sarah is still on
update-vendor-section, and nobody else touched her branch. But while she was working, Jake merged a completely different PR into main. Now main has changes her branch doesn’t know about. If Sarah doesn’t pull those in, her branch will drift further apart and run into conflicts when she eventually tries to merge.
Pulling your branch
This keeps your local copy in sync with what’s on GitHub for the branch you’re currently on.
The Claude Code way:
“Pull the latest changes.”
The manual way:

This downloads the latest changes from GitHub to your machine. You need this when changes have been pushed to your branch that are not on your local copy. Get in the habit of pulling before you start working each day.
Pulling main into your branch
When main moves forward without you, you need to pull the latest changes from main into your branch. There are two ways to do it:
Merge: This downloads the latest main and combines it with your branch. Simple and safe. The downside is it creates an extra commit in your history that just says “merged main into update-vendor-section” - not actual work you did, just a record that the merge happened. Do it a few times and your commit list gets noisy. Use merge when multiple people are committing to the same branch.
Rebase: This replays your commits on top of the latest main, as if you’d started your branch today instead of Monday. The result is a clean, linear history with no extra merge commits. The downside is that it rewrites your branch’s history, so only use it if you’re the only one working on the branch. Use rebase when you’re working solo on a branch - which is most of the time.
If you’re not sure, let Claude Code handle it.
The Claude Code way:
“Update my branch with the latest changes from main.”
Claude picks the right approach and handles it.
The manual way:
Merge

Rebase

Stashing
Here’s a situation you’ll hit sooner or later: Sarah is editing the vendor section on her branch, and Jake asks her to quickly look at something on his branch. To do this, she needs to switch branches.
What switching branches actually does: Two things can happen, depending on whether
Sarah has uncommitted changes.
Sarah switches without stashing or committing first. Her uncommitted changes carry over to the other branch - as long as they don’t conflict with files on Jake’s branch. Sarah’s half-finished edits show up on Jake’s branch as if she’d made them there. This is a common mistake and can get messy fast. If they do conflict, Git blocks the switch entirely and forces you to stash or commit first.
Sarah stashes or commits first, then switches. Her files literally change on disk. The file she added on her branch disappears from her IDE. This catches people off guard the first time - it really looks like you lost your work. You didn’t. It’s still safe on your branch.

main branch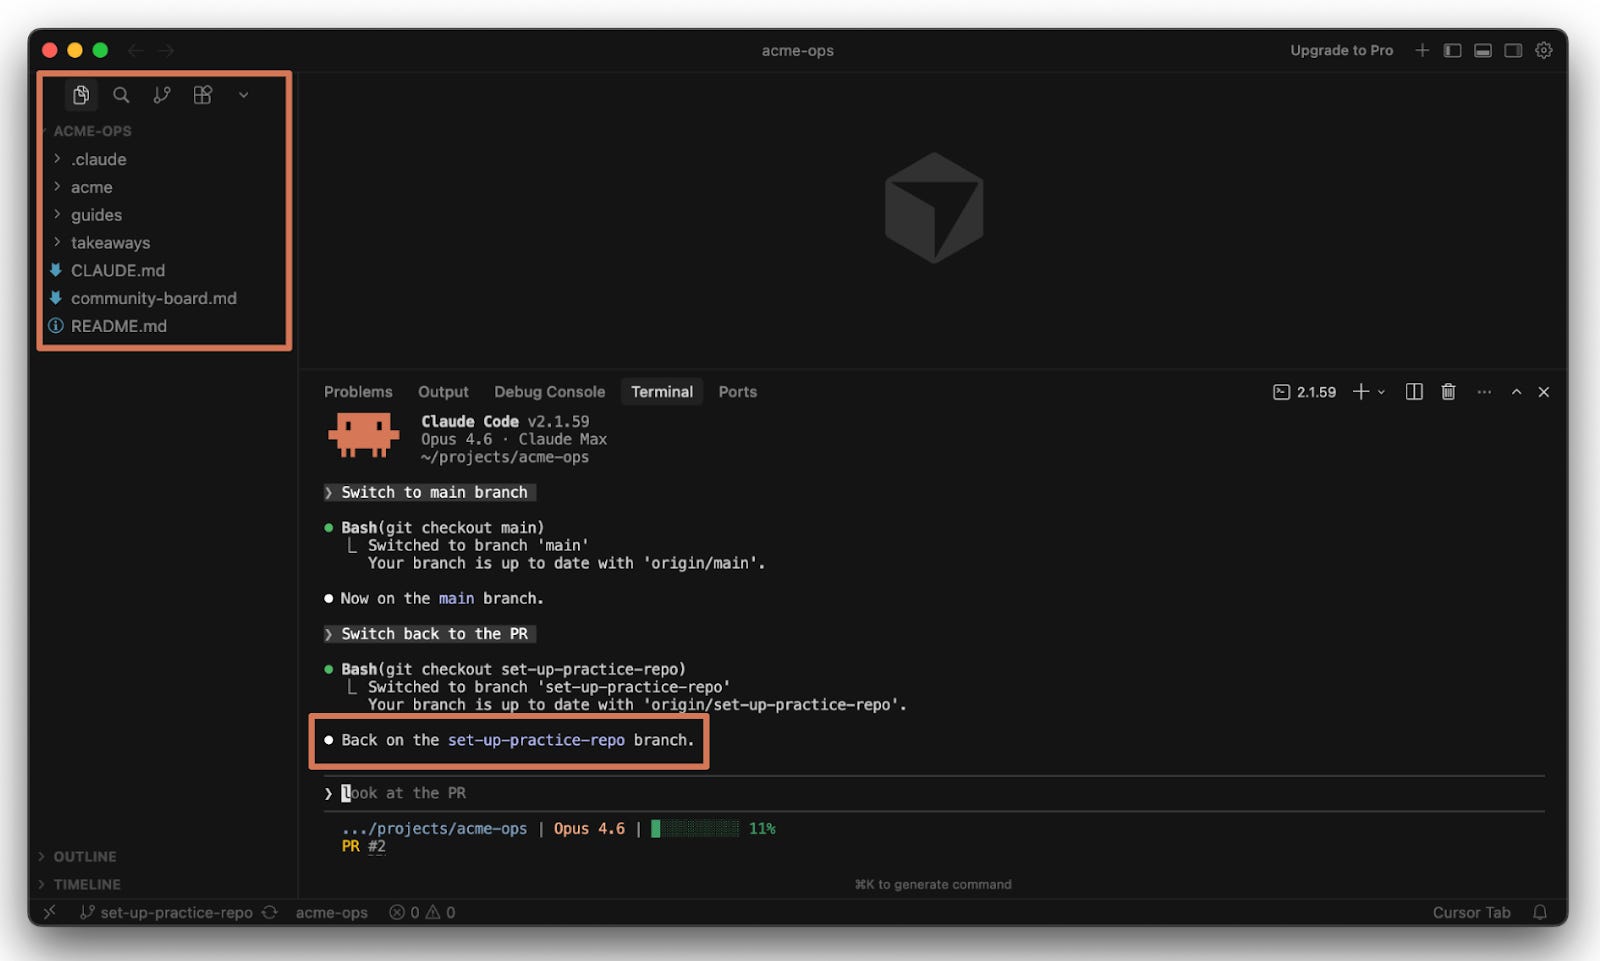
The problem is Sarah’s current changes aren’t ready to commit. They’re half-finished, maybe even broken. If she tries to switch branches without saving her work in some way, Git will complain. Why not just commit? She could, but a commit is a version you might want to roll back to later - you don’t want your history full of half-broken versions. Stashing lets her pause without committing something messy by tucking her uncommitted changes away in a temporary holding area so she can safely switch branches.
The Claude Code way:
“Stash my current changes.”
“Switch to jakes-branch.”
When Sarah switches back to her branch:
“Pop my stash.”
The manual way:

When Sarah switches back to her branch:

Sarah’s changes reappear exactly where she left them.
Step 2: Make your edits
This is the part where you actually do the work.
There’s nothing special about this step from a Git perspective. Open files, make changes, write content - you’re just editing like you normally would. The only difference is that Git is tracking every modification in the background. When you’re ready to save a checkpoint, that’s the next step.
Step 3: Commit
Review what you’ve changed and then save a snapshot.

Committing has two parts:
Review what you’ve changed to make sure everything looks right.
Save the snapshot.
First, before you commit, check what you’ve actually changed.
The Claude Code way:
“What’s the status of my repo?”
The manual way:

This is the “where am I?” command. It tells you which branch you’re on and which files have changed since your last commit. You’ll either run this constantly or use the source control panel in your IDE to fulfill the same function.
There are two ways to see your current status in Cursor:
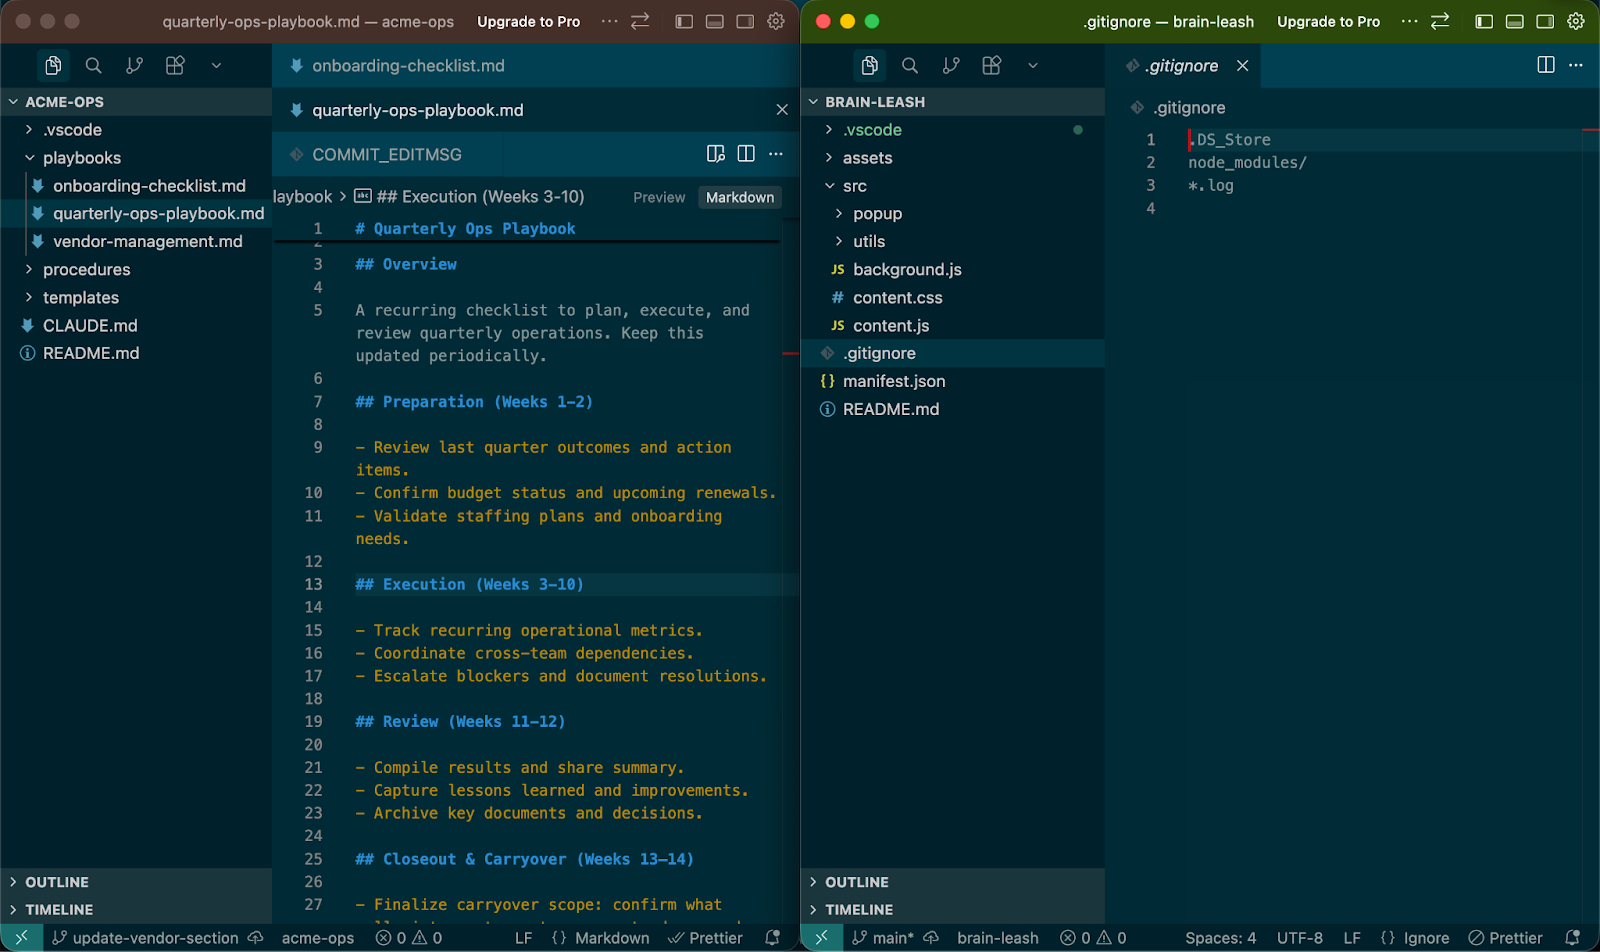
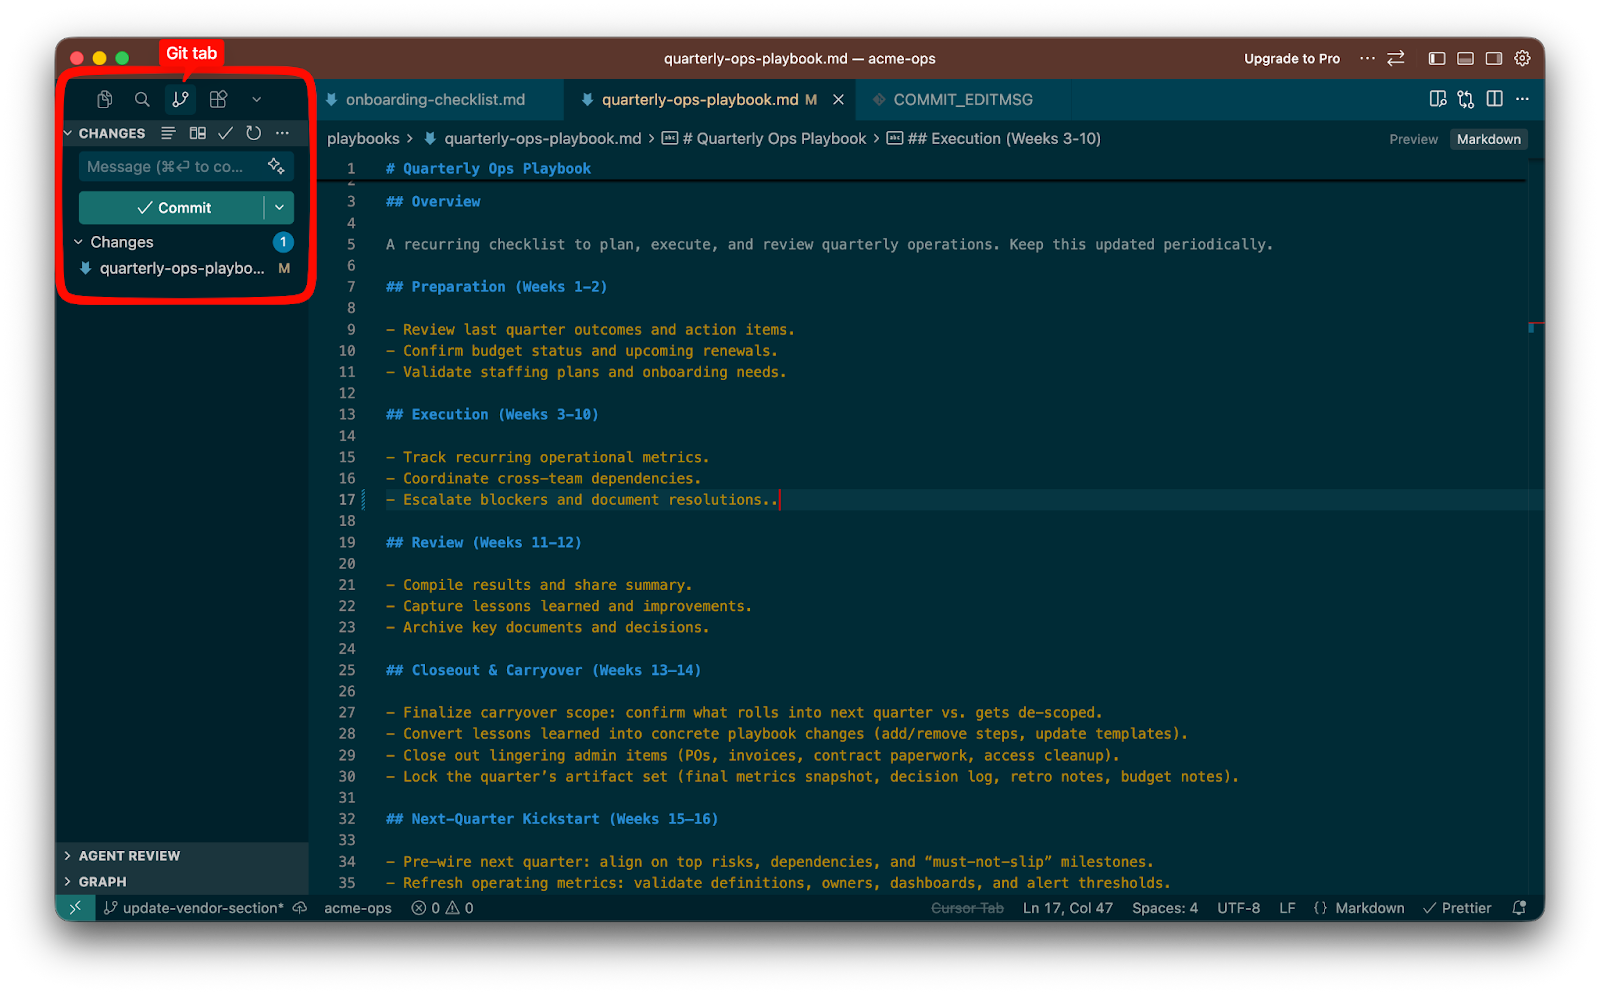
Source control panel: Click the branch icon in your IDE’s left sidebar (or press Ctrl+Shift+G / Cmd+Shift+G). This shows every file you’ve changed since your last commit. It’s a quick visual way to see what’s in progress.
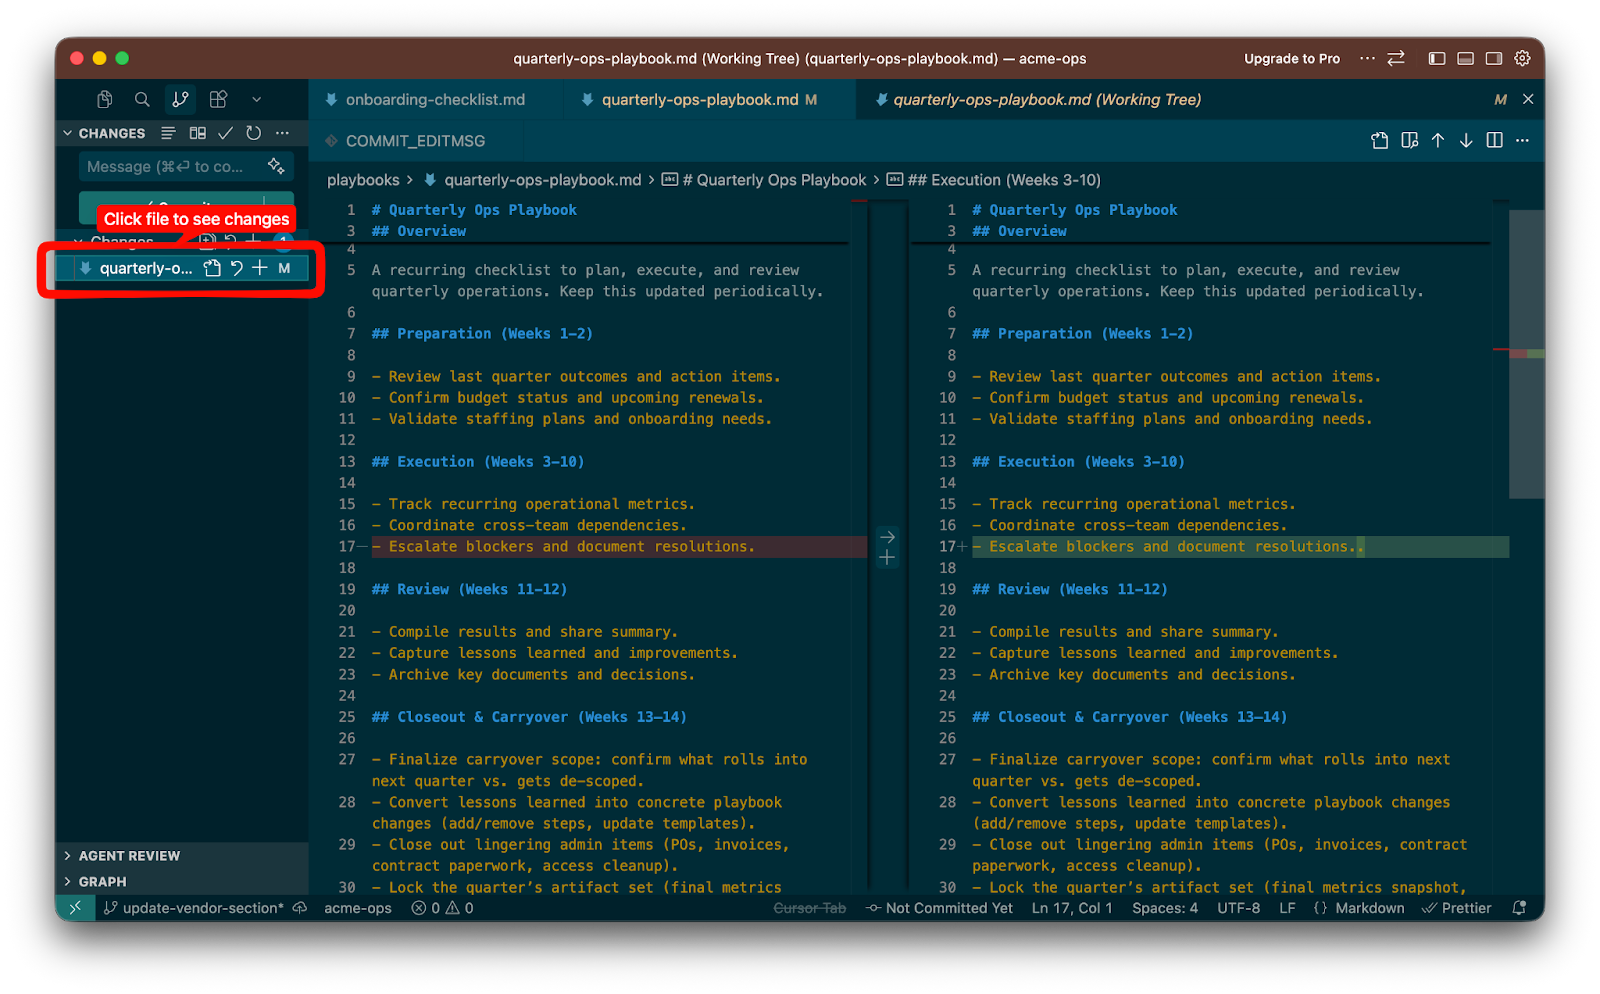
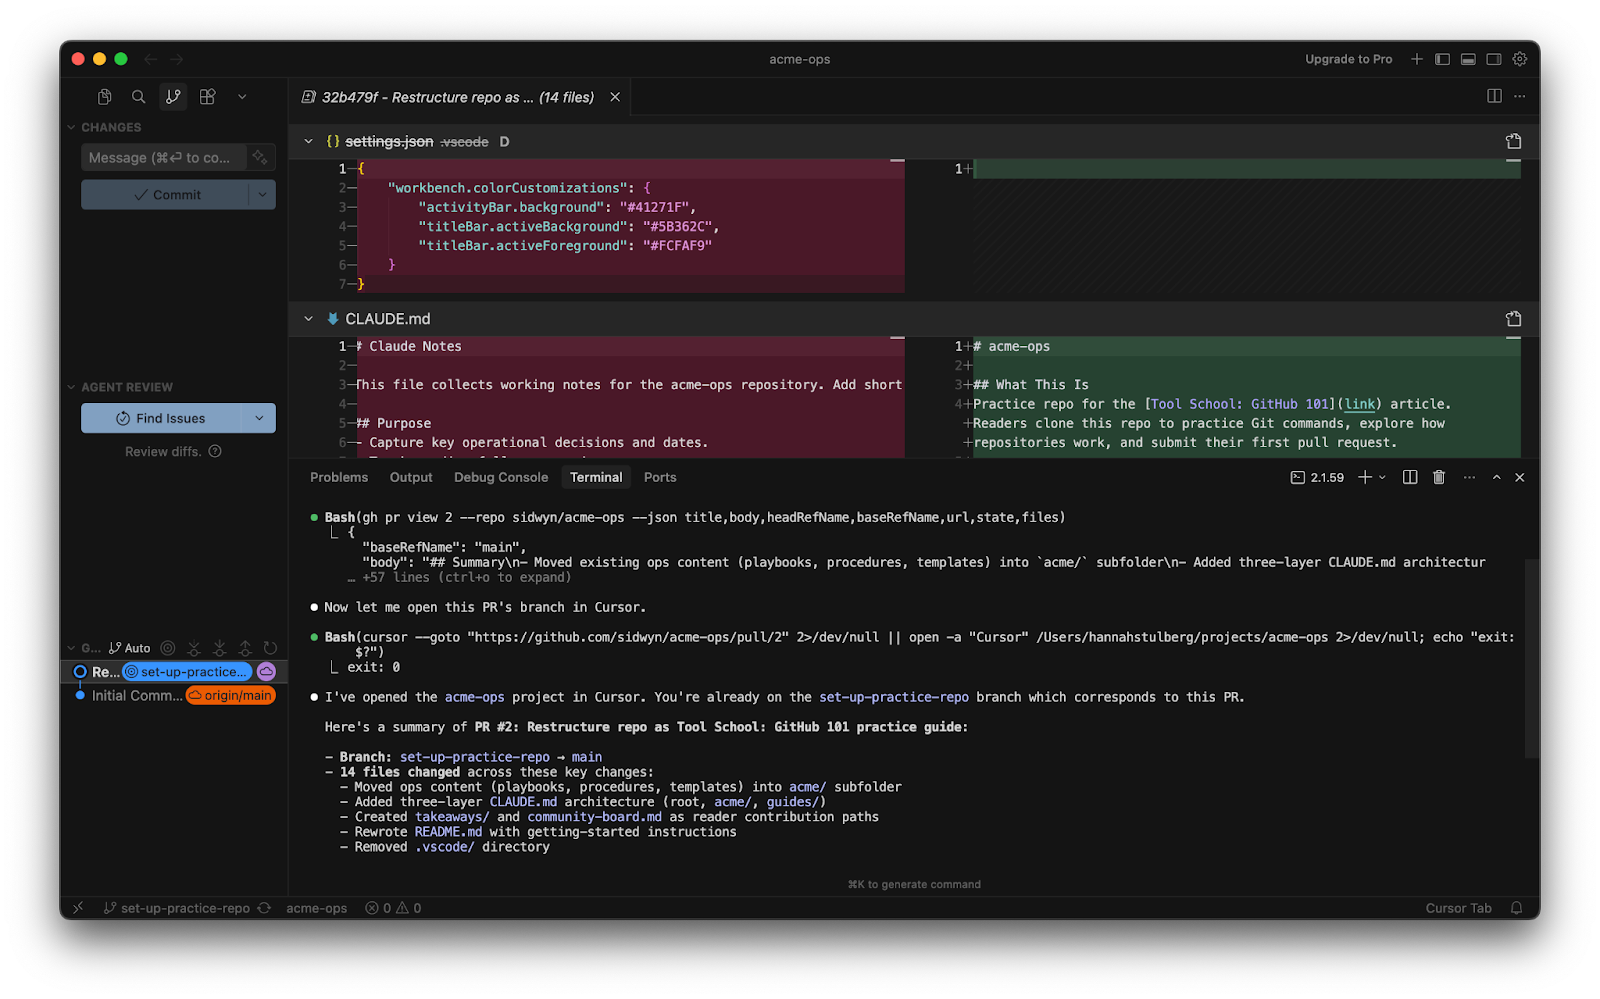
The diff view: Click any changed file in the source control panel to see the diff - a side-by-side comparison showing exactly what changed, line by line. Green highlights mean lines were added, red means lines were removed. You’ll use this constantly to review what you’ve changed before committing.
Once you’ve reviewed your changes and everything looks right, it’s time to commit. A commit is a snapshot of your work at a specific point in time. A commit is a snapshot of your work at a specific point in time. Think of it like naming versions in Google Docs - you don’t name every small edit, just the meaningful milestones: first draft, second draft, final version. Commits work the same way.
Every commit is a version you can roll back to if something goes wrong. That’s why the message matters - “Fixed stuff” tells you nothing when you’re scanning your history trying to find where things broke. “Update vendor contacts for Q2” tells you exactly what changed and why. Keep messages short and specific. Your future self will thank you.
Commit early, commit often. Knowing when to commit trips people up, so here’s how to think about it:
Commit when something works. You just finished a section, fixed an issue, or got things looking right? Commit. That state is saved now.
Commit before you try something risky. About to reorganize a big chunk of a document? Commit first. It’s your safety net.
Commit in logical chunks. Each commit should represent one coherent change. “Update vendor contacts” is a good commit. “Update vendors, rewrite intro, fix typos, and reorganize procedures” is four commits crammed into one.
Don’t wait for perfection. A commit doesn’t mean “this is done.” It means “this is a meaningful checkpoint.” Sidwyn and I sometimes commit 10+ times in a day on a single branch.
If you’re unsure, commit more often rather than less. You can always clean up your commit history later (that’s what squashing is for). However, you can’t go back to a state you never saved.
The Claude Code way:
“Commit my changes with a descriptive message.”
Claude Code stages the files, looks at what changed, and writes a commit message for you. You can shorten to just “commit my changes” and Claude does a pretty good job.
The manual way:

Two steps. git add . stages all your changes (selects them to be included in the next snapshot). git commit -m “...” creates the snapshot with a message describing what you did.
You can also commit specific files instead of all changes:

Step 4: Push
Upload your work to GitHub.
Until you push, your work exists only on your machine. Pushing uploads your local commits to GitHub so they’re safely stored online and visible to anyone with repo access.
The Claude Code way:
“Push my changes.”
The manual way:

Step 5: Open a pull request (PR)
How to create and review PRs - the part where collaboration actually happens.

Pull requests (PRs) are the heart of collaboration on GitHub. If commits are saves and branches are copies, a pull request is you saying: “I’m done working on my copy. Here are my changes, please look them over before we make them official.” It’s the same as sharing a Google Doc and asking for comments before you finalize it. Except on GitHub, the review process is more structured: people can comment on specific lines, approve the changes, request modifications, and everything is tracked. Sidwyn wrote about how to turn chaotic reviews into clear decisions - a lot of those principles apply to PR reviews too.
Pushing a commit to GitHub and opening a PR are two different things. You’ll often push multiple times before opening a PR - each push uploads your latest commits. The PR only gets created once, when you’re ready for feedback. Think of pushing as saving your work to the cloud and opening a PR as raising your hand and saying “this is ready for eyes.”
Creating a pull request
Before you open a PR: Pull the latest changes from main into your branch first. This reduces surprise conflicts during review.
The Claude Code way:
“Create a PR for this branch.”
Claude Code writes a title and description based on your commits and opens the PR. This is one of the places where Claude saves the most time - it reads all your changes and generates a clear description of what changed and why.
The manual way:
After you’ve pushed your branch to GitHub, go to your repo’s page. GitHub usually shows a yellow banner at the top:
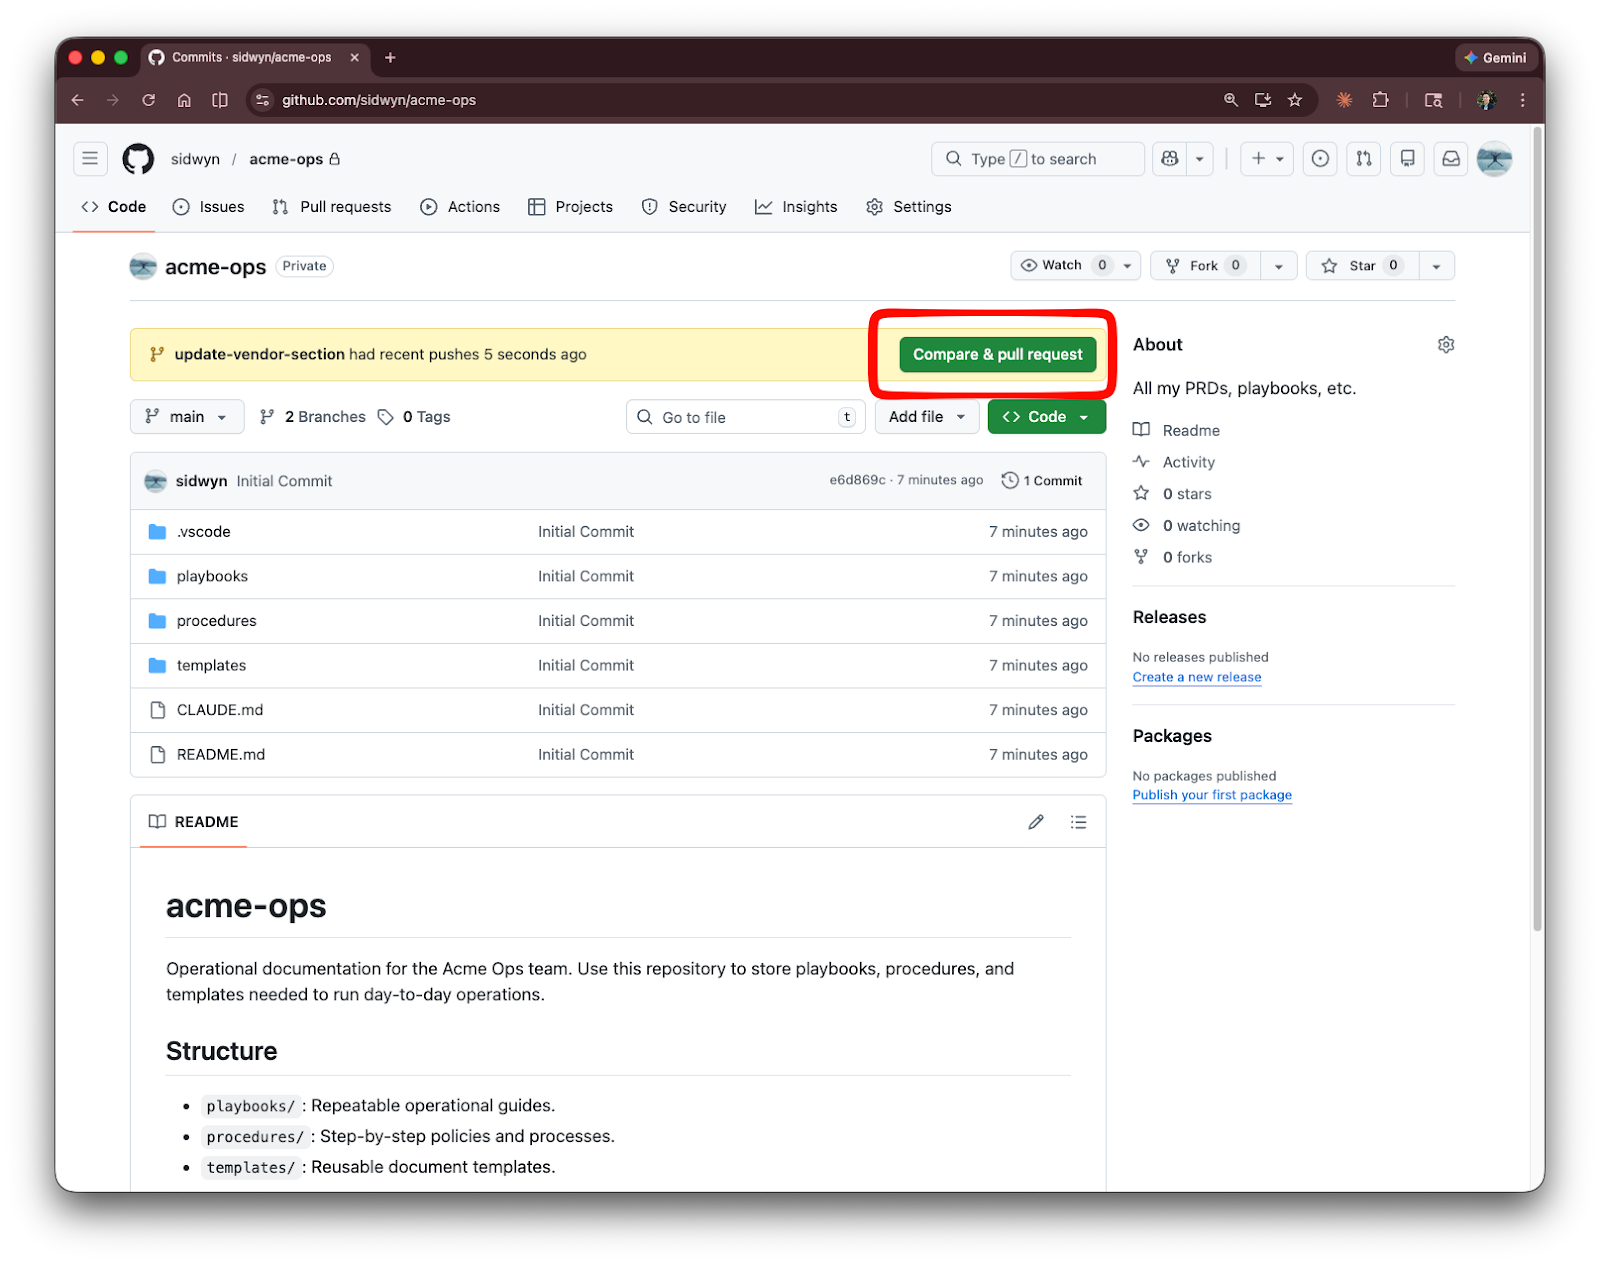
Click “Compare & pull request.” You’ll see a form:
Title: A clear summary of what this PR does. “Update vendor contacts for Q2” not “Updates.”
Description: Explain what changed and why. What problem does this solve? What should the reviewer know? A well-written PR description saves everyone time. Seriously, don’t skip this part. Sidwyn has written about the art of framing discussions - PR descriptions are basically the same skill. Frame the “why” before the “what.”
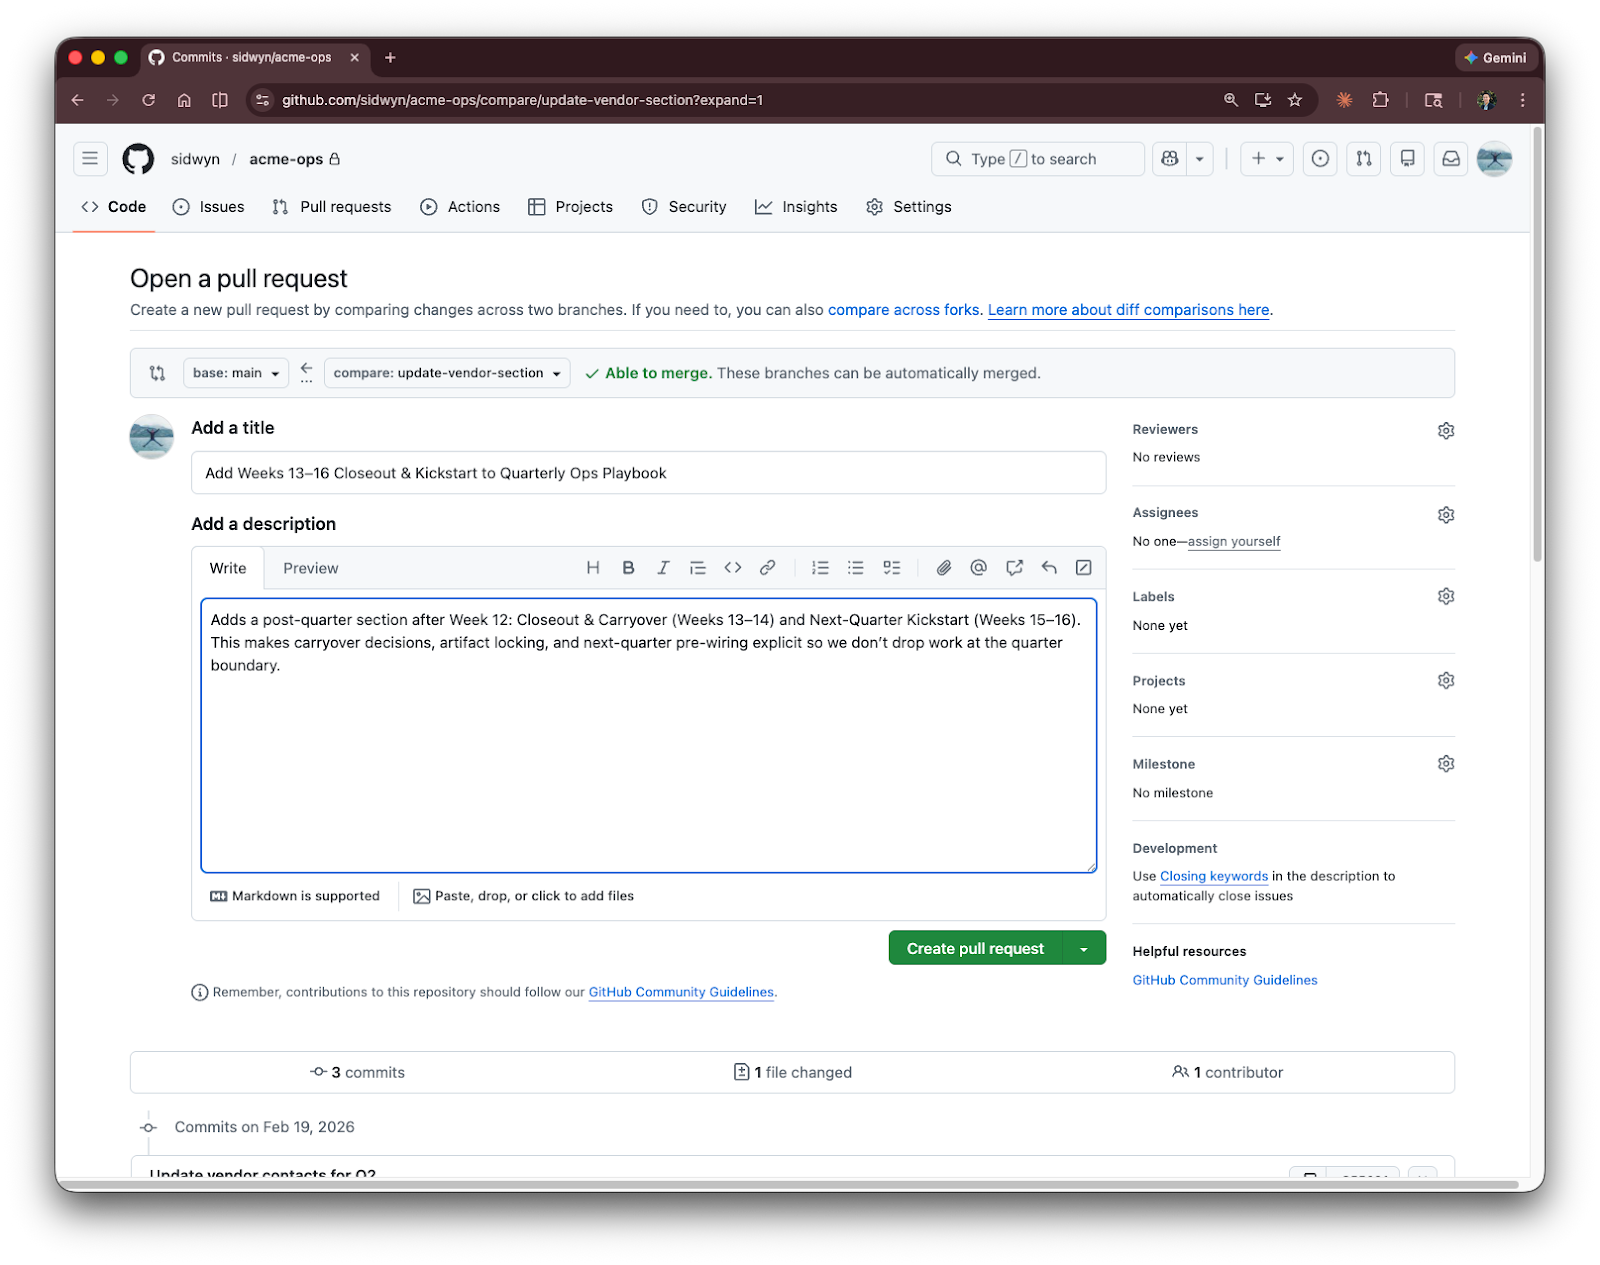
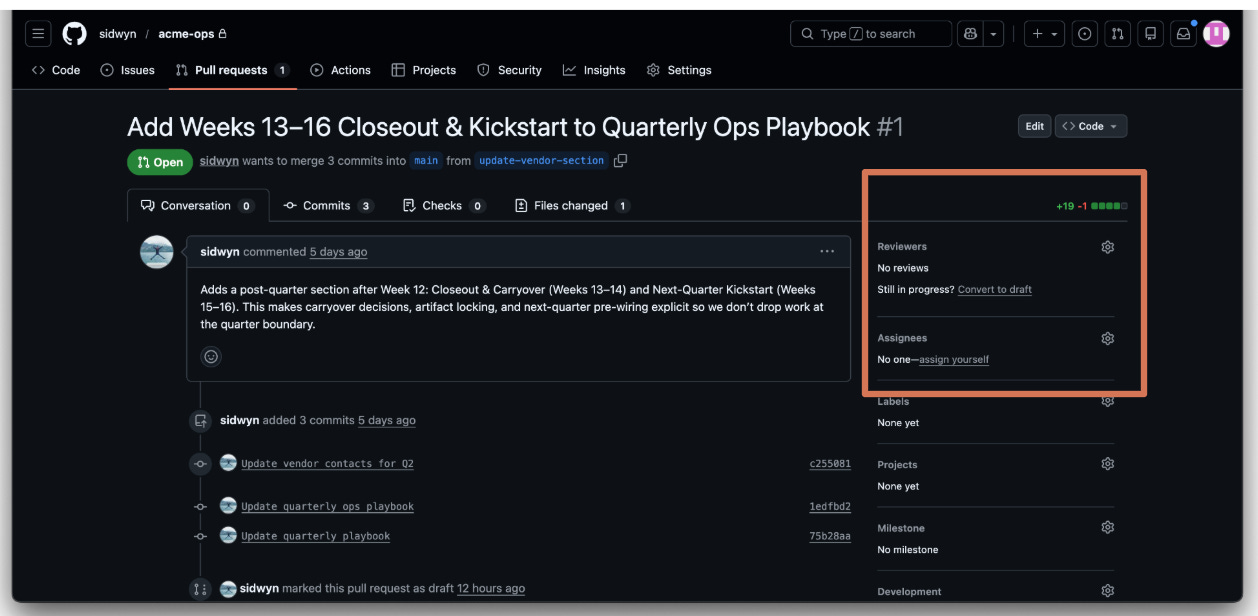
Want to see a real PR? Check out PR #1 on the acme-ops repo - it’s a real example you can browse.
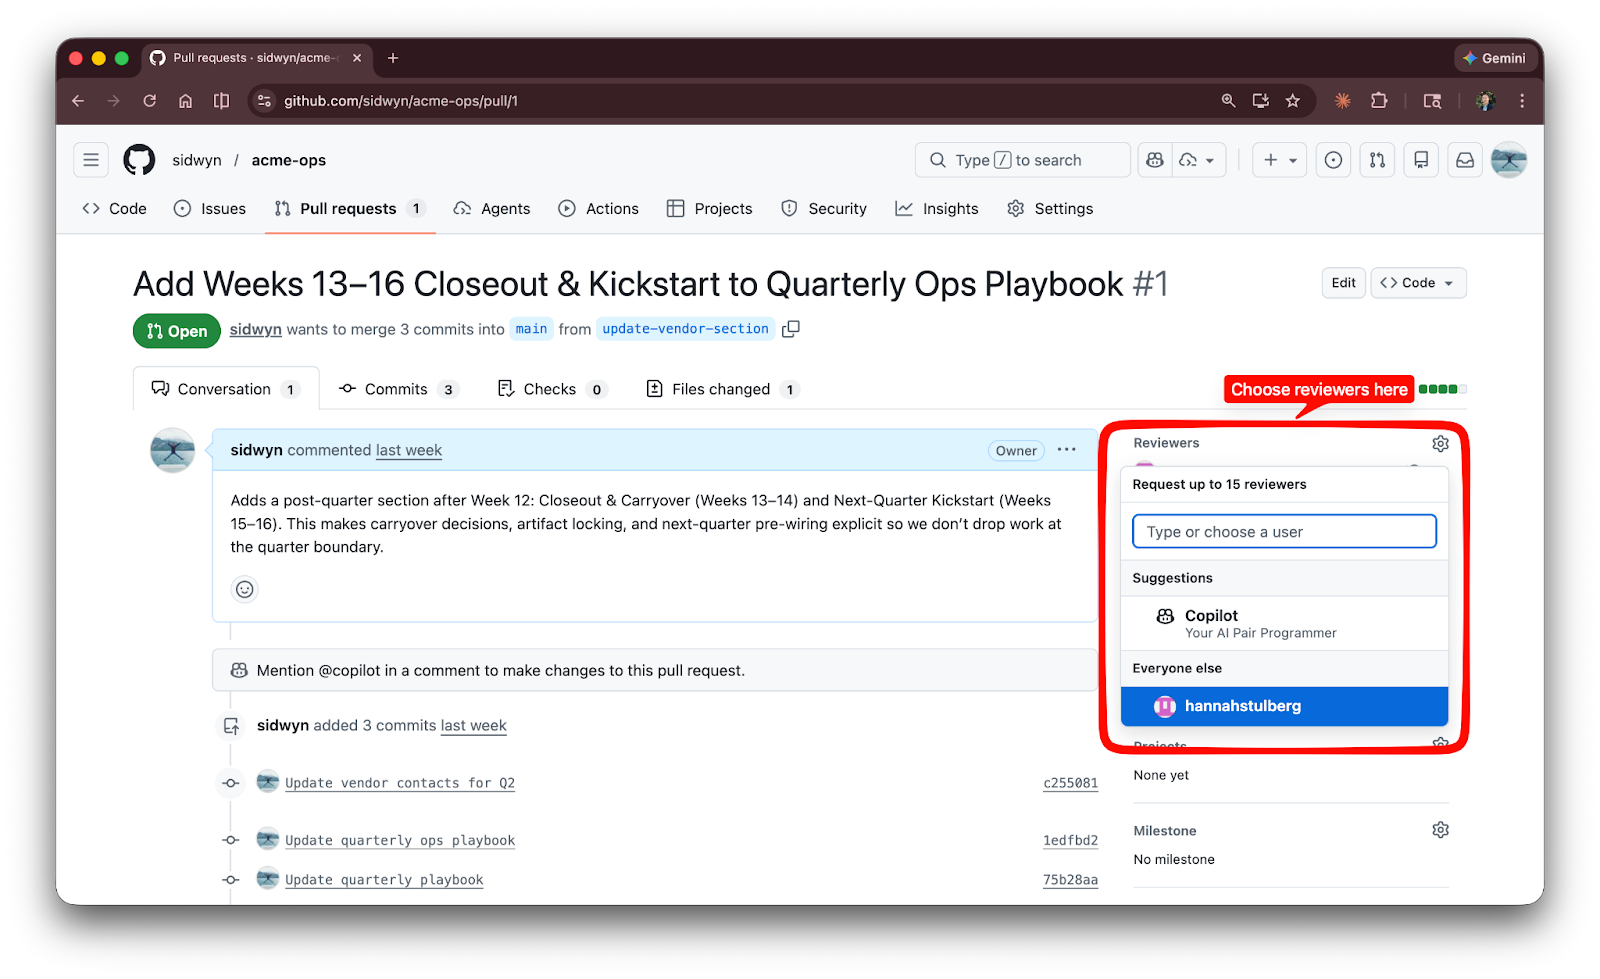
Adding reviewers to your PR
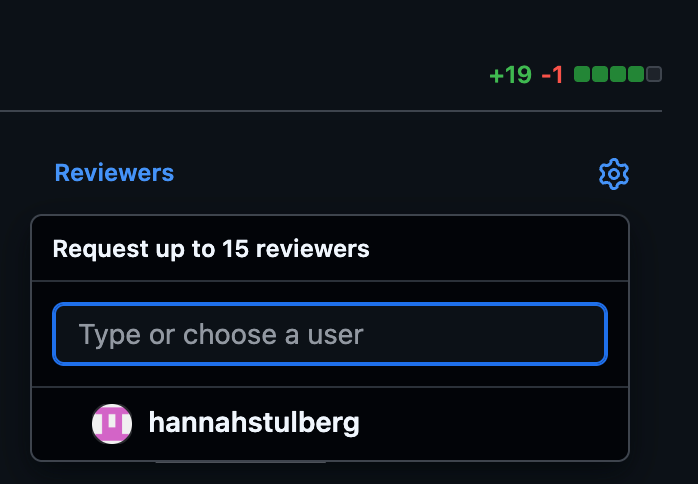
When you open a PR, you can (and should) request specific people to review it. This is how the reviewer knows it’s their turn.
The manual way: On the right sidebar of any PR page, you’ll see “Reviewers.” Click the gear icon, and GitHub shows a list of everyone with access to the repo. Pick who you want. They’ll get a notification (email and/or GitHub bell, depending on their settings).
The Claude Code way:
“Add @jake as a reviewer on this PR.”
How to choose who reviews: There’s no universal rule, but here are some practical defaults:
Pick someone who knows the area. If you’re updating the vendor playbook, ask the person who manages vendor relationships. If you’re changing the onboarding checklist, ask someone who recently went through onboarding.
Pick someone who’ll actually look at it. A review request that sits for a week isn’t helping anyone. If someone’s slammed, pick someone else or give them a heads up first.
For solo projects, review your own PR. Seriously. Open the PR, look at the diff, read through it as if someone else wrote it. You’ll catch things you missed. Then approve and merge it yourself. The PR still serves as a record of what changed and why.
One reviewer is usually enough. Some teams require two approvals, but that’s a team setting, not a GitHub default.
Reviewing a pull request
How to look at someone’s changes and give useful feedback.
Reviewing a PR has three parts:
Look at the diff (what changed).
Leave comments (feedback on specific lines or the PR overall).
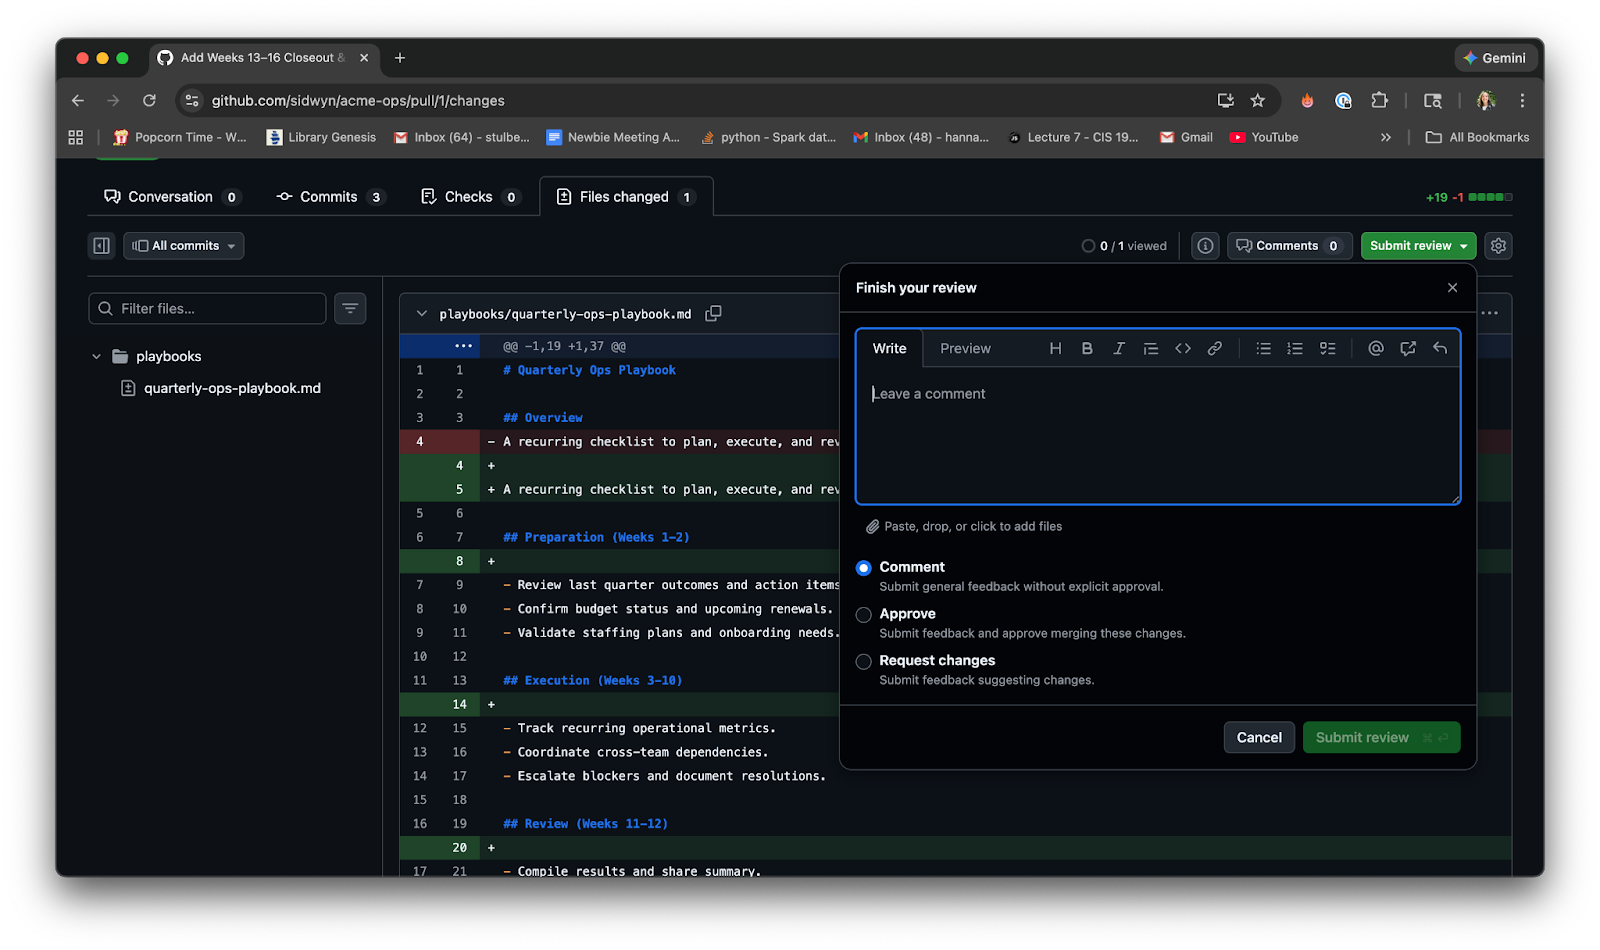
Close out your review (approve, request changes, or just leave general feedback).
You can do all of this in the GitHub web UI or in your IDE with Claude Code.
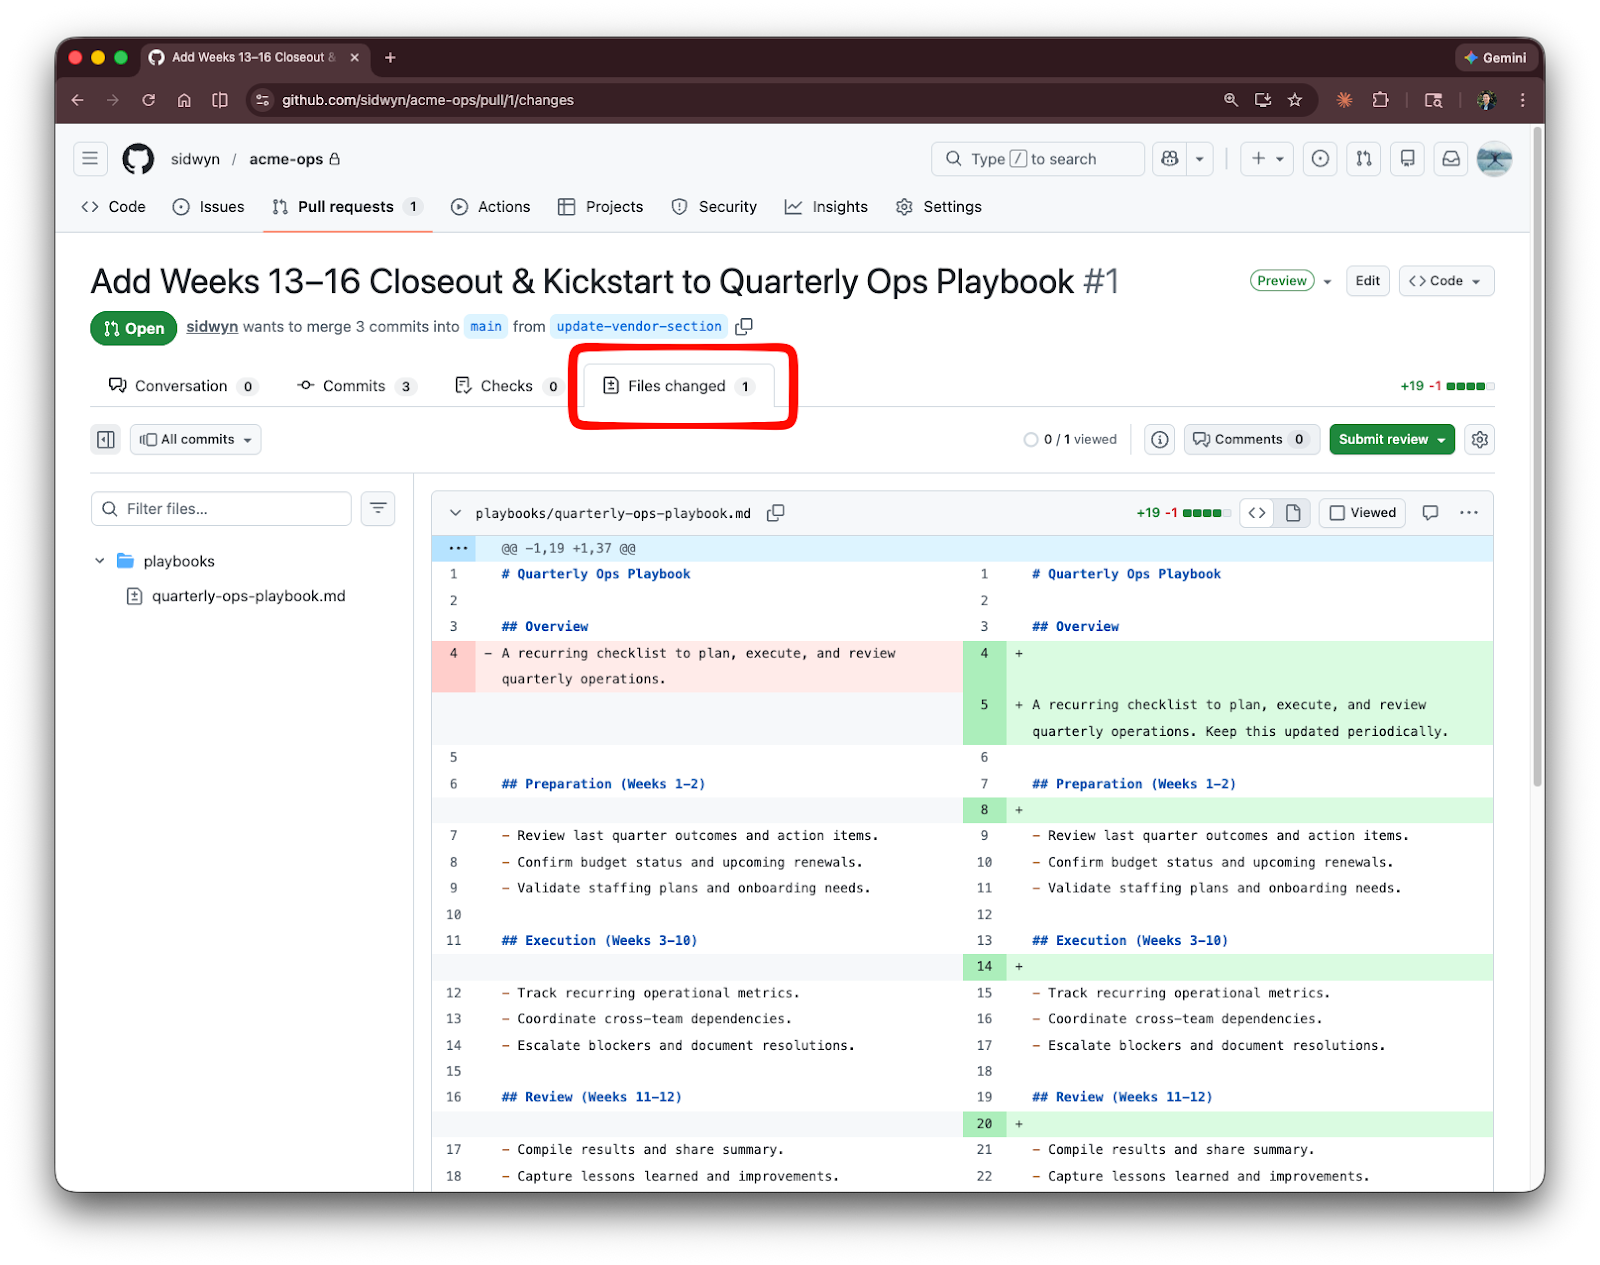
Looking at the diff
In the browser: Click into the PR and go to the “Files changed” tab. This is the diff view - the same concept you saw in your IDE, but now on GitHub’s web UI. Green highlights mean lines were added, red means removed.
With Claude Code: Ask Claude to walk you through the changes:
“Summarize the changes in this PR [PR URL] and walk me through them.”
Claude reads the diff and explains what changed in plain language, which makes reviewing much faster.
Leaving comments
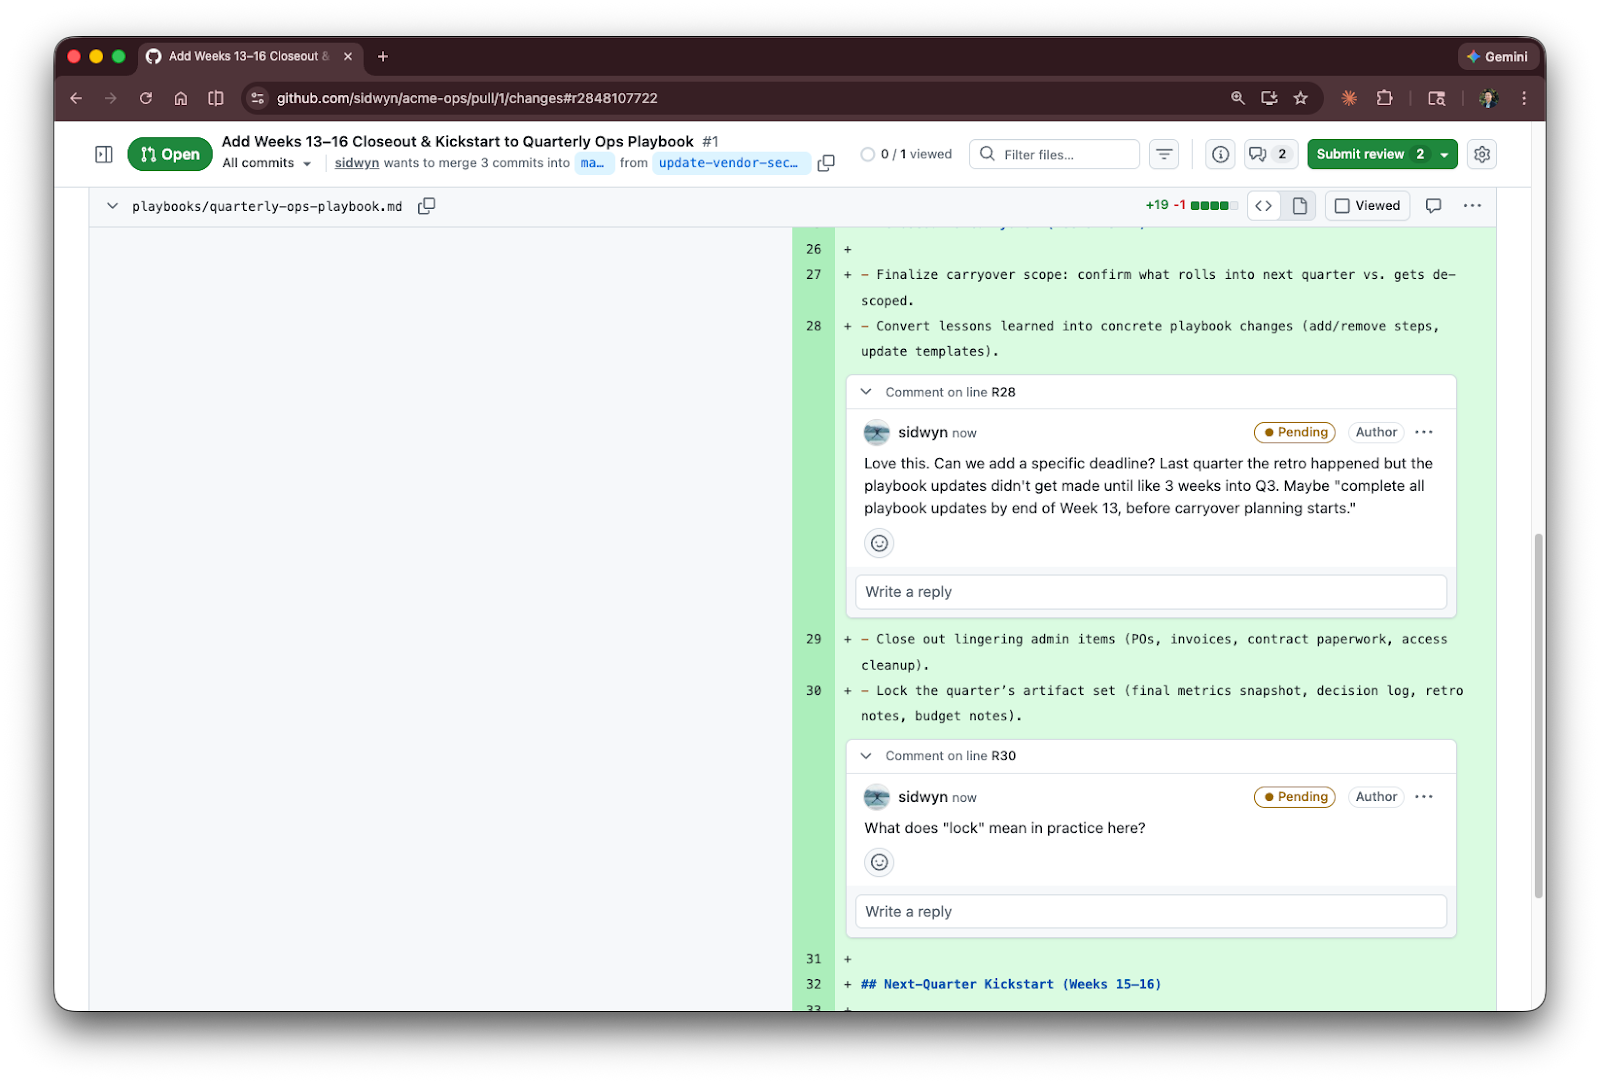
In the browser: Hover over a line number in the “Files changed” tab and click the blue “+” icon to leave a comment on that exact line. For broader feedback, use the “Conversation” tab.
With Claude Code: Claude can leave comments on the PR for you. Ask something like:
“Leave a comment on this PR suggesting we add a note about the vendor transition.”
Closing out your review
There are three options: to close out your review:
Comment: General feedback without formally approving or blocking.
Approve: You’re satisfied. Good to merge.
Request changes: Something needs to be fixed first.
In the browser: Click “Submit review” in the top right.
With Claude Code: You can ask Claude to approve or request changes on a PR directly.
“Leave a comment on the open PR asking them to update the vendor list before merging. Submit review with “Request Changes”.”
A quick note on PR review etiquette: be specific, be kind, and explain your reasoning. “This is wrong” is useless feedback. “This might cause confusion since we removed that vendor last quarter, could we add a note about the transition?” is helpful. Sidwyn’s two-part series on an engineer’s guide to influence goes deeper on how to give feedback that actually lands.
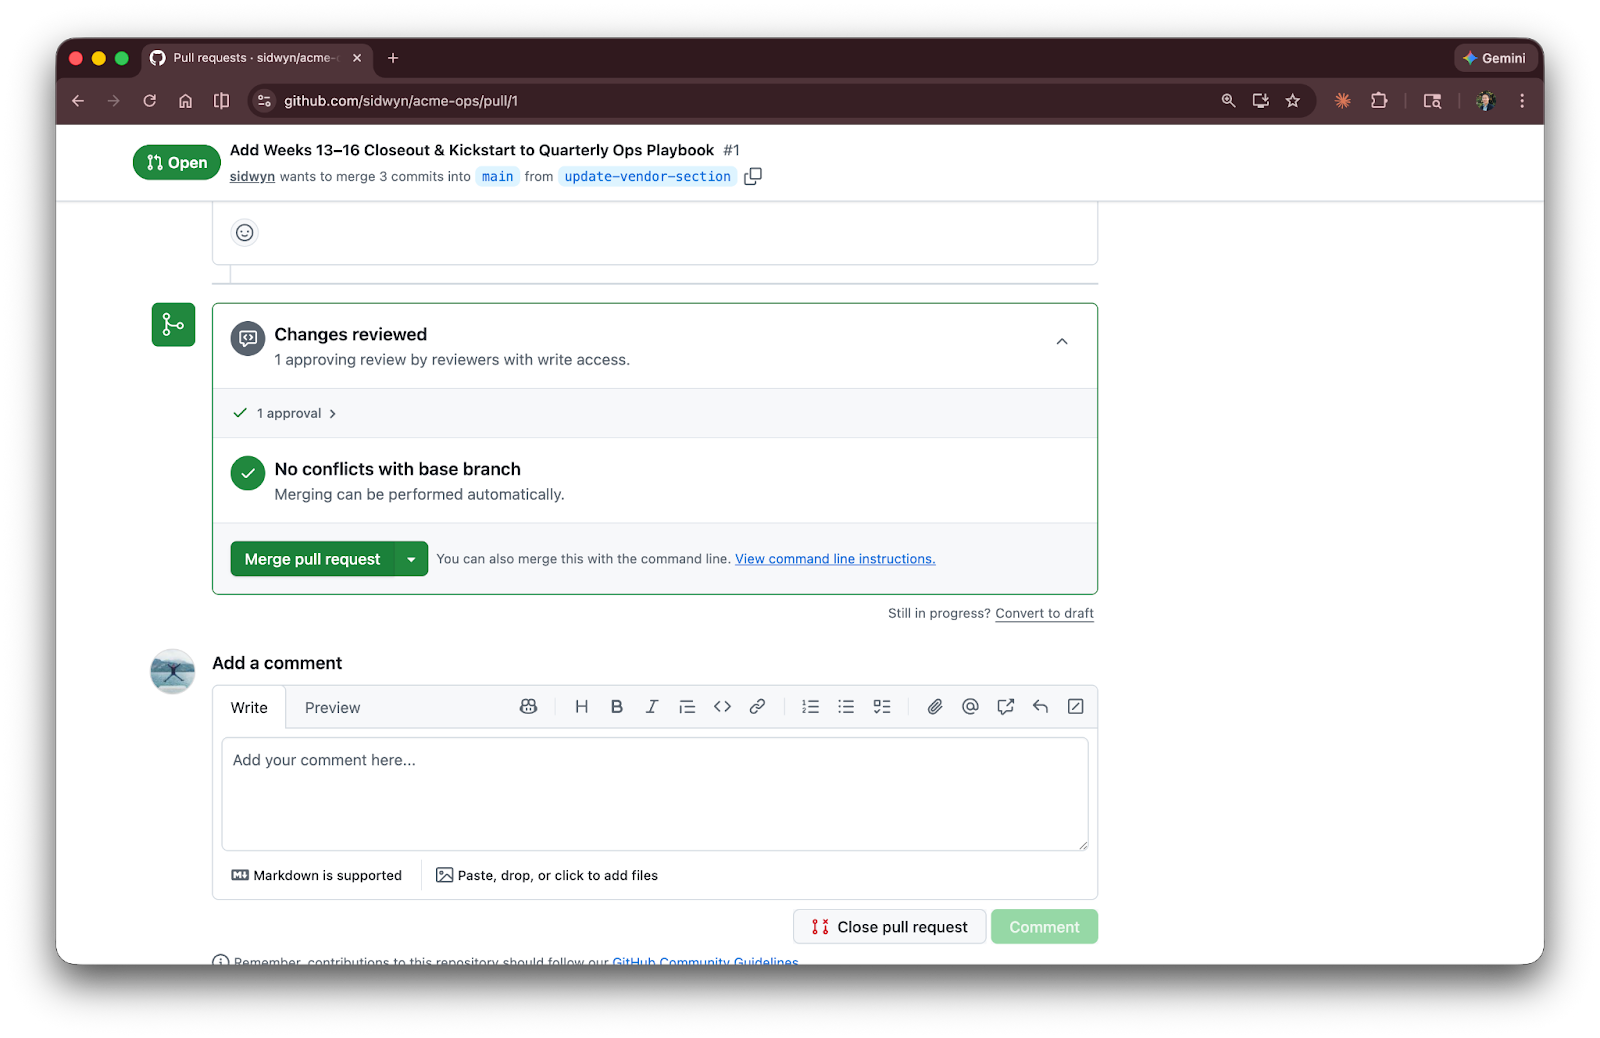
How to know when your PR is approved
Once you’ve requested a review, you’re waiting. Here’s how you’ll find out it’s done:
Email. If you have email notifications on (and you should for review activity), GitHub sends you an email the moment someone approves, requests changes, or leaves a comment. The subject line tells you which.
The GitHub bell. Click the bell icon on github.com. Review activity shows up here in real time. You can filter by “review requested” to see only PRs waiting on you, or check your own PRs for incoming reviews.
Slack. If your team uses Slack, the GitHub for Slack integration pipes notifications directly into your channels.
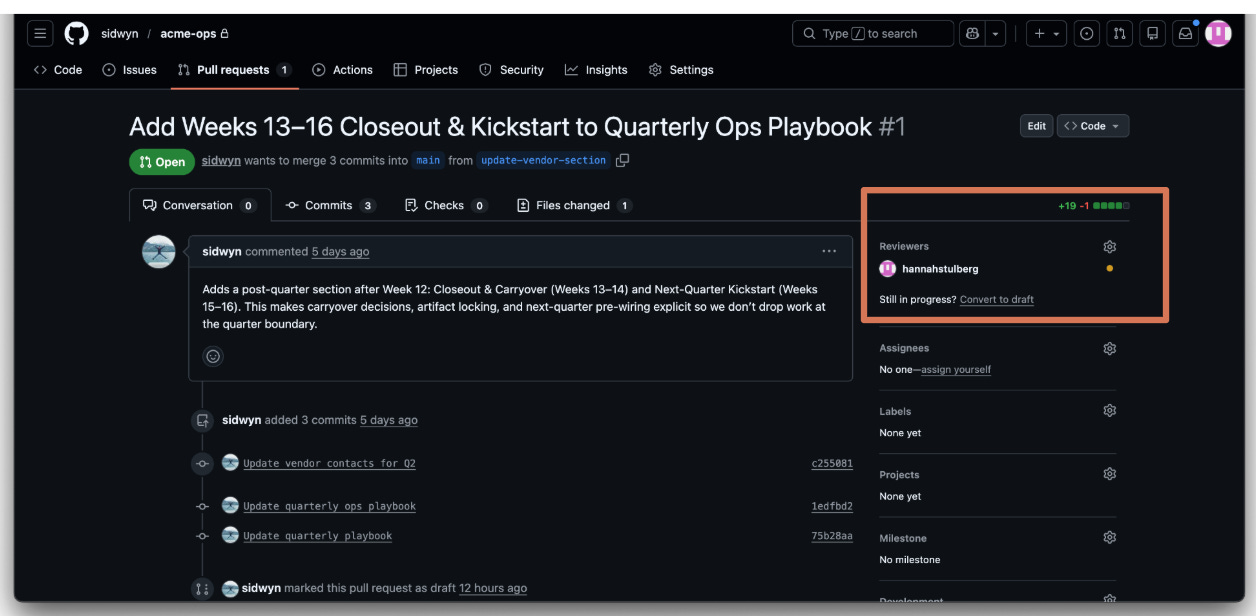
The PR page itself. Open your PR and look at two things:
The review status badge. Next to each reviewer’s name in the sidebar, you’ll see an icon: a green checkmark (approved), an orange dot (changes requested), or a gray clock (pending). At a glance, you know where things stand.
The merge button. When all required reviewers have approved, the green “Merge pull request” button becomes active. If someone requested changes, the button is blocked until they approve.
With Claude Code:
“What’s the status of my open PRs?”
Claude checks and tells you which are approved, which have comments, and which are still waiting.
A practical habit: Check your notifications at least twice a day, morning and afternoon. PRs that sit unreviewed slow everyone down. And when someone reviews yours, respond quickly, even if it’s just “thanks, will fix that tomorrow.” It keeps the loop moving.
Step 6: Merge
Combine your changes into the official version.
Once a PR is approved, it’s time to merge - combine the branch’s changes back into main.
Merge conflicts
When two people change the same lines - and how to resolve it without panic.
Sometimes two people change the same lines in the same file on different branches. When you try to merge, Git doesn’t know which version to keep. This is a merge conflict.
It’s not a bug. It’s not your fault. It just means Git needs a human (or Claude) to decide which changes win. The first time you see one of these it feels like the end of the world. It’s not.
The Claude Code way:
“Resolve the merge conflicts in this file.”
Claude Code reads both versions, understands the intent, and fixes the conflict. This is honestly one of the places where Claude Code saves the most time.
The manual way:
When a conflict happens, Git marks the file with these markers:

Everything between <<<<<<< and ======= is your version. Everything between ======= and >>>>>>> is the other version. You need to pick one, combine them, or write something new - then remove the markers.
To avoid big surprises, pull main into your branch regularly while you’re working. Smaller conflicts are easier to resolve than one giant one at the end.
Merging a pull request
Three ways to merge, and which one to pick.
Once a PR is approved, it’s time to merge - combine the branch’s changes back into main.
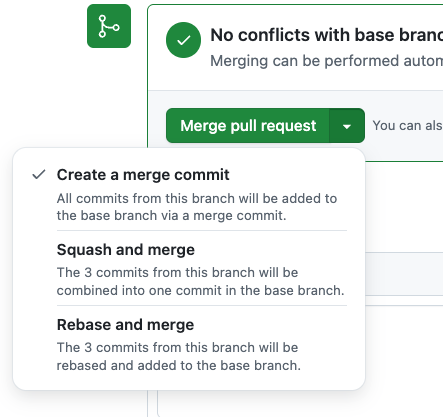
GitHub gives you three merge options:
Squash and merge. This is the one I’d recommend. It takes all your commits (”fix typo,” “actually fix the typo,” “ok now it’s really fixed”) and combines them into one clean commit. Your branch history might be messy, but main stays tidy.
Merge commit. Keeps every individual commit from your branch. Fine if your commits are already clean, but most of the time squash is simpler.
Rebase and merge. Advanced. Skip this for now.
If your team already has a preference, follow that. Otherwise, squash and merge is a safe default.
After merging, GitHub offers to delete the branch. Do it. The branch has served its purpose - your changes are in main now. If you don’t clean up and branches accumulate, you can prune them later:
The Claude Code way:
“Delete the merged branch and prune old branches.”
The manual way:

Beyond the Daily Workflow
Notifications
How to know when someone needs your attention.
Once you’re working with other people, you need to know when things happen: when someone reviews your PR, when you’re asked to review theirs, and when someone comments on your work.
GitHub sends email notifications by default. You’ll get emails when:
Someone comments on your PR
Someone requests your review on their PR
Someone mentions you with @your-username
A PR you’re watching gets merged or closed
The Notifications bell. On github.com, click the inbox icon in the top-right corner. This shows all your notifications in one feed: review requests, comments, mentions, and status updates. You can mark them as read, filter by repo, or mute noisy ones.

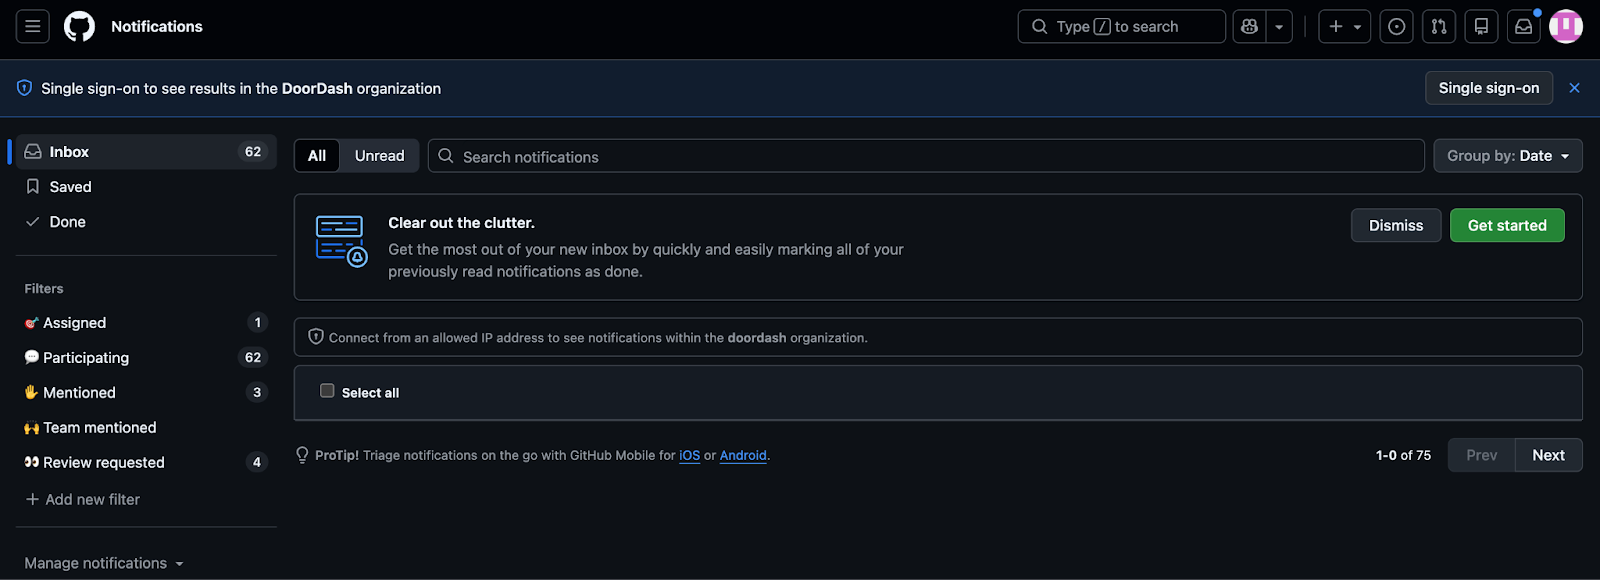
Customizing notifications: Go to github.com/settings/notifications to control what gets emailed vs. what stays in the web feed. I’d recommend keeping email notifications on for “review requested” at minimum. That’s the one you don’t want to miss.
GitHub Mobile. The GitHub mobile app (iOS and Android) sends push notifications, which is handy for staying responsive to review requests when you’re away from your computer.
Putting It All Together: Sarah’s Full Workflow
Every concept from this section, shown in a complete end-to-end example.
Let’s walk through a complete example with Sarah, now that every concept has been explained.
Sarah needs to update the vendor section of Acme’s operations playbook. Here’s what happens:
She opens the project in Cursor (her IDE). Sarah opens her
acme-opsfolder in Cursor. She can see all her files in the sidebar: playbooks, procedures, and templates. In the bottom-left corner, Cursor shows she’s on the main branch. This is the official version of everything.She pulls the latest from main. Before starting, Sarah tells Claude: “Pull the latest from main and summarize what changed.” She sees Jake merged a few updates last week. No surprises.
She creates a branch. Sarah doesn’t edit
maindirectly. She tells Claude: “Create a new branch off main called update-vendor-section.” Think of it as making a copy of the entire project folder that she can edit freely without affecting the original. Now she has her own workspace.She makes her edits. Sarah tells Claude to help her update
playbooks/quarterly-ops-playbook.md. With Claude, she adds the new catering vendor, removes the old printing company, and updates phone numbers. As she works, Cursor highlights every changed file in the source control panel.She commits. When the vendor section looks right, Sarah tells Claude: “Commit my changes with the message ‘Update vendor contacts for Q2.’” This is her save point. If she messes something up later, she can always come back here.
She pushes. Sarah tells Claude: “Push my branch.” Now her changes are backed up online and Jake can see them.
She opens a pull request. Sarah tells Claude: “Open a PR for this branch and add Jake as a reviewer.” Claude names the PR, writes a description based on her commits, and adds Jake. Jake gets a notification.
Jake reviews. Jake reads the changes, leaves a comment (”Can you double-check the catering vendor’s email?”), and Sarah fixes it, commits, and pushes again.
Merge. Jake approves the PR. Sarah merges her branch into main. The official playbook now has the updated vendor section. She deletes the branch since it’s done its job.
That’s the whole cycle. Pull, branch, edit, commit, push, PR, merge. Every day, this is the rhythm.

When Things Go Wrong
Git errors look scarier than they are. Here are the four most common ones and how to fix each.
Git error messages look like they were written to intimidate you. They weren’t, they’re just... poorly worded. Here are the ones you’ll actually encounter.
“Your branch is behind ‘origin/main’”
What it means: Someone else pushed changes and your local copy is out of date.
The Claude Code way:
“Pull the latest changes” or just “my branch is behind, fix it.”
The manual way:

That’s it. Get in the habit of pulling before you start working.
“Merge conflict in [filename]”
What it means: Two people changed the same lines. Git needs you to decide which version to keep.
The Claude Code way:
“Resolve the merge conflicts in this file.”
The manual way: Open the file, look for the <<<<<<< markers, resolve the conflict, remove the markers, commit.
“HEAD detached at [some hash]”
What it means: You checked out a specific commit instead of a branch. Sounds terrifying. It’s not.
The Claude Code way:
“I’m in a detached HEAD state, get me back to main.”
The manual way:

If you made changes while detached and want to keep them:

“Permission denied (publickey)”
What it means: Your SSH key isn’t set up correctly.
The Claude Code way:
“Test my GitHub SSH connection.”
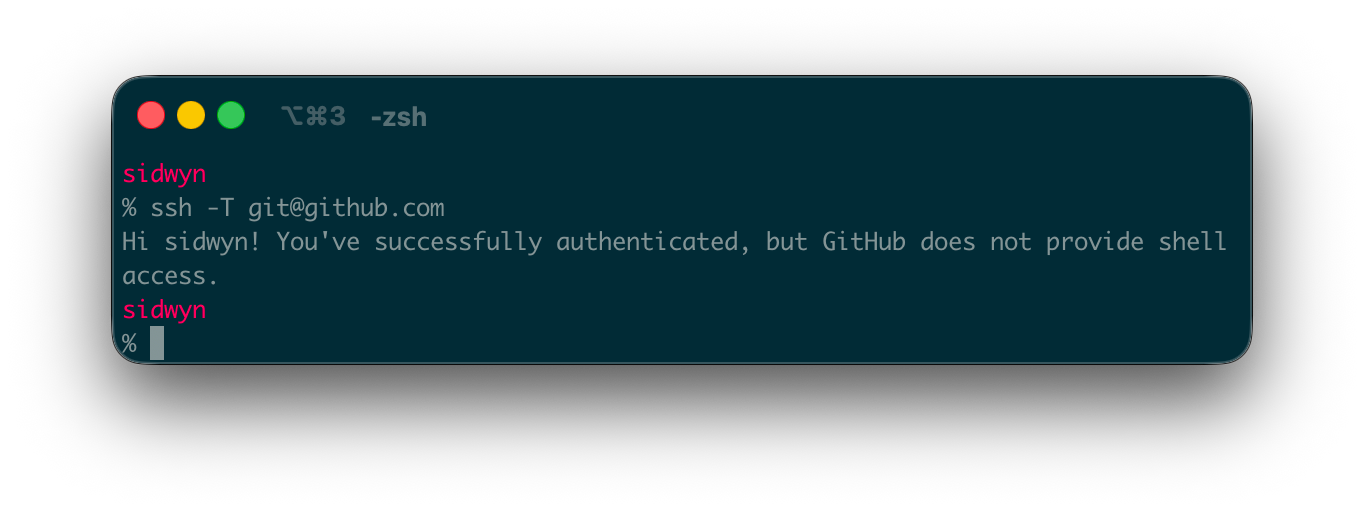
The manual way: Go back to the SSH setup section. Test with:

You should see “Hi username! You’ve successfully authenticated.”
“I accidentally cloned a repo inside another repo”
What it means: You now have a repo nested inside another repo, which means two separate version histories trying to track the same files. When you make a change, it’s unclear which repo records it - and you can end up with commits in the wrong repo or missing entirely.
The fix: Move the inner repo’s folder out so it sits next to the other repo, not inside it. If you followed the advice earlier and keep all your repos in one folder (e.g., ~/projects), move the nested repo there.
The Big Reassurance
These errors look scary, but they almost never mean you’ve lost work. Git is designed to be recoverable. Every commit you’ve ever made still exists somewhere.
And look, if Git feels overwhelming right now, that’s normal. Growth takes time. Software engineers who have been using Git for years still Google things or ask Claude for help (including Sidwyn!). If you’re ever really stuck, just describe the error to Claude Code and Claude will sort it out.
.gitignore: What NOT to Upload (For Coding Projects)
If you’re working with code, pay attention here. If you’re working purely with documents, skip this section.
Not everything in your project folder should go to GitHub. Some files are private (API keys, passwords), some are huge and unnecessary (dependency folders like node_modules), and some are generated files that don’t need to be tracked.
The security callout first: Your .env file is where API keys and secrets typically live. If you accidentally commit an .env file and push it to GitHub, those secrets are in the commit history forever, even if you delete the file later. Someone could find them. I’ve seen this happen to people, and it’s not fun. Set up your .gitignore before your first push.
The .gitignore file tells Git: “Pretend these files don’t exist.” Any file or folder pattern listed in .gitignore won’t be staged, committed, or pushed.
A typical .gitignore for a project built with Claude Code might include:
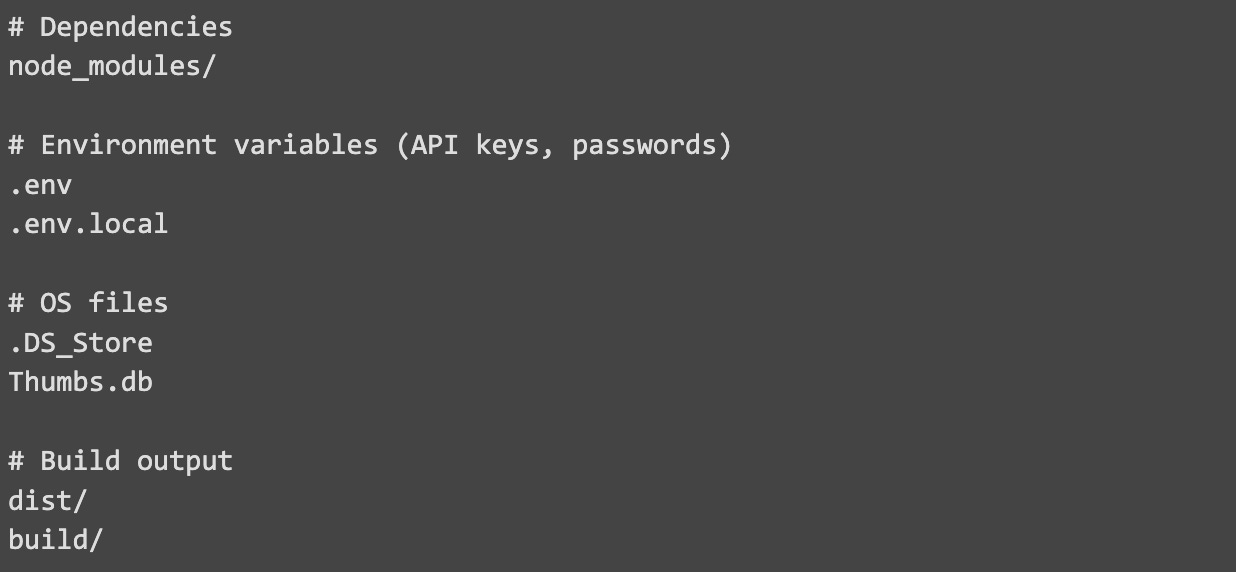
GitHub maintains a collection of .gitignore templates for different languages and frameworks. Worth bookmarking.
Claude Code often creates a .gitignore automatically when setting up a project. If it didn’t, ask:
“Create a .gitignore for this project.”
What You Should Have Now
If you’ve followed along, you now have:
Every core GitHub concept understood in plain language: Repos, branches, commits, pull requests, merging, rebasing, and stashing - all mapped to tools you already know.
GitHub fully set up on your machine: Git, SSH keys, GitHub CLI, and (optionally) the GitHub MCP - the full toolchain.
A practice repo forked, cloned and working: You’ve explored it, made changes, and seen the workflow in action.
The complete daily workflow from pull to merge: Pull, branch, edit, commit, push, PR, merge - you know the rhythm and what each step does.
Pull request confidence: You can create, review, and merge PRs, and you know what to do when conflicts come up.
What to do when things go wrong: The four most common Git errors, what they mean, and how to fix them - or how to ask Claude to fix them.
Your first PR submitted: You’ve contributed to a real project on GitHub. That’s not nothing.
Your Turn: Submit Your First PR
Every Tool School article ends with you doing the thing. This is your moment.
Time to put everything you’ve learned into practice. You’re going to contribute to the acme-ops repo by submitting your first pull request (PR).
You already forked and cloned the repo in Part 2. Now you’ll use that fork:
Create a branch, add your file, commit, push
Open a PR back to the original
acme-opsrepo
Once you open the PR, the repo owner reviews and merges it. You’ll get a GitHub notification when that happens.
This is your chance to practice the full workflow you just learned - and your PR will show up on the real repo for everyone to see.
If you get stuck, remember: the article is in the repo. Ask Claude (or your AI coding tool of choice) and Claude will walk you through it.
The easy path:
Create a file:
takeaways/[your-github-username].mdWrite one thing you learned, one takeaway, or how you’re planning to use GitHub
Commit, push, and open your PR
The challenge path:
Instead of (or in addition to) creating your own file, add your takeaway to
community-board.mdYou’ll likely hit a merge conflict - resolve it using what you learned earlier in this article
This is the real-world version of the exercise
Preview: GitHub 102
This article covered everything you need to use GitHub day-to-day. But there’s much more to explore once you’re comfortable with the basics.
In an upcoming edition of Tool School, we’ll cover GitHub 102:
Worktrees: Working on two branches at once without stashing
Claude Code Action: AI-powered code review directly on your GitHub PRs
GitHub Actions: Automation that runs when things happen in your repo
GitHub Issues: Track tasks and plan work directly in your repo
GitHub Pages: Put a website on the internet for free, directly from your repo
Advanced branching strategies: Patterns teams use at scale
Want to Go Deeper?
This article covers what you need to work with GitHub day-to-day. If you want to keep going:
Learn Git Branching - An interactive visual tutorial where you can see branches and commits as diagrams. Worth 30 minutes of your time.
GitHub’s own learning paths - Structured courses that walk you through features step by step. Well done and free.
The GitHub CLI (gh) - A command line tool for managing GitHub from your terminal. Pairs well with Claude Code.
The Pro Git book - Free, comprehensive, and online. Way more detail than you need right now, but a solid reference.
Claude Code documentation - The official docs. Good reference for all the Git-related things Claude Code can do.
Oh Shit, Git!?! - Exactly what it sounds like. A funny, practical guide to fixing common Git mistakes. Bookmark this one.
 | A guest post by
|
Kindred spirit here - also a former PM who has committed (pun intended) some errors using GitHub.
Love that you included the Claude Code way of doing things. At this point my GH usage mostly boils down to instructions in Claude.md to commit changes and use general best practices (though to be fair I’m currently working almost entirely on solo projects so GH is basically a backup plus a place I can automate scripts via GH Actions).
Such a great article, perhaps the best GitHub 101 I have come across!